
Project: Git'R driving...a VERY short build
- Thread starter supraguy@aol
- Start date
You are using an out of date browser. It may not display this or other websites correctly.
You should upgrade or use an alternative browser.
You should upgrade or use an alternative browser.

Got done with that. It's not perfect, but it's WAY better than seeing the yellow urethane underneath.

I still have to do the rear bumper, but I ran out of paint. Gotta get some more.
I still have to do the rear bumper, but I ran out of paint. Gotta get some more.
Last edited:
Wow, that came out great. I need to repaint my bumpers too and have kinda tossed around the idea of trying it myself rather than paying a shop. Any more details on how you did it?
If I bring my bumpers down to Atlanta you want to paint them for me haha:biglaugh:?
If I bring my bumpers down to Atlanta you want to paint them for me haha:biglaugh:?
Ha!
You probably don't want me to. The color is slightly darker. It's close enough for me, but it's not perfect.
I basically just sanded the nose and bumper down with 220-320 grit, to get the shine of the old clearcoat off. On the parts of the bumper that had eroded urethane,
I sanded down a bit extra, to remove the dead material, and get it closer to smooth. If I had been more motivated, I would have used a little filler to get it flawless.
Wiped it all with acetone, Sprayed a touch of Bulldog adhesion promoter on the bare areas, then primed with 2 light coats. 600 grit(lightly) to get rid of any roughness,
Then 3 coats of paint, 5 minutes dry time between. 30 minutes later, 3 coats of clear, 5 minutes between. The next day, 2000grit wetsand, with lots of water.
Then rubbing compound and polishing compound, till my hands hurt.
Next on the to-do list.

New stock style clutch, and shifter bushing kit.
By the way- If anyone wants a good deal on the green 'truck' bushing and the lower ball socket bushing, This is a Dorman replacement kit now.
Part # 924-258. Cost me $13.95 shipped! That's less than half what it would have cost me through Toyota.
New stock style clutch, and shifter bushing kit.
By the way- If anyone wants a good deal on the green 'truck' bushing and the lower ball socket bushing, This is a Dorman replacement kit now.
Part # 924-258. Cost me $13.95 shipped! That's less than half what it would have cost me through Toyota.
Last edited:
So I haven't had any time over the past week to get much work done on this, but yesterday,
I did manage to remove the tranny. This allowed me to determine the reason for the constant ABS warning light;
As I pulled the tranny out from under the car, I found a spot on the ABS sensor harness where the sleeving was worn away,
and one of the three wires is torn off inside. Should be an easy fix, and will allow me to finally get rid of that last warning light.
New input and output shaft seals, as well as rear main seal are ready to go in.
Pictures will be up this evening.
PS- SO damn greasy.
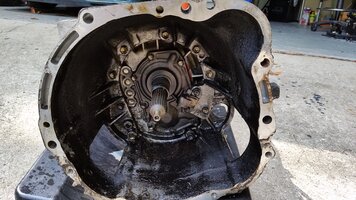
So, I started with a greasy R154, now I have a...less-greasy R154.
Ugh:


Better:


New front input shaft is installed, as well as the ABS wire has been repaired and covered in new loom.
I also installed the new throwout bearing onto the release hub. Next is the rear main seal, and the output shaft seal.
Then it goes back in the car, I measured the old disc thickness vs. new disc- 6mm vs. 9mm. So that ought to help on grip. And hopefully, having a little less grease flying around in there will
help as well. Not sure if I'll have time to work on the car over the next couple of days, but it'll get done when it gets done.
Ugh:
Better:
New front input shaft is installed, as well as the ABS wire has been repaired and covered in new loom.
I also installed the new throwout bearing onto the release hub. Next is the rear main seal, and the output shaft seal.
Then it goes back in the car, I measured the old disc thickness vs. new disc- 6mm vs. 9mm. So that ought to help on grip. And hopefully, having a little less grease flying around in there will
help as well. Not sure if I'll have time to work on the car over the next couple of days, but it'll get done when it gets done.
Attachments
Last edited:
Small additional delay.
I took off the flywheel, and found that the surface was irregular, in that it had polished spots and dull spots.
This tells me that it's probably been unevenly heated during use, likely because of oil contamination.
So I need to get it machined, but I have to go out of town so it'll be a few days before I can even drop it off.
On a positive note, the existing rear main seal looks perfect, and there's no seepage. But I'll probably replace it anyway,
as a preventative measure.
So, I dropped off the flywheel for machining yesterday, but the guy wasn't going to be there till tomorrow, so I'll pick it up then.
In the meantime, I degreased the tranny tunnel and driveshaft, and painted the rear bumper.
Before:

During:

Almost after:

And after:

I'll wetsand the orange peel off tomorrow, and then dive into the tranny install.
In the meantime, I degreased the tranny tunnel and driveshaft, and painted the rear bumper.
Before:
During:
Almost after:
And after:
I'll wetsand the orange peel off tomorrow, and then dive into the tranny install.
Last edited:
Welp, I completed the rear bumper today, and I'm certainly happy enough with the results I got for a daily driver.
Near side cut/ polished, far half orange peel:

Pretty glossy for rattle cans:


Bumper is done.

This pretty much ends any improvements or repairs to the exterior of the car. As I said not too long ago, there are always things to do,
to keep an old car in proper shape, but I'm nearing the end of this thread. Tomorrow, the transmission install, and then I'm nearly done.
Near side cut/ polished, far half orange peel:
Pretty glossy for rattle cans:
Bumper is done.
This pretty much ends any improvements or repairs to the exterior of the car. As I said not too long ago, there are always things to do,
to keep an old car in proper shape, but I'm nearing the end of this thread. Tomorrow, the transmission install, and then I'm nearly done.
Last edited:

Looks great, even rattle canning it teaches you a lot about how to paint and finish properly. It looks like decent quality paint to get that finish though. I just finished fixing where someone tagged the front bumper of my truck last weekend. I chose to airbrush since it was too small for even my touch up gun. Luckily doing the whole bumpers you didn't have any blending to worry about.
While I am going to miss seeing updates on this thread I hope this means your real build will start to get some action? Mine is going to start picking up here quickly after years....... and I could use the motivation.
While I am going to miss seeing updates on this thread I hope this means your real build will start to get some action? Mine is going to start picking up here quickly after years....... and I could use the motivation.
Yeah, My efforts will be put back into the '88 after this.
Part of the problem, is that I have to track down a mystery oil burning issue. Not sure if its from the turbo, the head, or the rings.
And that's got me a bit disheartened, since everything is basically new on that motor. But once that's resolved, I will continue prepping for paint.
And THAT job won't be done by me, or with any rattle cans, lol.
I completely understand, been there. Comp test may be a good indication but unfortunately doesn't tell you if something is up with any of the oil rings. Turbo and valve seals are pretty common culprits as it sounds you know.
As for paint its a good call, I shot mine this last time but had the hookup on a booth after hours and its not my first rodeo. The majority of the labor cost on a paint job is the prep and post work though so there is still a large amount you can do yourself.
Ever nail down when you are going to be out this way?
-R
GC89;2055430 said:Ever nail down when you are going to be out this way?
-R
Yup, Tomorrow I head out there.
Will be there through Monday. LMK if there's a time that you'll be around the Seattle area. Otherwise, I'll just plan to ship that console lid.
Zazzn;2055478 said:what antenna did you use?
Metra 44-PW22B
More description:
http://www.supramania.com/forums/sh...tion-What-replacement-antenna-for-the-89-wing
Got the tranny in today.


Just gotta connect the driveshaft tomorrow, and the exhaust.
Just gotta connect the driveshaft tomorrow, and the exhaust.
Last edited:
Welp, finished the tranny, but the intermittent fuel issue I had is terminal now.
It appears that the cheap fuel pump I bought was in fact...a cheap fuel pump. In case I didn't explain it earlier:
The problem started as a no-start condition one day, about 3 weeks after replacing the fuel pump. The pump would not come on during crank.
I jumpered the Fp and B+, and at first, there would be no pump operation, but the jumper wire would start to get hot. Then, the pump usually started working in a few seconds of that.
But now, the pump will not run continuously without being jumpered, and the jumper wire still gets hot. I tested the ground for the pump, and there's almost no resistance. Then I checked
voltage at the pump plug, and its over 12 volts. So next week, I will replace the pump and see if that corrects the issue. There could be a problem with the circuit opening relay, or the FP relay, but I doubt it,
since jumpering in the diagnostic port bypasses these, and I still had the issue. Oh well, not a big deal.