
You are using an out of date browser. It may not display this or other websites correctly.
You should upgrade or use an alternative browser.
You should upgrade or use an alternative browser.

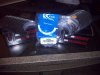
Does anyone know where the caps that fit into the side of the block can be purchased? The engine warmer one has holes drilled in it from the PO... Thanks in advance guys!
Sent from my LG-P999 using Tapatalk 2
Sent from my LG-P999 using Tapatalk 2
Lol, yeah. It's too late... More specifically though the engine warmer freeze plug. My block has one, but the cord is cut and the PO tried to remove it by drilling holes in it... know anyone that has one with the cord intact? I found a set of freeze plugs on Ebay, but not with the engine warmer. Guess I don't really need it, but it would be nice to have.
When did you want to come pick up that crank pulley bearing?
Sent from my LG-P999 using Tapatalk 2
When did you want to come pick up that crank pulley bearing?
Sent from my LG-P999 using Tapatalk 2
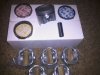
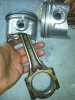
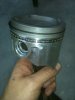
Just got my new pistons, rings, thrust washers, and rod and main bearings in the mail today! Just have to get the time to put them in now!
Sent from my LG-P999 using Tapatalk 2
Sent from my LG-P999 using Tapatalk 2
Attachments
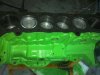
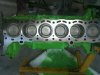
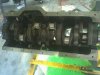
Today I got my block out and installed my new main bearings. Scrubbed the crankshaft and dropped it into head and torqued the main bolts down to 75 pounds. Then I cleaned my rods, and installed the new pistons and the piston rings and dropped those in, put in the new rod bearings and torqued them down to 47 pounds.
Cleaned her up and ran the crank! Nothing like the sound of new rings making a new surface! Such a beautiful thing!
Sent from my LG-P999 using Tapatalk 2
Cleaned her up and ran the crank! Nothing like the sound of new rings making a new surface! Such a beautiful thing!
Sent from my LG-P999 using Tapatalk 2
Attachments
And a short video of turning the crank after the install!
https://www.youtube.com/watch?v=eOkPNX8oRuw&feature=youtube_gdata_player
Sent from my LG-P999 using Tapatalk 2
https://www.youtube.com/watch?v=eOkPNX8oRuw&feature=youtube_gdata_player
Sent from my LG-P999 using Tapatalk 2
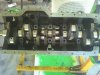
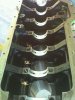
I heard that you can dramatically increase block cooling with drilling some more block cooling passages. This methods looks similar to how the 2jz is designed
Heres a link to that upgrade http://www.supracarparts.com/info/?p=35
Comparing 2JZ block to 7m

 The 7m is missing some coolant hose compared to 2J imagine drilling it like this
 wouldnt the 7m benefit from these extra coolant holes?
Heres a link to that upgrade http://www.supracarparts.com/info/?p=35
Comparing 2JZ block to 7m
The 7m is missing some coolant hose compared to 2J imagine drilling it like this wouldnt the 7m benefit from these extra coolant holes?Awesome! Thanks for the feedback! Definitely something to consider!
Sent from my LG-P999 using Tapatalk 2
Sent from my LG-P999 using Tapatalk 2

Sent from my LG-P999 using Tapatalk 2
Last edited:
Well, it's been awhile since I've actually done any work to my car. Been very busy lately. Did have the chance to start to Helicoil the exhaust side threads on Sunday. Got a couple of them done. Replacing 4 threads all together. Here is a short video of us making new threads with the tap. Hopefully next weekend I'll be able to finish it up and shim the other side and drop the cam in. Can't wait until I'm done with this damn head!
https://www.youtube.com/watch?v=2X8Rz1qow6Q&feature=youtube_gdata_player
Sent from my G2x using Tapatalk 2
https://www.youtube.com/watch?v=2X8Rz1qow6Q&feature=youtube_gdata_player
Sent from my G2x using Tapatalk 2
yea helicoiling can be a bitch, it seems like itll hold torque better just then the stud in the aluminum.
I sure hope so. Four of the threads on there were just completely trashed and completely stripped. That's what happens to 20 year old aluminum when it overheats... Plus the PO probably over torqued them... I think I remember reading that the specs were 29 ft lbs... I'll have to double check once I get to that point.
napa, part source, auto zone, should have a block heater in stock for about $45? maybe toyota as well but more expensive. slide hammer puller, homemade or bought will work good to remove that old one. good videos, nice work. good luck with build. ")
Thanks! Yeah, I might just getting a regular freeze plug to fit the hole. They are only like two bucks each. I don't really need a block heater, and I don't really plan on driving it on Idaho winter roads lol. Hopefully I'll finish that head this weekend. Then I need to measure and get a head gasket and ARP bolts. Then it should be assembly time!
Sent from my G2x using Tapatalk 2
Sent from my G2x using Tapatalk 2
So this weekend I was able to finally get the rest of the Helicoil finished up. Also finished getting the valve lash/clearance within spec, so both sides are done now. Just need to install the front cam seals. As soon as my video is done uploading to Youtube, I will post the link to the quick video that I made explaining how to check lash and the appropriate specs, as well as the correct order for removing and installing the cam journals.
Just to clarify for the video(because I said .010 didn't fit so that is still within spec, which is true, but may have been confusing for some), recommended in spec lash(clearance) for the intake side is between .006-.010(if .011 or more fits it is not within spec) with .008 being the most preferable, and on the exhaust side it is between .008-.012(if .013 or more fits it is not within spec) with .010 being the most preferable. Hope that clears up any confusion that may have been had and keeps the trolls off my jock
Just to clarify for the video(because I said .010 didn't fit so that is still within spec, which is true, but may have been confusing for some), recommended in spec lash(clearance) for the intake side is between .006-.010(if .011 or more fits it is not within spec) with .008 being the most preferable, and on the exhaust side it is between .008-.012(if .013 or more fits it is not within spec) with .010 being the most preferable. Hope that clears up any confusion that may have been had and keeps the trolls off my jock
Ok, took forever to upload that video to YouTube being as T-Mobile decided to throttle my data speeds since I exceeded 5GB, lol. But, here it is!
How to check valve lash on a 7M-GTE engine:
https://www.youtube.com/watch?v=YnO-mOltlmY&feature=youtube_gdata_player
Sent from my LG-P999 using Tapatalk 2
How to check valve lash on a 7M-GTE engine:
https://www.youtube.com/watch?v=YnO-mOltlmY&feature=youtube_gdata_player
Sent from my LG-P999 using Tapatalk 2