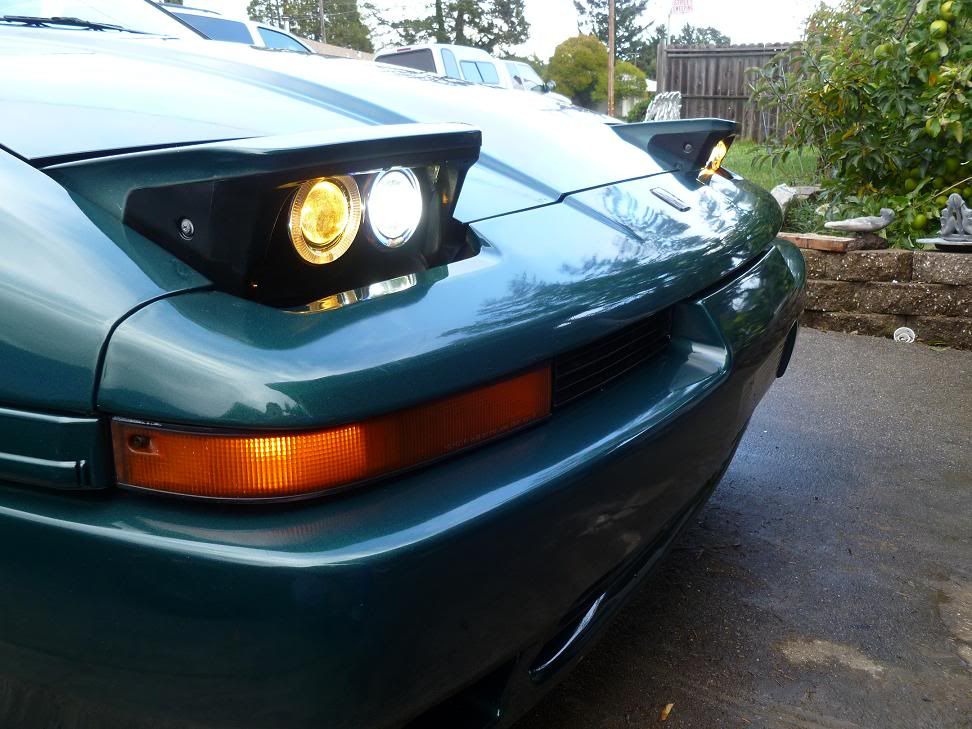
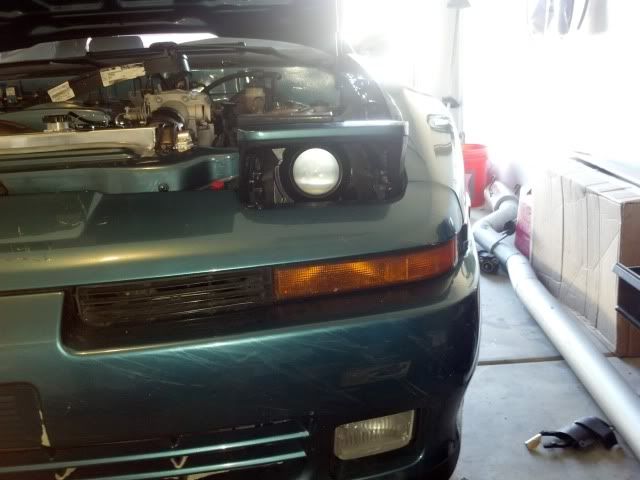
Alright guys I'm working on doing a projector retrofit along with functioning sleepy eyes. Let me start off with I know there is a lot of love/ hate with the sleepy eyes and if we can just leave this out of the topic that would be great. Also I have chosen to do the single projector Bi xenon retrofit and I know it doesn't look as great as the double halogen projectors people are used to seeing but its what I've chosen to do so lets not clutter up this thread with that debate. NO I WILL NOT BE MAKING KITS FOR THESE DO NOT ASK!!!
Great now that's out of the way I will show you how I created the sleepy eyes for about $10 from a local hardware store. Little back ground every one thinks that by cutting the arm that the eyes will be functional but that is not true. As soon as you put the lights down the rocker arm would want to return to the original arm length and that would cause you to break one of the ball joints or inhibit the motor from completing its full revolution. What I came up with is a telescoping arm that takes the height of the light needed when up and changes to full length when the light is down.
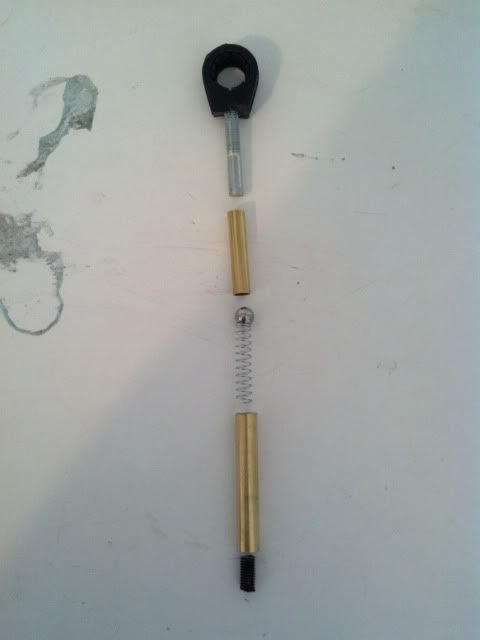
The list of parts needed are:
1--- (11/32) brass tubing
1--- (9/32) brass tubing
2---5/16 ball bearing
2---Spring that will fit inside the (11/32) brass tube
2---M6x1x45 bolts
M6x1 left hand thread (I have a full meter if interested I can send you the small pieces)
Tension spring that you will need to find for your application.
To start off the rocker arm ball joint is the side that has the left hand thread.
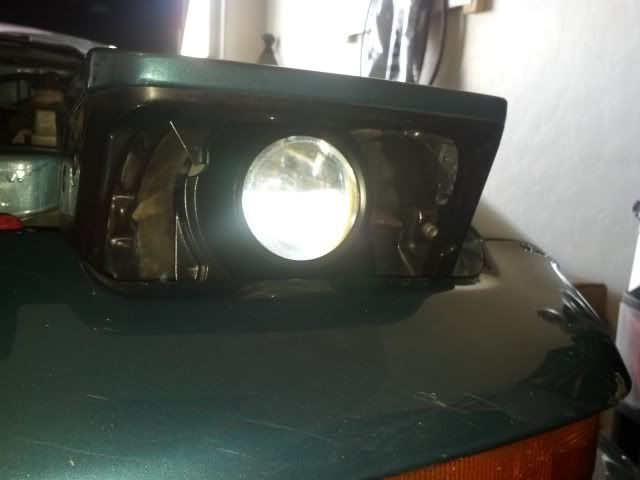
Step 1: Cut the 11/32 brass arm 2 inches long, this will give you the height that will hold the headlight up for the sleepy eyes. I fount that at 2 inches this put the lights at 3.5 inches high allowing the use of my 3 inch projector lens. This can be changed depending on your needed height.
Step 2: Take a small half inch piece of the left hand thread M6x1 and using jb weld, adhere it to the inside of the 11/32 tube. I went no more than 1/8 inside the tube as the farther you place the piece inside the higher your headlight will be. Wait about 3-4 minutes until the jb weld is like a putty consistence so that you don't have to hold the thread so long in the tube. There is a lot of space to fill in the tube with the jb weld.
Step 3: Cut the 9/32 tube roughly 1.5 inches
Step 4: Trim and or stretch spring so that it is only about .25 inches in length when compressed but about and 1 inch when relaxed. The longer the spring when collapsed the higher your headlight will be.
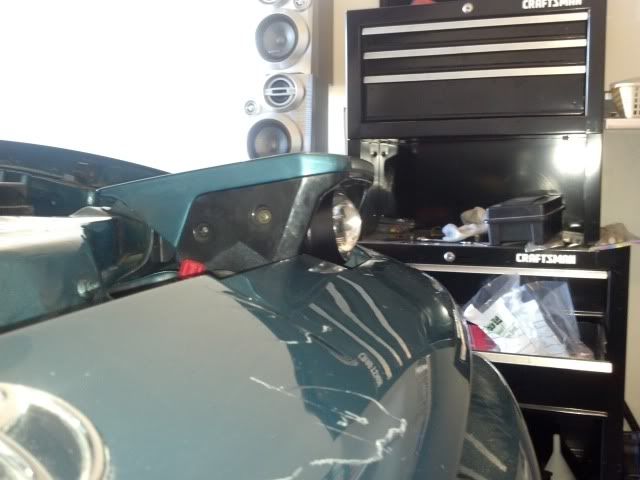
Step 5: Take black ball joint arm off headlight and cut it about .5 inches, you might need to re-tap the plastic afterwards for the bolt.
Step 6: Cut the hex head off of the M6x1x45 bolt and debur the cut.
Here is a layout of how all the parts should be and how they will be placed together
Once installed a tension spring should be installed to your liking so that the headlights do not flip up during driving. The addition the spring also allows smother operation when the headlight goes up and down as tension will be placed on the new arm and will keep the headlight from slamming down. A video is below showing the sleepy eyes with out the tension spring and it can be seen how it bounces once down. Also make sure to grab a longer bolt to replace the OEM height stop once the lights are completely finished.
[video=youtube;LSvJ7vZY0BU]http://www.youtube.com/watch?v=LSvJ7vZY0BU[/video]
=================================================================================================================
Now I'll be going over the projector retrofit. I have just started an I'm learning a lot and will probably change quite a bit but I will keep the first post updated with changes.
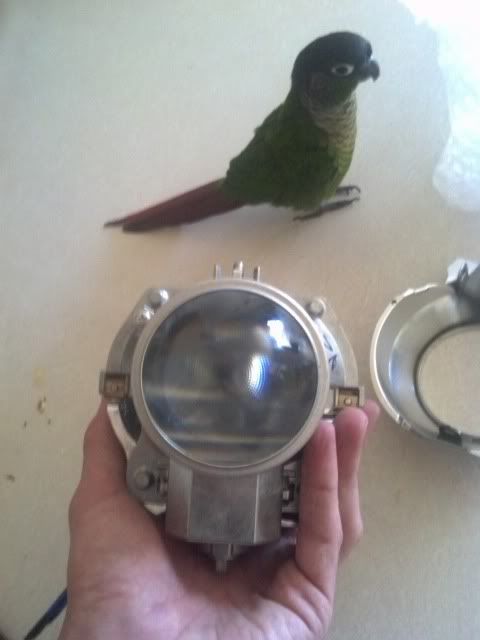
I started off my purchasing IS250 projectors (around $100) I chose these as they are side mount bulbs and do not require cutting of the radiator support because they are so short. I will be coupling these with the morimoto DS2 4300K bulbs and ballasts as well as STI clear lenses. Here is what they look like. (My bird was quite intrigued)
I found out that they are short enough I could maintain using the OEM aiming bowl to mount them in. I used aluminum strap and mounted them with pre existing screws on the projector.
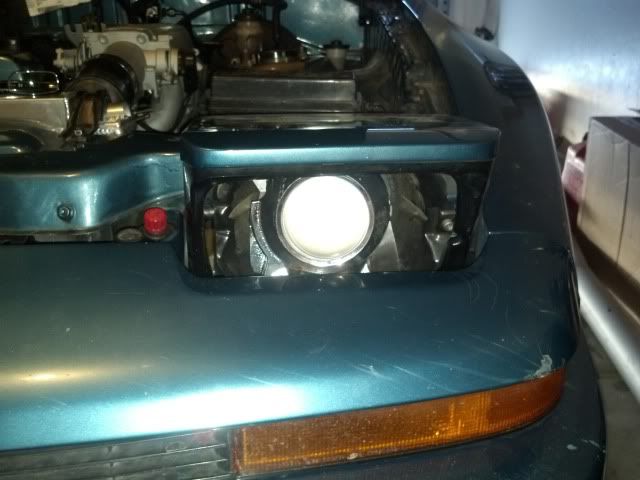
Once the Ballasts come in and I can fully aim the projectors I will be placing bolts in the bowl to allow more support for the rear of the housing to eliminate vibration. I then decided that I was going to black out the cover and painted it.
The next step from here will be to take the side cover and build the sides up so that they are vertical and that way I can create a plexiglass cover to protect the inside of the headlight and a bowl to make it water tight. This is where I'm at so far and will be working on this in my free time. So update might not be frequent.
Here is a link to the light pattern of the IS250 lights http://www.hidplanet.com/forums/showthread.php?29758-IS250-Projector-Upgrade
Great now that's out of the way I will show you how I created the sleepy eyes for about $10 from a local hardware store. Little back ground every one thinks that by cutting the arm that the eyes will be functional but that is not true. As soon as you put the lights down the rocker arm would want to return to the original arm length and that would cause you to break one of the ball joints or inhibit the motor from completing its full revolution. What I came up with is a telescoping arm that takes the height of the light needed when up and changes to full length when the light is down.
The list of parts needed are:
1--- (11/32) brass tubing
1--- (9/32) brass tubing
2---5/16 ball bearing
2---Spring that will fit inside the (11/32) brass tube
2---M6x1x45 bolts
M6x1 left hand thread (I have a full meter if interested I can send you the small pieces)
Tension spring that you will need to find for your application.
To start off the rocker arm ball joint is the side that has the left hand thread.
Step 1: Cut the 11/32 brass arm 2 inches long, this will give you the height that will hold the headlight up for the sleepy eyes. I fount that at 2 inches this put the lights at 3.5 inches high allowing the use of my 3 inch projector lens. This can be changed depending on your needed height.
Step 2: Take a small half inch piece of the left hand thread M6x1 and using jb weld, adhere it to the inside of the 11/32 tube. I went no more than 1/8 inside the tube as the farther you place the piece inside the higher your headlight will be. Wait about 3-4 minutes until the jb weld is like a putty consistence so that you don't have to hold the thread so long in the tube. There is a lot of space to fill in the tube with the jb weld.
Step 3: Cut the 9/32 tube roughly 1.5 inches
Step 4: Trim and or stretch spring so that it is only about .25 inches in length when compressed but about and 1 inch when relaxed. The longer the spring when collapsed the higher your headlight will be.
Step 5: Take black ball joint arm off headlight and cut it about .5 inches, you might need to re-tap the plastic afterwards for the bolt.
Step 6: Cut the hex head off of the M6x1x45 bolt and debur the cut.
Here is a layout of how all the parts should be and how they will be placed together
Once installed a tension spring should be installed to your liking so that the headlights do not flip up during driving. The addition the spring also allows smother operation when the headlight goes up and down as tension will be placed on the new arm and will keep the headlight from slamming down. A video is below showing the sleepy eyes with out the tension spring and it can be seen how it bounces once down. Also make sure to grab a longer bolt to replace the OEM height stop once the lights are completely finished.
[video=youtube;LSvJ7vZY0BU]http://www.youtube.com/watch?v=LSvJ7vZY0BU[/video]
=================================================================================================================
Now I'll be going over the projector retrofit. I have just started an I'm learning a lot and will probably change quite a bit but I will keep the first post updated with changes.
I started off my purchasing IS250 projectors (around $100) I chose these as they are side mount bulbs and do not require cutting of the radiator support because they are so short. I will be coupling these with the morimoto DS2 4300K bulbs and ballasts as well as STI clear lenses. Here is what they look like. (My bird was quite intrigued)
I found out that they are short enough I could maintain using the OEM aiming bowl to mount them in. I used aluminum strap and mounted them with pre existing screws on the projector.
Once the Ballasts come in and I can fully aim the projectors I will be placing bolts in the bowl to allow more support for the rear of the housing to eliminate vibration. I then decided that I was going to black out the cover and painted it.
The next step from here will be to take the side cover and build the sides up so that they are vertical and that way I can create a plexiglass cover to protect the inside of the headlight and a bowl to make it water tight. This is where I'm at so far and will be working on this in my free time. So update might not be frequent.
Here is a link to the light pattern of the IS250 lights http://www.hidplanet.com/forums/showthread.php?29758-IS250-Projector-Upgrade
Last edited: