
That's pretty much what I did to my ct26 elbow when I took it off to swap my exhaust...just clamped a belt sander in a vice and hit the mating surfaces a couple times from two or three angles. I also cleaned the bulk of the carbon out of it with a wire brush dremel shank...figured I might as well. No exhaust leak there, even after I reused the old crusty gasket. Can't say much for the warped flanges at the muffler, though :x
Project Lex (aka: Teh Bean) '92 SC300
- Thread starter Halon
- Start date
You are using an out of date browser. It may not display this or other websites correctly.
You should upgrade or use an alternative browser.
You should upgrade or use an alternative browser.
Got everything together as much as needed just to start the car up and check for leaks or anything since I had it apart. Started right up! Don't see any leaks so far so that's good!! Just gotta start putting the turbo back on, and all the piping!!
http://www.youtube.com/watch?v=GWSfinCLMas
http://www.youtube.com/watch?v=GWSfinCLMas
Installed the 4-Runner distributor. Only 2 of the 3 holes line up, wondering if that's normal???
Took the manifold to a sanding belt. Got the T4 flange a bit flatter. Brought it home and threw it on. Installed the turbo hot side. This should ensure the bolts don't loosen up")

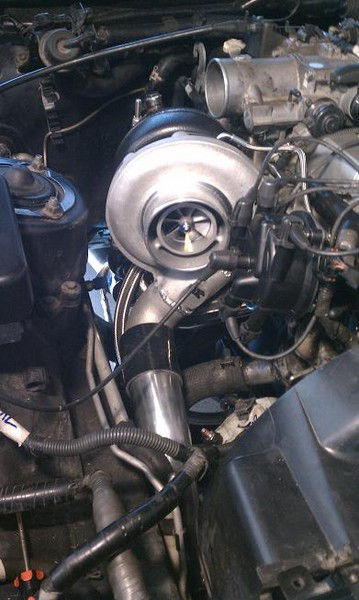
Put the rest of the turbo on. The return is a tight fit. The turbo will have to be clocked slightly which you'll notice. Otherwise everything is going fairly smoothly

Started w/ Turbo on No comp cover as it's out for welding. Turbo spinz!!!
http://www.youtube.com/watch?v=jLgYXYTJLMM
Took the manifold to a sanding belt. Got the T4 flange a bit flatter. Brought it home and threw it on. Installed the turbo hot side. This should ensure the bolts don't loosen up
Put the rest of the turbo on. The return is a tight fit. The turbo will have to be clocked slightly which you'll notice. Otherwise everything is going fairly smoothly
Started w/ Turbo on
No comp cover as it's out for welding. Turbo spinz!!!http://www.youtube.com/watch?v=jLgYXYTJLMM
hey how similar is that rack and pinion to the mk3 one.
i wonder if that would be a good alternative to a sloshy mk3 one.
i wonder if that would be a good alternative to a sloshy mk3 one.
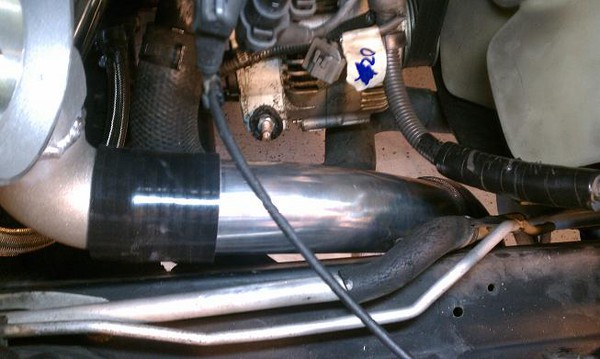
Little bit of progress. So the exhaust plan is 3" downpipe going to dual 2.5" in the rear. Got the downpipe tacked up with the Marmon Flange that mates to this turbo. Fits like a champ!


Grabbed a section of the Talon's old exhaust to start cutting it up to make the rest of the 3" portion. Grabbed a 3" flange and gasket from MAP, thanks again guys!


Here's the only piece I managed to get done tonight, but I'm glad I got it done because I suck at fabbing and I thought getting this angle just right was going to be a biatch. Took me a couple cuts and test fits to get the angle just right.
Gettin that angle juuuuust right

Done, just need to get it welded up!


And found an old 2.5" SS Upper IC pipe from the talon that had SS bends. So I cut those off and those are added to the pile of 2.5" random SS bends to use for the 2.5" portions. They're still powdercoated, maybe I'll leave em and see how long until it burns off

Huge thanks to Momin (Speedfreak) for taking the time to weld this up for me, and Aaron for lending the equipment!
Grabbed a section of the Talon's old exhaust to start cutting it up to make the rest of the 3" portion. Grabbed a 3" flange and gasket from MAP, thanks again guys!
Here's the only piece I managed to get done tonight, but I'm glad I got it done because I suck at fabbing and I thought getting this angle just right was going to be a biatch. Took me a couple cuts and test fits to get the angle just right.
Gettin that angle juuuuust right
Done, just need to get it welded up!
And found an old 2.5" SS Upper IC pipe from the talon that had SS bends. So I cut those off and those are added to the pile of 2.5" random SS bends to use for the 2.5" portions. They're still powdercoated, maybe I'll leave em and see how long until it burns off
Huge thanks to Momin (Speedfreak) for taking the time to weld this up for me, and Aaron for lending the equipment!
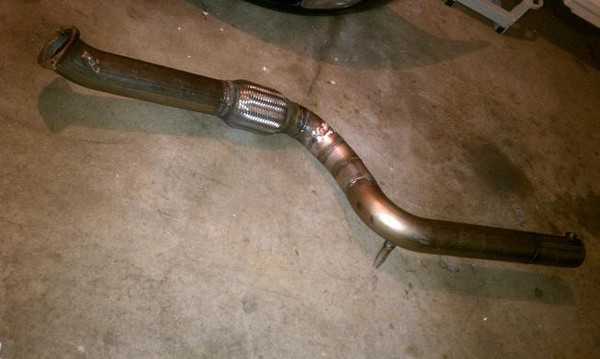
Got some more of the exhaust done. Pretty much the entire 3" section is done though. I still have a 3" resonator I may put on yet, but not sure if I'll put it on yet...
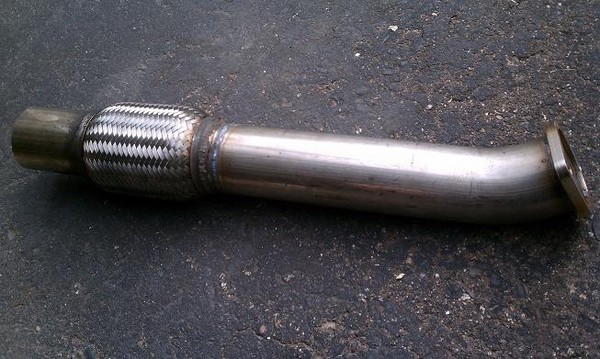
Used the old flex section from my Talon exhaust. Had it so figured might as well use it.
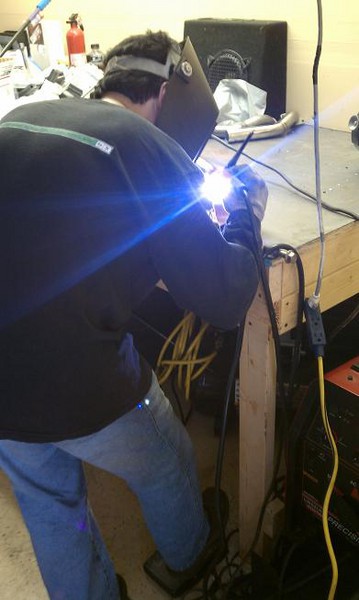
Momin workin his mad TIG skillz Thanks a million again, especially for dealing with my crappy fabbing and doing your best to make it all work! And also thanks again to Aaron for the equipment!
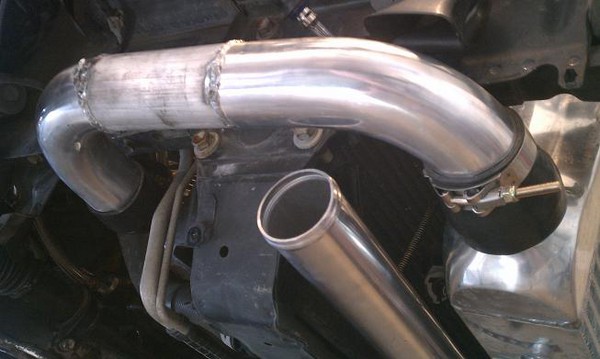
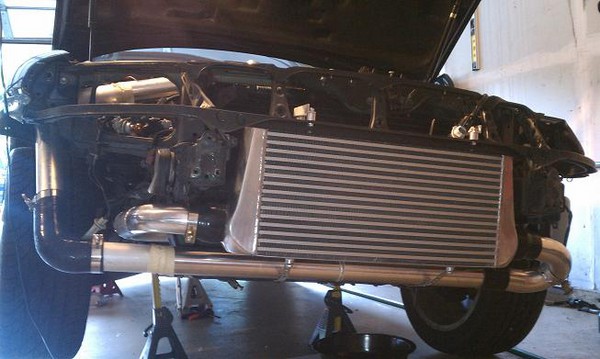
More IC piping mocked up.
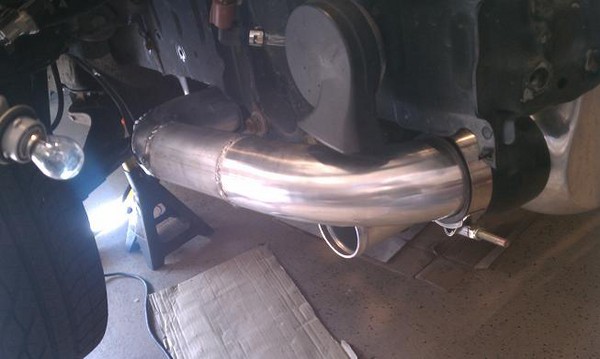
Used the old flex section from my Talon exhaust. Had it so figured might as well use it.
Momin workin his mad TIG skillz
Thanks a million again, especially for dealing with my crappy fabbing and doing your best to make it all work! And also thanks again to Aaron for the equipment!
More IC piping mocked up.
Last edited:
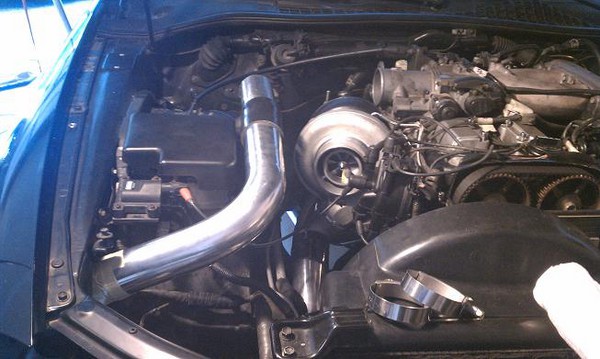
Got a fantabulous pie cut style bend rigged up to get around the hotside. Not the most beautiful arrangement ever, but it is temporary until I eventually switch to a forward facing intake manifold. So it'll do just fine for now I think. Welding it might not be so fun...
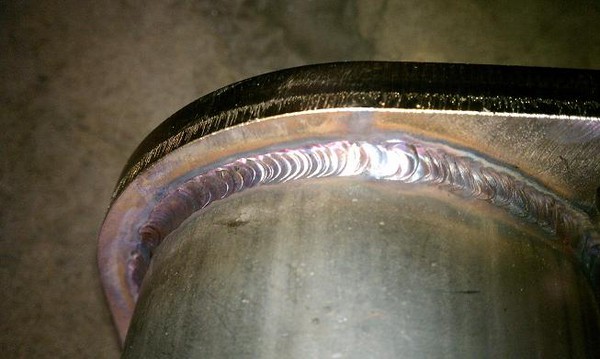
Also got the V-Band flange for the WG fully welded around.


Also got the V-Band flange for the WG fully welded around.
Last edited:
Thanks for the heads-up. Should be fixed now.
Dropped off the pie-cut ghetto bend to get welded, should be done Friday. Got all the other stuff back from him. Thanks again Momin, your TIG'in skillz are awesome!!
Also bought a can of black Plasti-Dip. Got the idea from another local who used it on his engine bay. Figured it may be a nice cheap coating option for my pipes. It'll dry as a sort of rubber coating, like the handle of some hand tools. Supposed to be extremely durable, if there's ever a flaw you just spray more on and it melts right into the old stuff. If you want it removed, just cut it and peel it right off. Also it's a nice flat black, which is exactly what I want, keep it clean/simple/OEM looking.
Also needed to get something to mount the gauges to. A-1 Acrylics in Osseo here hooked it up, thanks to Matt Dizzle for recommending them.
http://a1acrylics.com/
They have lots of scrap stuff, and they charge $1 per pound for scrap. So walked out of there with a huge piece of this matte finished textured piece of ABS Plastic for $2
Here's some pics!
ABS Plastic for gauge surroud

The Plasti-Dip

Freshly coated and wet

Hanging to dry


Dropped off the pie-cut ghetto bend to get welded, should be done Friday. Got all the other stuff back from him. Thanks again Momin, your TIG'in skillz are awesome!!
Also bought a can of black Plasti-Dip. Got the idea from another local who used it on his engine bay. Figured it may be a nice cheap coating option for my pipes. It'll dry as a sort of rubber coating, like the handle of some hand tools. Supposed to be extremely durable, if there's ever a flaw you just spray more on and it melts right into the old stuff. If you want it removed, just cut it and peel it right off. Also it's a nice flat black, which is exactly what I want, keep it clean/simple/OEM looking.
Also needed to get something to mount the gauges to. A-1 Acrylics in Osseo here hooked it up, thanks to Matt Dizzle for recommending them.
http://a1acrylics.com/
They have lots of scrap stuff, and they charge $1 per pound for scrap. So walked out of there with a huge piece of this matte finished textured piece of ABS Plastic for $2
Here's some pics!
ABS Plastic for gauge surroud
The Plasti-Dip
Freshly coated and wet
Hanging to dry
Got things fairly buttoned up today. The piping is all done. You can see I had to do a little special something to the TB because it was hitting the massive BW exhaust housing. I'm referring to that as the "ghetto bend" from now on.
I do still need to add a bov flange to the piping, but I may take it for a spin around the block as-is.
Also I started on the gauge surround piece for the two gauges.


I do still need to add a bov flange to the piping, but I may take it for a spin around the block as-is.
Also I started on the gauge surround piece for the two gauges.
Plasti-dipped IC piping looks extra legit. I want to do something similar when I do mine...polished everything just isn't my thing. I was thinking of using a wrinkle coat of some sort, myself...but rubberized looks great, too.
Got it started up today. There's no BOV installed at the moment however.
Here's some pics as it sits. Also a pic of my gauge setup. I'm not the best at making interior stuff, so I know it doesn't look "OEM" but I think it looks pretty good and will do the job just fine. You might notice that boost gauge has some dents in the outter ring. A replacement is on the way and should be here very shortly. Gauges are setup so that when you start the car, the boost gauge is lit up white, and the wideband has white logo's with blue back-light. Soon as you turn on the headlights, the boost gauge changes to blue, and the wideband slightly dims.
Took it for a very quick spin down the road. It's running pretty rough right now so I have some troubleshooting to do. But otherwise I'm just pretty excited it started and the gauges are in
Here's some pics / vids.


Played with a different camera setting for fun

Video:
http://www.youtube.com/watch?v=qgLwuAf2YX0
Here's some pics as it sits. Also a pic of my gauge setup. I'm not the best at making interior stuff, so I know it doesn't look "OEM" but I think it looks pretty good and will do the job just fine. You might notice that boost gauge has some dents in the outter ring. A replacement is on the way and should be here very shortly. Gauges are setup so that when you start the car, the boost gauge is lit up white, and the wideband has white logo's with blue back-light. Soon as you turn on the headlights, the boost gauge changes to blue, and the wideband slightly dims.
Took it for a very quick spin down the road. It's running pretty rough right now so I have some troubleshooting to do. But otherwise I'm just pretty excited it started and the gauges are in
Here's some pics / vids.
Played with a different camera setting for fun
Video:
http://www.youtube.com/watch?v=qgLwuAf2YX0
Oh hai, Brandon! I didn't know you were posting the build here too Congrats on getting it running! (feels good, doesn't it?)
Congrats on getting it running! (feels good, doesn't it?)