'95 BMW M3 - shaeff's summer daily driver

IJ.

Grumpy Old Man
Mar 30, 2005
38,728
0
0
61
I come from a land down under
Had both!

Another is oily overalls that catch fire ;)

That or slag goes down the front of your work boots and burns your ankles.

I also have an IC shaped scar on my inner thigh where I steadied it while tigging on some brackets.... didn't realise how fast it would transfer heat.... DOH
 

shaeff

Kurt is FTMFW x2!!!!
Staff member
Super Moderator
Mar 30, 2005
10,588
9
38
Around
Well, I'll try very hard to avoid those scenarios for the future! I've actually had my cloths catch fire before. That was a wakeup call! I'll pass on the slag in the ankles, too, thanks.

Hey, at least you know your IC is efficient, eh!? That's probably a cool lookin' scar, too!
 

Tire Shredder

New Member
Sep 15, 2005
569
0
0
36
Oshawa
shaeff;1382182 said:
Thanks, though I'll never recommend one to anybody who doesn't like DIY work! They're built like garbage. LOL. The Supra, while being a tank, is 10x better quality build than this car.
.

curious shaeff, what examples of build quality do you have? I've done some work on my friend's 325i and not liked it aswell. To me, it felt like they were built as high quality disposable cars. money spent in areas the person notices (HUGE amount of sound deadening and foam, thick dash and console but horrible in other areas to work on. (clips snapping and breaking, routing of everything engine bay impossible to work on ridiculous shift linkage.

in for pics of coilovers and video of exhaust!
 

shaeff

Kurt is FTMFW x2!!!!
Staff member
Super Moderator
Mar 30, 2005
10,588
9
38
Around
I'll get pics of coils and exhaust vids very soon. :)

As for build quality:
1) the aforementioned rear trailing arm bushing pocket mount ripping out.
2) The differential mounting setup (three bolts, front one always snaps)
3) Rear shock towers rip themselves apart without proper reinforcement. (z3 plates or rear shock tower bar required.
4) Front strut towers should be reinforced with '96+ plates, and they tend to "splay" the three bolts used for mounting.
5) Shift linkage sucks, often times there are bushings in the tranny that cause the shifter to rest in the 5'th gear position. (mine doesn't do this...yet)
6) Interior quality (front and rear door panels) are absolute shit. They fall apart, peel up, rattle, etc...
7) Super thin spare tire well sheet metal. If you kick it hard enough, you could probably put your foot through it. And it's nearly impossible to weld there and not blow holes in it.
8) The gas pedal is a throw away item. When removed, you're "supposed" to get a new one. When it breaks, it will likely pin the throttle to the floor. Ask me how I know. :nono:
9) The driveline doesn't take to power very well at all. Guys with 6-700hp (turbo) break shit on a daily basis- blowing differentials apart, literally tearing the rear subframes into pieces, the trannys grenade. No Supra built-tough parts in there!
10) Stupid drivetrain flex disc (guibo)- doesn't take power well either. Shreds easily.
11) Stock plastic headlights: terrible beam pattern, terrible light spread, absolute shit quality for a near $40k car! WTF were they thinking!?
12) Absolutely terrible cooling systems. The waterpumps explode and send your fan into the radiator, all the cooling hoses are under the intake manifold and are a complete bitch to remove. Crappy non-self bleeding also- has a bleed screw. It sucks to bleed, much worse than putting the front end up and revving it like on a Supra (which pretty much self purges anyway if your system is healthy)
13) '95 M3's plagued with knock sensor codes. Nobody really knows why, but I have several ideas.
14) In the rear, the trunk harness shorts out against the body from repeated opening/closing of the trunk. Causes all sorts of headaches, including losing the entire gauge cluster.
15) BMW used a cheap O-ring in the VANOS system (variable valve timing type thing)- causes them to stop functioning properly at around 100k or earlier. Also, they fail quickly otherwise- sound like "marbles in a can"
16) Stitching on the front seats ("Vaders") rips out easily, seat heaters are junk and don't last very long at all.
17) The front and rear bumpers are very prone to sagging due to crappy mounting technique.
18) The stock underpanel (engine bay) is absolute shit. Shreds itself quickly, which causes the brake ducts to fall out, and the fenderliners to rub against the tires when turning.
19) Clutch arm bushings are shit- causes the clutch pedal to slop around quite a bit.
20) Front subframes tear up right around the motor mounts.
21) When the motormounts fail, it also helps the fan contact the radiator.
22) Same for the tranny mounts.

Literally, I typed that one after the other off the top of my head. And, there's more!
 

Tire Shredder

New Member
Sep 15, 2005
569
0
0
36
Oshawa
shaeff, wow man. my support goes out to you as a fellow enthusiast.

fixing things is a pain in the ass as it is. It makes you appreciate it when you don't have to re-engineer the whole car. At least, it sounds like you have most of the bugs worked out on your car...it will be a satisfying drive when you are finished.
 

shaeff

Kurt is FTMFW x2!!!!
Staff member
Super Moderator
Mar 30, 2005
10,588
9
38
Around
LOL, thanks dude! It definitely is a pain in the ass, but when I'm ripping down a deserted back road, it's totally worth it! I've got most of the bugs worked out for sure. When they're ALL worked out (and all bushings have been replaced, hopefully this winter's job)- I'll be turbocharging it. :) It never ends!
 

shaeff

Kurt is FTMFW x2!!!!
Staff member
Super Moderator
Mar 30, 2005
10,588
9
38
Around
Oh, it's definitely getting turbocharged. There's no doubt. gt35r FTW! End goal is 400rwhp on pump gas with a conservative tune.
 

spipedong

Level 2 Rythym Rogue
Apr 2, 2005
404
0
0
40
Eugene, OR
While I don't care for the interior build quality I do like almost everything else about my E36. Everything I've done has been quite easy and actually kind of fun.

It's also nice to have a car that rewards repairs. My supra was always trouble and despite replacing almost every suspension bit there was it still never handled like I felt it should. With the M3 I can tell an immediate and significant difference after a repair.

Maybe I just had lemon supras (4 of them) :nono:
 

shaeff

Kurt is FTMFW x2!!!!
Staff member
Super Moderator
Mar 30, 2005
10,588
9
38
Around
It's not that I don't like it, it's just the fact that it's not built as well as the Supra. I thoroughly enjoy working on the car, and even more, driving it. If I didn't like either, I'd sell it immediately. LOL.

I never had much trouble with the Supra, so I can't relate to you there. It was a tank!
 

shaeff

Kurt is FTMFW x2!!!!
Staff member
Super Moderator
Mar 30, 2005
10,588
9
38
Around
Update: I replaced knock sensors 1 and 2 last night. It took me about 2.5hrs w/ basic hand tools in my driveway. No more CEL flash between shifts 1-2, and a noticeable amount more torque down low! Much better for around town cruising when you roll into the skinny pedal to scoot around things, or away from people. Very happy with the outcome!

My "writeup" copy/pasted from BF.c:

shaeff said:
So, like many '95 M3 owners, I was plagued by an intermittent CEL, generally between shifts 1-2 where the CEL would illuminate briefly, then go out. I could always feel a flat spot in the lower RPM range, and the car didn't feel like it had the amount of torque at the initial stab of the throttle like I assumed it should have. I would get code 1226 frequently, and frankly, it annoyed the piss out of me. Then, recently, I started getting code 1225 (knock sensor #1) every time it rained. At this point, the CEL would come on and stay on. I can't stand any orange warning lights shining in my face at night- time to fix the problem!

I ordered two new OEM Bosch knock sensors from RMEuropean a few weeks back, and decided I'd take a stab at it last night. My car is a 10/94 build, and I'd read that you must remove the intake manifold to get to KS #2. I wasn't about to do that, as I had the manifold off earlier this year and totally forgot to deal with the KS issues. (ugh )

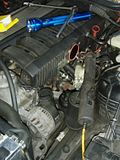
So I grabbed a 3/8" drive ratchet, a universal joint, a plethora of extensions, a florescent drop light, and a flat head screwdriver. I disconnected the TPS/removed the the throttlebody, unbolted the charcoal canister, unclipped the intake air temp sensor under the back side of the manifold near the brake booster/firewall, removed the alternator air duct, the hose off the lower part of the ICV, and the rest of the intake pipe (filter/silicone boot/MAF).

Note: click any of the pics to enlarge them.

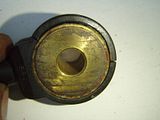
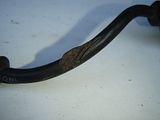
Immediately upon looking in, I located knock sensor #1. I removed and inspected it. Here's what I found. Note there are three visible cracks on the plastic housing, and the chafed wire.


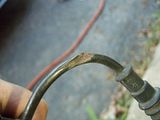
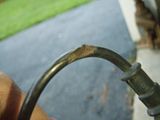
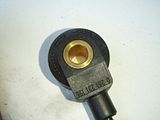
Chafed wire. On the new knock sensors, I put a piece of split loom wire covering on them. It fit perfectly (it's 3/8" for those of you wondering what size), and should help protect from this happening again. I also made sure when I torqued down the KS's that the wires weren't touching anything solid:


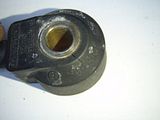
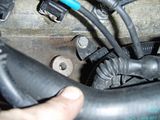
And here you can see the boss on the block where #1 goes:


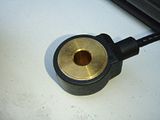
Here are pics of one of the two brand new OEM Bosch Knock sensors:


And the last pic- the only stuff I removed to replace both knock sensors. It took a total of 2.5hrs from start to finish to do this. Not bad at all.


I have no pics of doing KS #2- but rest assured, it's a bit more difficult than #1 (and I couldn't fit the camera in there either, too much crap in the way and I was in a hurry), but it's definitely doable from up top with basic hand tools!

No pics of it installed, but you get the point. Now moving on to the rear sensor. Unfortunately, I was in a hurry (didn't want to take my pickup to work today, so I went quickly, didn't take many pics )

As I previously stated, pulling the intake manifold was not an option. I just didn't feel like doing it again, even though it wouldn't have taken that much time. (keep in mind I started this around 7pm, finished by 9:30pm when it was fully dark out)

Above KS #2, there is a metal bracket. I'm guessing that someone prior to me had the manifold off before, as even when I pulled the manifold a few months ago, nothing was connected to it. Grabbed my trusty ratchet, slapped on a 1' extension with the universal joint and a 13mm socket. I reached in from the brake booster area past the starter. (YES, I had already unplugged the battery!) Got that bracket out no problem. It's two 13mm bolts. It's a bit tricky, but easy once you figure out that you need to move the main engine harness, and push that spider-looking coolant pipe out of the way. I wrapped a piece of speaker wire around them and tied them up to the manifold through those little holes.

Once that was removed, I tied a small piece of rope to the other bracket that's down there, and pulled out a few of the bolts for that as well. I tied it up to the oil fill cap, and it revealed the rear knock sensor! (#2- you know, the one that it seems is impossible to get from the top?)

Less than ten minutes later, I had the knock sensor removed, the boss on the block cleaned up, and the new sensor torqued back down (15ft lbs). Connect the wire, back in business! I then re-connected the intake air temp sensor, looked for any leaks (there were none, of course!), and started plugging things back in. Once I got everything under the manifold situated as far as the electronics go, I clamped on the lower ICV pipe, double-checked everything again, and re-installed everything else.

I wish I'd taken pics of this, but I hate driving my pickup in good weather. This is driving weather, and the pickup is NOT a "driver's" vehicle!

Every time I used to get in the car, I'd get that CEL flash between shifts 1-2, and the 1226 code would register. The car would have a flat spot in the lower RPM, felt like I was missing torque. (I WAS!) Now the car accelerates MUCH smoother than before, and has a noticeable amount more torque lower in the RPM band. It's not PUSH YOU IN THE SEAT better, but it's... much more "around town" friendly. When I roll into the skinny pedal, it does it's gentle "brace your neck" a bit better feeling. I adore it.
 

shaeff

Kurt is FTMFW x2!!!!
Staff member
Super Moderator
Mar 30, 2005
10,588
9
38
Around
If you're nimble, you sure can. Literally, the only tools I used were:

-3/8" drive ratchet
-A plethora of different extensions. Ideally, you'll want a 1', 6", 4", and a universal joint
-13mm socket
-10mm socket
-Flatblade screwdriver
-Drop light to see what I'm looking at
-Flashlight for places the drop light didn't illuminate

Your arms will get scratched up, and there's a lot of twisting your body into uncomfortable positions to get to that rear one, but it's certainly doable, as can be told by the fact that it only took me 2.5hrs, while being dark out most of the time. In the daylight, I could have cut a half hour easy off that time.

I paid about $160 (iirc) from RMEuropean for the knock sensors, and they ship a hell of a lot faster than Pelican Parts, while having more competitive pricing as well. (for most things)
 

shaeff

Kurt is FTMFW x2!!!!
Staff member
Super Moderator
Mar 30, 2005
10,588
9
38
Around
Back from the dead thread. Figured I'd throw this up here just for documentation:

Two weeks ago on a hard 7krpm 2nd -> 3rd gear shift, I snapped one of the rear mounting points for the differential in the M3. Damn near ripped the diff right out of the car, as with that sort of stress, the other two mounts nearly gave way. The bang it made nearly sent me through the sunroof. It was awesome.

I wont get too specific, but here's a cut/paste of a post I just made over on m3forum.net:

So I went out today around noon, maybe 1pm to start disassembling my subframe assy. Got it all pretty much broken down now.

I also received my new rear subframe, which was cool as hell. Someone tried to burn one or two of the bushings out. Whoever it was got one bushing's guts removed, but the steel sleeve remained. Of the five total subframe bushings (4 sub mounts, 1 diff mount) it only took me fifteen minutes to remove them all.

The MIS RTAB puller worked like a charm. I used a small propane torch to heat the subframe around the bushings, not hot, just warm them up- then used the RTAB puller to pop them right out. No issues at all.

I even put two larger nuts in between the end of the puller and the front diff bushing and used the same method. Popped right out. I'll weld my reinforcements either tomorrow (if I have time) or during the week/next weekend. Not sure when yet. Tomorrow I'm going to help my friend pull the front differential out of his pickup. In exchange for helping him do that, he's letting me use the shop press to take care of all the other bushings (upper/lower control arms, and the knuckle bushings.

I didn't pick up new wheel bearings yet, I have to go back and read where Cal got his *** wheel bearings, as I want to replace/repack them like he did.

My question for the day: Should I remove/loctite the bolts in my new 3.38 differential while it's out of the car? Is this something I should be worried about? The seller removed the rear cover and said everything looks great inside. Just wondering if this is worth while at this point in time.

Here's a bunch of pics I took of the progress.
"New" rear subframe. Note the surface rust- mostly from where someone tried to burn one or two of the bushings out then quit.


Left RTA detatched. After a few brief pics I kinda skipped the rest of disassembly. Once the subframe is out it's super easy to take apart. Took me only a few minutes with an 18mm open end wrench and an impact gun. <3 air tools:


Note the difference between these two pics. Old vs New:


Why I decided to replace rather than weld. This was failing before I got the car and I missed it while I was inspecting it. Live and learn:


Used my MIS Tools RTAB puller to remove the subframe bushings. Works very well if you lightly heat the outer subframe sleeve where the bushings are pressed into. Don't need it super hot, just enough to make the rubber greasy and they pop right out:


Even used it on the front differential mount bushing, simply using two larger nuts as spacers to push out the bushing. A little heat and it popped right out:


All the bushings from the subframe- the one that's already hogged out is the one that was burned out already:


My MIS RTAB tool:


And last for today, the bare subframe all ugly and surface rusted. I have an outdoor sandblaster so after I do the welding I'll blast it and paint. I decided I don't currently have the funds for powdercoating, as I've got a project car that sucks up lots of money. Paint will do until the project car is complete.


IJ.

Grumpy Old Man
Mar 30, 2005
38,728
0
0
61
I come from a land down under
Interesting to see that another manufacturer has screwed the pooch in the rear subframe design process....

Have to wonder if it's an age/loading thing as tire rubber gets better and the steel suffers from corrosion/stress?
 

shaeff

Kurt is FTMFW x2!!!!
Staff member
Super Moderator
Mar 30, 2005
10,588
9
38
Around
Yeah, except that the MKIII subframe seems much more robust than the e36's. There are several weak spots that I'm going to reinforce within the next week or so. I've researched a bit, and found that this particular failure isn't uncommon, but it's not the norm either. I've only got about 260bhp right now, but that was probably the icing on the cake. This subframe has seen better days. I'll post pics of my welding/progress here when I get it done.

I'm willing to bet that the steel was first to start to go. There is a decent amount of rust on the cracked areas. It looks like that bushing failed on my hard 2->3 shift, and on it's way ripping out, it just banana peeled the steel right out of the subframe. However, if I'd caught that bushing failing earlier (d'oh!) I might have been able to save the subframe. If the bushing started to loosen up, then my heavy right foot just kept tearing that steel out with every hard shift.
 

shaeff

Kurt is FTMFW x2!!!!
Staff member
Super Moderator
Mar 30, 2005
10,588
9
38
Around
Pics from today. Not very interesting, but I figured I'd document it anyhow. Let me just say that the control arm bushings (subframe ends) were a PITA even with the press. Those suckers didn't want to move. It's a 30 ton press. Anyway, I marked up the arms a little, but I don't care at this point. LOL.

Tip for you non BMW folk following- the lower control arms in the rear are essentially two pieces with a single 3/4" long stitch weld holding them together. They're designed to crumple on a side impact in order to preserve the subframe.


Interesting note- the new bushing is aluminum, both inner and outer sleeve. The old is steel. The weight difference is very noticeable when holding them. I wonder why they changed the composition?


New vs Old: