
Someone PM'd me (on another forum), asking about the biggest obstacles involved in a 1UZ Swap. I asked him a few questions to narrow things down and I gave my reply; I figured I might as well take my reply and make it more universal so that others may benefit from it, seeing as how 1UZ Swaps are becoming more common these days. If any one else has any thing to add, feel free to do so. If any one has any questions to ask, feel free to ask them. For the record, I plan on starting a build thread soon and it'll be a lot more specific and in-depth than this. This thread is just a brief overview.
Parts List:
Chambers has kindly provided us with a parts list for a 1UZ/W58 Swap.
For a 1UZ/R154 swap, the list is essentially the same with a few changes.
Now, there are a few things to consider once you've decided to do a 1UZ Swap.
What are you going to use the car for?
If it's going to be a track car, you can get rid of a bunch of shit (A/C, Power steering, etc), and the swap will be much easier. If the car is go going to be a daily driver, you're definitely going to want power steering, and you may or may not want A/C depending on where you live and how much money/effort you're willing to put into it. Keep in mind you will need to run a shorter belt if you're going to remove the A/C compressor, the part number is: 6PK1600. Any auto parts store should be able to cross-reference that part number and match it up with one of their own.
How much power do you intend on making?
Decide before anything if you want to do forced induction or not. If you want to turbocharge your car, you are going to want to stick to the 91-94 engines for multiple reasons (thicker rods, lower compression). You're also going to want to thoroughly service the engine and, depending on your power goals, you might want to change out the head gaskets and head bolts for MLS gaskets and ARP studs. Aside from that, your 1UZ will love boost.
If you want to keep it N/A but you want to make more power you absolutely NEED an aftermarket ECU. Piggy backs and airflow converters simply don't work on the 1UZ. There are far too many checks and balances to trick the ECU. Keep in mind, however that with just an ECU (Megasquirt, AEM, Haltec, electromotive, etc) with sequential fuel/ignition (get rid of those distributors!), you can easily achieve between 300-320rwhp/torque. Proper tuning is key.
Are you going to use a manual transmission or retain the auto?
If you're going to retain automatic, it's going to be smooth sailing and the swap is going to be very inexpensive for you; but you're also going to be extremely lame and unhappy. You're also not going to make nearly as much power because the automatic transmission saps a substantial amount of it; you might as well just buy an SC400.
If you're going to do a manual conversion, you need to consider a few things. You need to decide between the W58 or the R154. Fortunately, this all ties in with the previous two questions. If you plan on staying N/A, I recommend you use a W58. There are going to be some naysayers who will try to convince you that the W58 is a garbage/weak transmission, but it simply isn't true. The W58 is a great transmission, and it shifts as smooth as butter. No matter how much power you make on an N/A motor (ecu, ITBs, cams, whatever) you won't exceed the capabilities of a W58. There are many benefits to the W58; the conversion kits are a lot cheaper, it's easy to find a replacement transmission, they shift smooth, the gear ratios are short and great for drifting (this is also a drawback, because the short ratios aren't too great on the road, but this can almost be offset with the correct differential).
If you plan on doing any sort of forced induction, skip the bullshit and get an R154 from the start. It's a lot more expensive to replace the transmission and buy the conversion kit, but it's worth it. The R154 is a clunky transmission, but it'll will take tons of abuse so long as its weaknesses are addressed (first gear thrust washer).
What chassis is the motor going in to?
If it's a late 86 - early '89, you're going to need to do some hammering to the firewall, and you MAY or MAY NOT need to do something about the ABS brake lines. I used an early '89 chassis, and the ABS brake lines/shield actually blocked my motor. I suppose I could have hammered them in, or re-routed them, or maybe even just removed the shield! But I just decided to delete ABS. I'm not sure if others have experienced this, but if you decide to delete ABS, you're going to need some brake lines and a three-way splitter. If this is the case, do this BEFORE THE MOTOR IS IN THE CAR. You can either bend your own brand new lines and use a brand new splitter, or you can just pull some off of a non-ABS Supra.

If you decide to delete ABS, you're going to have to re-route the proportioning valve as such.
If your car is a '90-'92, you won't have to do a damn thing to your firewall or brake lines.
Now, when you buy your motor make sure to get one from an SC400. You need a rear sump oil pan to clear the sub frame. If you have the opportunity to pull a 1UZ out of the car yourself, be sure to also grab the Igniters and air flow meter.
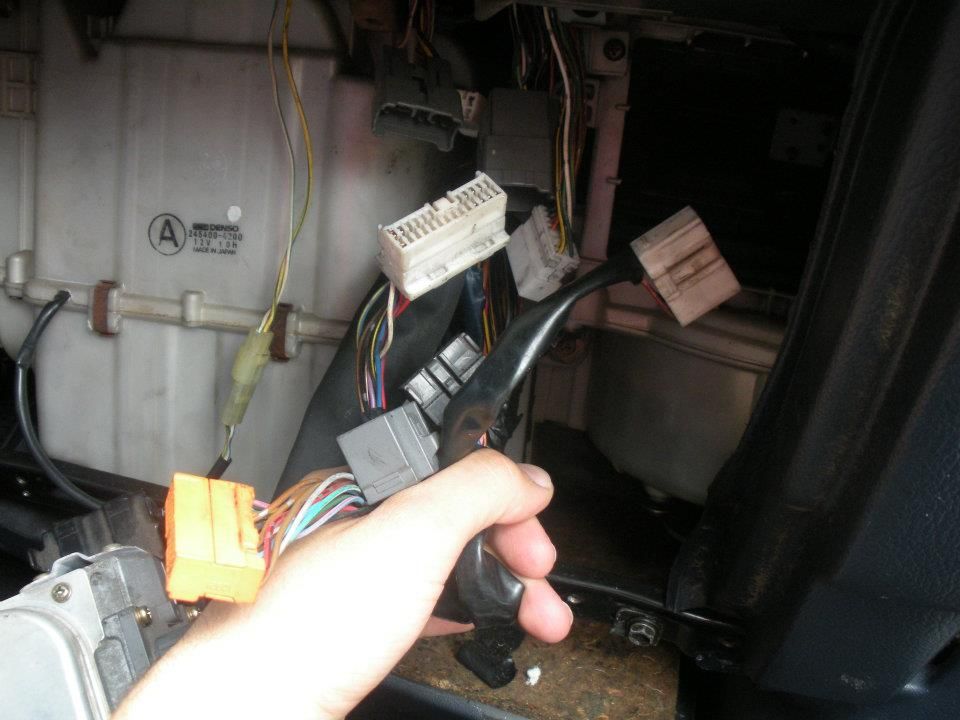
If the donor car is in (or on its way to) the junk yard, you might also want to cut off the male-side dash plugs, which plug into the four plugs shown above. On an SC400, they are located on the passenger-side kick panel

While you're at it, grab the engine bay harness; the two plugs that are near the igniters (8-pin and 3-pin) by the fuse box.
For the Manual Conversion Kit, there are a bunch of options available these days. I went with the Quantum Auto kit, but they've changed management and then subsequently gone out of business. They had the most complete kit available at the time; it came with a great clutch, bolts, and hoses and everything. There are a few other companies making these kits as well, so don't rule any one else out. Take the time to do your research and make a well-informed decision when it comes to your conversion kit.
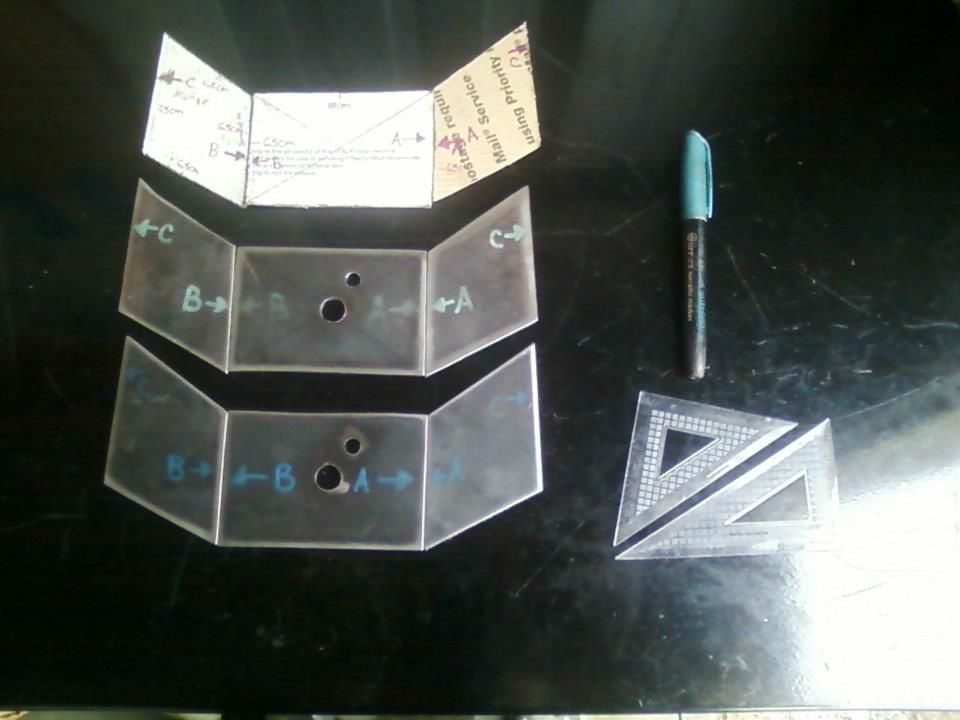
Motor Mounts:


For your motor mounts, you might have to do some searching. I'm sure there are some companies that make them; I just made my own, using a bare block and transmission to design them. Keep in mind that the differences between 86-89 and 89-92 still apply! My mounts were for an early '89 (square mounts).
There are a few things you should do to the motor before you install it; I learned the hard way.
First, do all of the maintenance. I was broke when I was doing my swap, so I couldn't afford to do much to it while it was out, but then I got a good job when the motor was already in, so I started up a service budget. I changed the timing belt and water pump and did a full tune up with new seals and valve cover gaskets and all that shit; it ended up being a good test, however. I found out that you can absolutely service a 1UZ inside an A70 engine bay, but the A/C compressor makes it very difficult. I had to jack the motor up to install and remove the compressor. Anyway, If you can afford it, go ahead and get it done before you proceed.
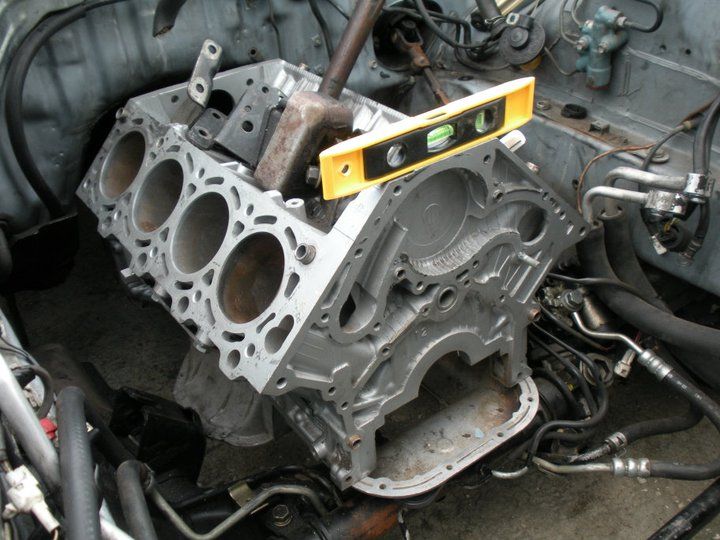
Second, assuming you have a 1UZ from an SC400, there's one pesky detail you have to change.
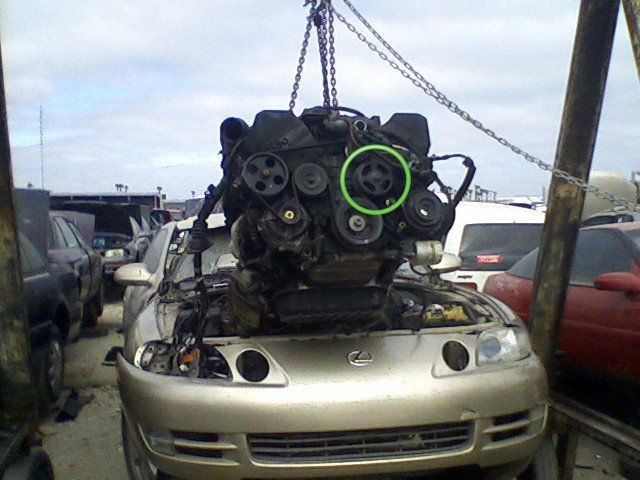
Do you see the idler pulley in the center? That pulley is also a hydraulic pump for the hydraulic radiator fans that SC400s use; similar to JZA70 Supras with 1JZs.

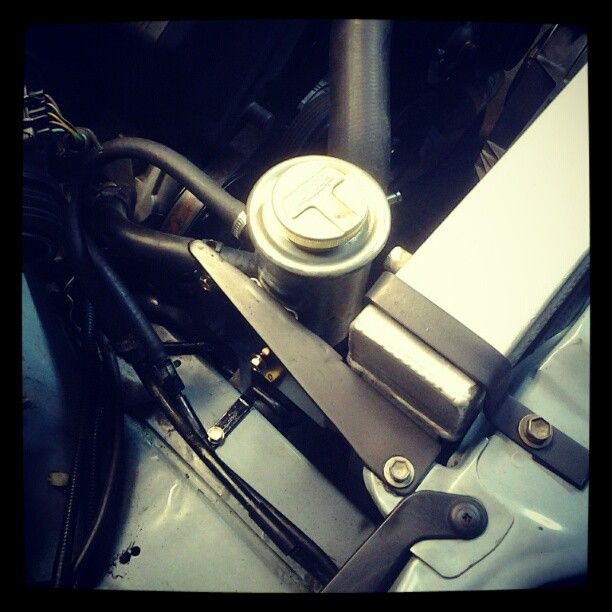
Go to the junk yard and pull the idler bracket from an LS400. You can also grab the power steering reservoir from the LS400 if you don't want to run a remote reservoir; alternatively, you can grab the reservoir from an N/A Supra.

Clean it up and get rid of the fan clutch. Then remove the studs using vice grips and install the pulley using M8 (10mm) bolts. Keep in mind you have to run an electric fan.

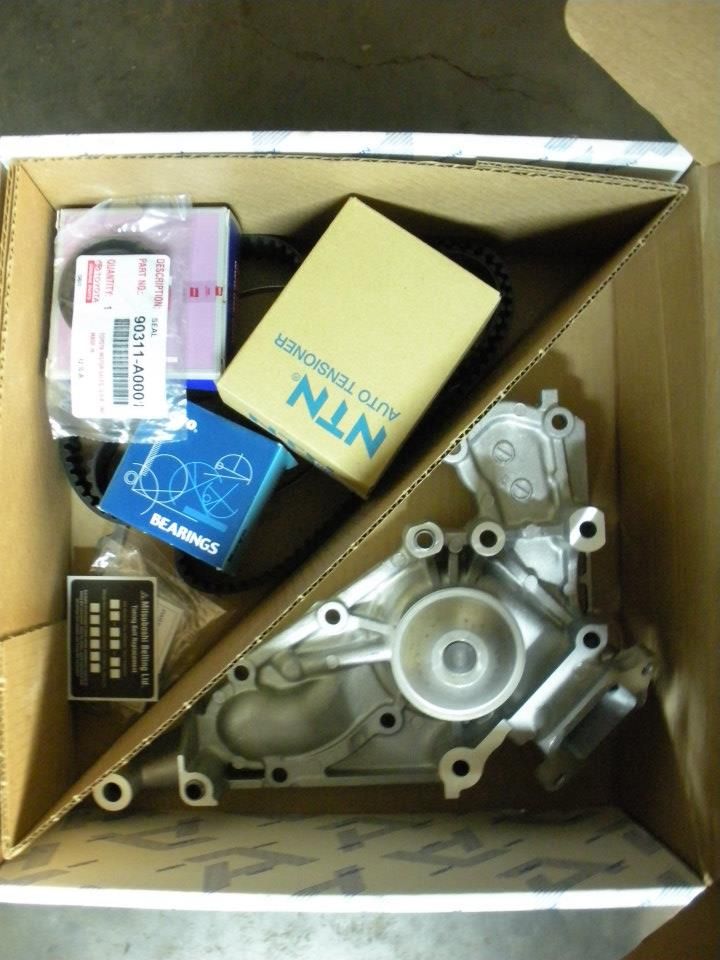
Since you have to take off most of the accessories/brackets to replace that idler bracket, this is the perfect time to replace the timing belt. Always go OEM when it comes to this shit; the kit I bought is an OEM AISIN kit, and it cost me somewhere around $260-$280. If you plan on turbocharging the car in the future, I recommend you also take this opportunity to replace the head gaskets with MLS (multilayer steel/metal) gaskets and replace the head bolts with ARP Studs. I also changed my water pump, but you really don't have to; especially if you have a low-mileage motor. The water pumps on these motors rarely ever go bad. I just changed mine out because I have OCD.

Also, be sure to change out the Cam and Crank seals; those become rock hard after so many years, and it's always a good idea to change them along with the timing belt.

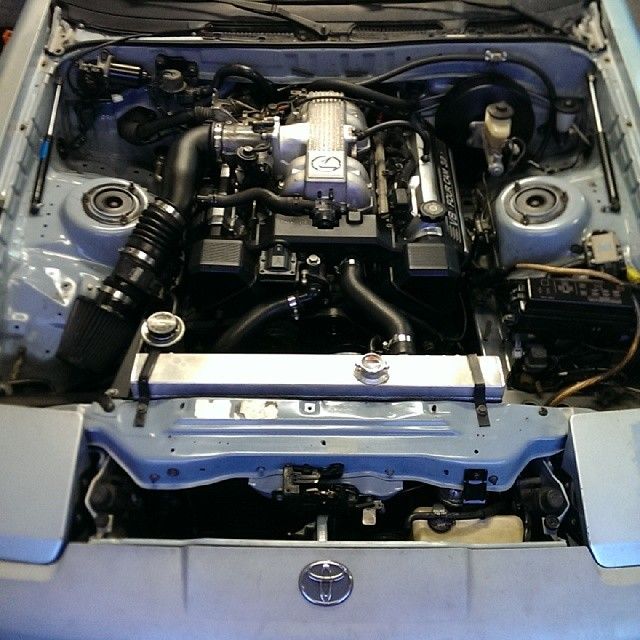
When it's all said and done, it should look something like this. The reason why you have to get rid of that hydraulic pulley is because it would just seize itself if you used it without hydraulic fluid circulating.
To get the motor to actually fit in the engine bay, you need to first do a couple of things:
1. Swap out the stock Brake booster for a 1984-1989 Toyota Pickup/Hilux brake booster. It's a lot thinner and it'll bolt right up. You just have to install it upside-down so that the vacuum port is on the right side. You might ALSO have to hammer a little dip in the booster so that it clears the valve cover; use a ball-peen hammer.


You also have to cut about an inch off the push-rod of the booster. Be sure to leave a nut on there so that you could clean up the treads after you make your cut.


As mentioned, you have to install the brake booster upside-down so that the vacuum port sits in the right spot.
It'll point downward, but that's nothing a longer 3/8th vacuum hose can't solve.
2. You need to remove the driver's side exhaust manifold heat shield so that it clears the steering column. [EDIT: removing the exhaust shield isn't necessary, but you have to hammer the shit out of it to get it to clear.
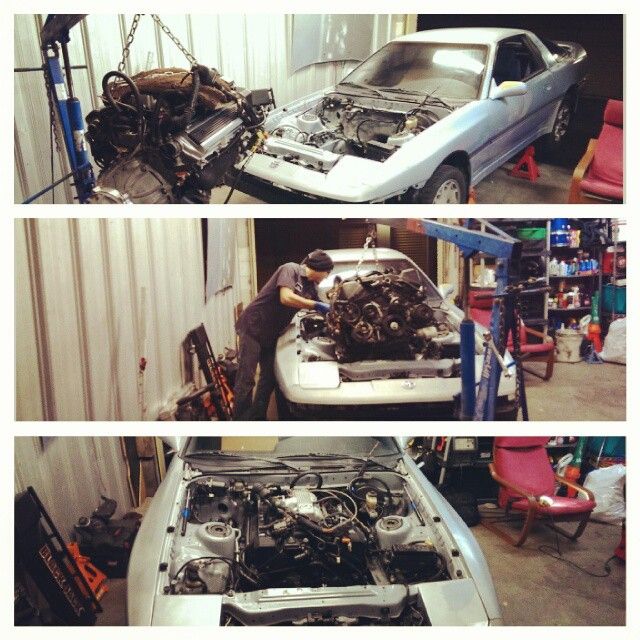
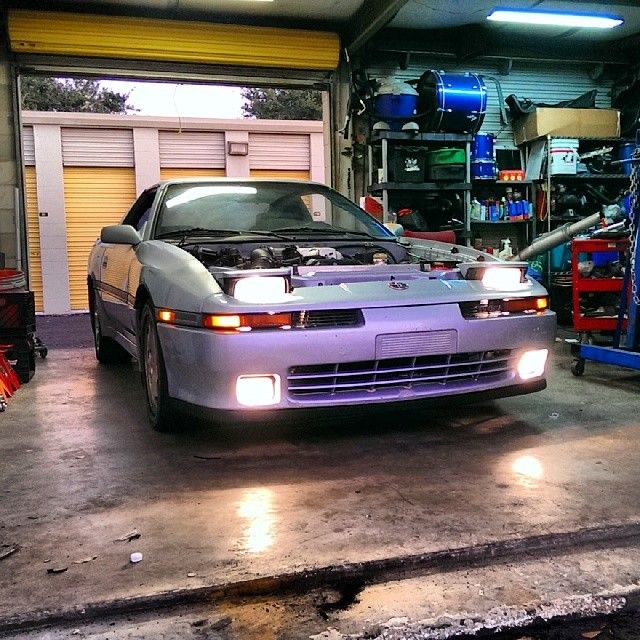
3. This may be common sense, but when you go to install the engine, first remove the bumper and crash bar so that the hoist can get as close as it needs to. Also, jack the rear of the car up, because the motor needs to go in at an aggressive angle.

You can see that the crash bar was stopping the hoist. I didn't take it off, I just extended the hoist arm to the maximum and it was just barely long enough to clear it. Removing the crash bar would make things much easier.

You can also see that I have jack stands in the rear and not in the front. This allowed me to crawl underneath the car to bolt up the motor/transmission mounts while also positioning the car at the correct angle for the motor to clear the firewall. [Note: The car was on stock suspension at the time. You'll also needs some stands up front if your car is lowered.
To get power steering to work, you need to get a custom high pressure line made. There's a local place around me called Amazon Hose and Rubber Co. that makes custom power steering lines for $70 each. All I had to do was bring my stock A70 Power steering line with the pump-side end piece of the 1UZ power steering line. They cut the end pieces off, added fittings to them, and then bolted them to a brand new two-piece power steering line, which can be separated in the middle; this makes draining a breeze. The return line can just be routed directly to the reservoir whether it be a remote set up or the LS400 internal reservoir.
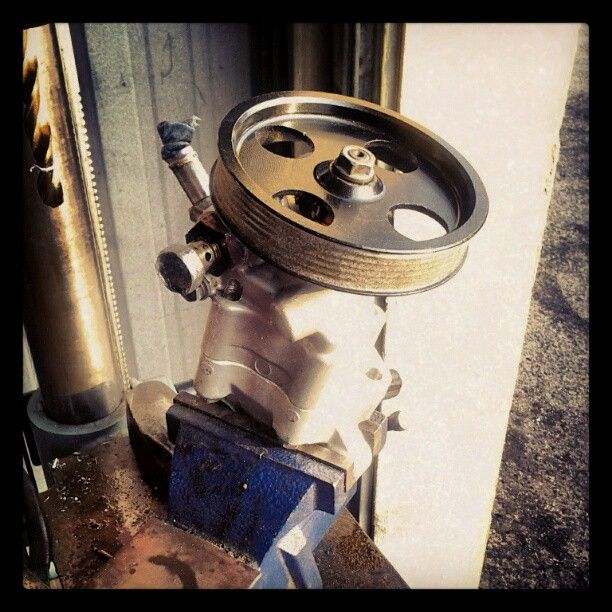
I also rebuilt my powersteering pump with a rebuild kit from Rock Auto. It only cost me $18 shipped and these pumps are notorious for blowing. It wasn't difficult to do with a slide hammer.
A/C is going to work the same way, but it's a LOT more complicated. You need to take both lines off of your Supra and take both lines off of an SC400; just tell them you want the SC400 ends on the Supra hoses.
Wiring is going to be another big thing. I finished mine, but it took me about three months of research and a lot of trial and error. Thank you Chambers for all of your efforts!

I hope this helps a few of you guys out. Thanks for reading.
Parts List:
Chambers has kindly provided us with a parts list for a 1UZ/W58 Swap.
Chambers;1748622 said:Off the top of my head for my car:
1UZ-FE From Oil Pan to ECU (Don't forget the bellhousing!)
W58
W58 cross member
W58 shifter
W58 driveshaft
Quantum Auto W58 Adapter kit
-QA Flywheel
-QA Clutch disk and pressure plate
-QA Slave cylinder/throw out bearing spacer
-QA Clutch Lines
-Bell housing to adapter plate bolts
-Pilot Bearing
1JZ-GTE ARP flywheel bolts
7M-GE pressure plate bolts
Quarter Master slave cylinder/throw out bearing #721-100
Engine mounts
Extend Alt power and regulator wires
Use 1UZ radiator and heater hoses
-Flipped long hose upside down and trimmed accordingly
-Short hose trimmed accordingly
-Extended drivers side heater hose
-Passenger side heater hose was good
Throttle cable from a early 90's Celica
Use stock Supra radiator with electric fans
7M Oil pressure sensor
-Removed the oil pressure switch (dummy light)
-Replaced with 7M sensor
Rear o2 sensor simulators
-4 Resistors # 271-133 (2 packs) 50 ohm wirewond resistors 10watt
-Diod Heat sinks
-Thermo paste
-Super glue
1986 Toyota Truck 4cyl brake booster
Tach driver from a 80’s celica
-Havent found one exactly right yet tho
I believe that’s it for my car...
For a 1UZ/R154 swap, the list is essentially the same with a few changes.
Chambers said:1UZ-FE From Oil Pan to ECU (Don't forget the bellhousing!)
R154
R154/W58 cross member [Same part#]
R154/W58 shifter [Same part#]
R154 drive-shaft
Quantum Auto R154 Adapter kit, Includes:
-QA Flywheel
-QA Clutch disk and pressure plate
-QA Clutch Lines
-Bell housing to adapter plate bolts
-Pilot Bearing
-7MGTE OEM Toyota flywheel bolts
-7MGTE OEM Toyota pressure plate bolts
Tilton Release Bearing #61-400

Engine mounts
Extend Alt power and regulator wires
Use 1UZ radiator and heater hoses
-Flipped long hose upside down and trimmed accordingly7MGE throttle cable
-Short hose trimmed accordingly
-Extended drivers side heater hose
-Passenger side heater hose was good
Use stock Supra radiator with electric fans
7M Oil pressure sensor
-Removed the oil pressure switch (dummy light)Rear o2 sensor simulators
-Replaced with 7M sensor
-4 Resistors # 271-133 (2 packs) 50 ohm wirewond resistors 10watt1984-1989 Toyota Pickup/Hilux 4cyl brake booster
-Diod Heat sinks
-Thermo paste
-Super glue
Tach driver from a 80’s celica
Now, there are a few things to consider once you've decided to do a 1UZ Swap.
What are you going to use the car for?
If it's going to be a track car, you can get rid of a bunch of shit (A/C, Power steering, etc), and the swap will be much easier. If the car is go going to be a daily driver, you're definitely going to want power steering, and you may or may not want A/C depending on where you live and how much money/effort you're willing to put into it. Keep in mind you will need to run a shorter belt if you're going to remove the A/C compressor, the part number is: 6PK1600. Any auto parts store should be able to cross-reference that part number and match it up with one of their own.
How much power do you intend on making?
Decide before anything if you want to do forced induction or not. If you want to turbocharge your car, you are going to want to stick to the 91-94 engines for multiple reasons (thicker rods, lower compression). You're also going to want to thoroughly service the engine and, depending on your power goals, you might want to change out the head gaskets and head bolts for MLS gaskets and ARP studs. Aside from that, your 1UZ will love boost.
If you want to keep it N/A but you want to make more power you absolutely NEED an aftermarket ECU. Piggy backs and airflow converters simply don't work on the 1UZ. There are far too many checks and balances to trick the ECU. Keep in mind, however that with just an ECU (Megasquirt, AEM, Haltec, electromotive, etc) with sequential fuel/ignition (get rid of those distributors!), you can easily achieve between 300-320rwhp/torque. Proper tuning is key.
Are you going to use a manual transmission or retain the auto?
If you're going to retain automatic, it's going to be smooth sailing and the swap is going to be very inexpensive for you; but you're also going to be extremely lame and unhappy. You're also not going to make nearly as much power because the automatic transmission saps a substantial amount of it; you might as well just buy an SC400.
If you're going to do a manual conversion, you need to consider a few things. You need to decide between the W58 or the R154. Fortunately, this all ties in with the previous two questions. If you plan on staying N/A, I recommend you use a W58. There are going to be some naysayers who will try to convince you that the W58 is a garbage/weak transmission, but it simply isn't true. The W58 is a great transmission, and it shifts as smooth as butter. No matter how much power you make on an N/A motor (ecu, ITBs, cams, whatever) you won't exceed the capabilities of a W58. There are many benefits to the W58; the conversion kits are a lot cheaper, it's easy to find a replacement transmission, they shift smooth, the gear ratios are short and great for drifting (this is also a drawback, because the short ratios aren't too great on the road, but this can almost be offset with the correct differential).
If you plan on doing any sort of forced induction, skip the bullshit and get an R154 from the start. It's a lot more expensive to replace the transmission and buy the conversion kit, but it's worth it. The R154 is a clunky transmission, but it'll will take tons of abuse so long as its weaknesses are addressed (first gear thrust washer).
What chassis is the motor going in to?
If it's a late 86 - early '89, you're going to need to do some hammering to the firewall, and you MAY or MAY NOT need to do something about the ABS brake lines. I used an early '89 chassis, and the ABS brake lines/shield actually blocked my motor. I suppose I could have hammered them in, or re-routed them, or maybe even just removed the shield! But I just decided to delete ABS. I'm not sure if others have experienced this, but if you decide to delete ABS, you're going to need some brake lines and a three-way splitter. If this is the case, do this BEFORE THE MOTOR IS IN THE CAR. You can either bend your own brand new lines and use a brand new splitter, or you can just pull some off of a non-ABS Supra.
If you decide to delete ABS, you're going to have to re-route the proportioning valve as such.
If your car is a '90-'92, you won't have to do a damn thing to your firewall or brake lines.
Now, when you buy your motor make sure to get one from an SC400. You need a rear sump oil pan to clear the sub frame. If you have the opportunity to pull a 1UZ out of the car yourself, be sure to also grab the Igniters and air flow meter.
If the donor car is in (or on its way to) the junk yard, you might also want to cut off the male-side dash plugs, which plug into the four plugs shown above. On an SC400, they are located on the passenger-side kick panel
While you're at it, grab the engine bay harness; the two plugs that are near the igniters (8-pin and 3-pin) by the fuse box.
For the Manual Conversion Kit, there are a bunch of options available these days. I went with the Quantum Auto kit, but they've changed management and then subsequently gone out of business. They had the most complete kit available at the time; it came with a great clutch, bolts, and hoses and everything. There are a few other companies making these kits as well, so don't rule any one else out. Take the time to do your research and make a well-informed decision when it comes to your conversion kit.
Motor Mounts:
For your motor mounts, you might have to do some searching. I'm sure there are some companies that make them; I just made my own, using a bare block and transmission to design them. Keep in mind that the differences between 86-89 and 89-92 still apply! My mounts were for an early '89 (square mounts).
There are a few things you should do to the motor before you install it; I learned the hard way.
First, do all of the maintenance. I was broke when I was doing my swap, so I couldn't afford to do much to it while it was out, but then I got a good job when the motor was already in, so I started up a service budget. I changed the timing belt and water pump and did a full tune up with new seals and valve cover gaskets and all that shit; it ended up being a good test, however. I found out that you can absolutely service a 1UZ inside an A70 engine bay, but the A/C compressor makes it very difficult. I had to jack the motor up to install and remove the compressor. Anyway, If you can afford it, go ahead and get it done before you proceed.
Second, assuming you have a 1UZ from an SC400, there's one pesky detail you have to change.
Do you see the idler pulley in the center? That pulley is also a hydraulic pump for the hydraulic radiator fans that SC400s use; similar to JZA70 Supras with 1JZs.
Go to the junk yard and pull the idler bracket from an LS400. You can also grab the power steering reservoir from the LS400 if you don't want to run a remote reservoir; alternatively, you can grab the reservoir from an N/A Supra.
Clean it up and get rid of the fan clutch. Then remove the studs using vice grips and install the pulley using M8 (10mm) bolts. Keep in mind you have to run an electric fan.
Since you have to take off most of the accessories/brackets to replace that idler bracket, this is the perfect time to replace the timing belt. Always go OEM when it comes to this shit; the kit I bought is an OEM AISIN kit, and it cost me somewhere around $260-$280. If you plan on turbocharging the car in the future, I recommend you also take this opportunity to replace the head gaskets with MLS (multilayer steel/metal) gaskets and replace the head bolts with ARP Studs. I also changed my water pump, but you really don't have to; especially if you have a low-mileage motor. The water pumps on these motors rarely ever go bad. I just changed mine out because I have OCD.
Also, be sure to change out the Cam and Crank seals; those become rock hard after so many years, and it's always a good idea to change them along with the timing belt.
When it's all said and done, it should look something like this. The reason why you have to get rid of that hydraulic pulley is because it would just seize itself if you used it without hydraulic fluid circulating.
To get the motor to actually fit in the engine bay, you need to first do a couple of things:
1. Swap out the stock Brake booster for a 1984-1989 Toyota Pickup/Hilux brake booster. It's a lot thinner and it'll bolt right up. You just have to install it upside-down so that the vacuum port is on the right side. You might ALSO have to hammer a little dip in the booster so that it clears the valve cover; use a ball-peen hammer.
You also have to cut about an inch off the push-rod of the booster. Be sure to leave a nut on there so that you could clean up the treads after you make your cut.
As mentioned, you have to install the brake booster upside-down so that the vacuum port sits in the right spot.
It'll point downward, but that's nothing a longer 3/8th vacuum hose can't solve.
2. You need to remove the driver's side exhaust manifold heat shield so that it clears the steering column. [EDIT: removing the exhaust shield isn't necessary, but you have to hammer the shit out of it to get it to clear.
3. This may be common sense, but when you go to install the engine, first remove the bumper and crash bar so that the hoist can get as close as it needs to. Also, jack the rear of the car up, because the motor needs to go in at an aggressive angle.
You can see that the crash bar was stopping the hoist. I didn't take it off, I just extended the hoist arm to the maximum and it was just barely long enough to clear it. Removing the crash bar would make things much easier.
You can also see that I have jack stands in the rear and not in the front. This allowed me to crawl underneath the car to bolt up the motor/transmission mounts while also positioning the car at the correct angle for the motor to clear the firewall. [Note: The car was on stock suspension at the time. You'll also needs some stands up front if your car is lowered.
To get power steering to work, you need to get a custom high pressure line made. There's a local place around me called Amazon Hose and Rubber Co. that makes custom power steering lines for $70 each. All I had to do was bring my stock A70 Power steering line with the pump-side end piece of the 1UZ power steering line. They cut the end pieces off, added fittings to them, and then bolted them to a brand new two-piece power steering line, which can be separated in the middle; this makes draining a breeze. The return line can just be routed directly to the reservoir whether it be a remote set up or the LS400 internal reservoir.
I also rebuilt my powersteering pump with a rebuild kit from Rock Auto. It only cost me $18 shipped and these pumps are notorious for blowing. It wasn't difficult to do with a slide hammer.
A/C is going to work the same way, but it's a LOT more complicated. You need to take both lines off of your Supra and take both lines off of an SC400; just tell them you want the SC400 ends on the Supra hoses.
Wiring is going to be another big thing. I finished mine, but it took me about three months of research and a lot of trial and error. Thank you Chambers for all of your efforts!
I hope this helps a few of you guys out. Thanks for reading.
Last edited: