It's finally running!!!!
My machinist has finished his job, so i figured maybe it's time to start up a build thread!
I got my first supra almost 2 years ago, a 87 N/A, it has been my daily driver since, it has a messed up rear quarter panel though... it would need at least $2k in body work, so i figured i need to pick up another supra!
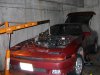
Meet the 87 Turbo! I picked her up for $700, as a car that doesnt really run, with lots of cranking and throttle it eventually started up, and as long as i held it above 2k rpm, stayed running, lol. Under load i had to keep it above 3000, or even if i floored it there would be no throttle response, and the engine wanted to bog down and die.
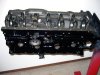
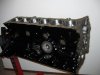
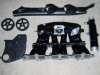
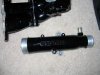
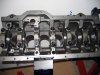
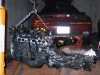
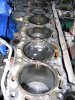
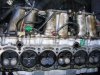
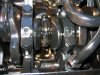
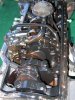
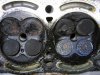
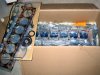
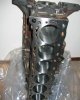
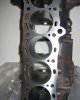
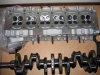
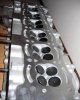
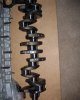
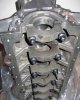
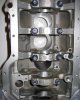
Since then, i have pulled the engine, i'll let the pictures do the rest of the talking :icon_razz
Current To-Do list to get it running!
http://www.supramania.com/forums/showpost.php?p=1048333&postcount=409
Current Modifications List Updated 8/28/08
Engine:
All New hoses, seals, bolts and hundreds of other new Toyota parts (not exclusive to engine)
Wiseco Forged Pistons & Wiseco Rings
ACL bearings
Fully balanced rotating assembly
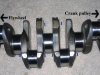
Prepped stock rods & crank
ARP Main Studs
ARP Rod bolts
ARP Headstuds
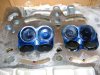
Cometic 1.8mm MHG
Driftmotion large Exhaust stud upgrade
Walbro 255
Bic Divorced Downpipe
Bic Test Pipe
Cooleeze 3" Catback
Magnaflow 3" straight through muffler
Bic Semi-Solid mounts
LIPP Stainless Steel Spark Plug Valley Cover
Stainless allen head valve cover hardware
Oiling system:
ARZ Oil supply hardline
Toyota pump spec'd out and shimmed 5.5mm
B&M Supercooler, 70274
Permacool Dual oil filter mount, 3/4-16 thread
Canton 90* Billet oil filter adapter
Mocal 180* Thermostat, -10 fittings
Aeroquip -10 socketless hose
Mocal -10 hose ends, straight and 90*
Mocal 1/2" NPT to -10 adaptors
Aeroquip -10 Tee (plus other adaptors for oil press and temp sensors)
Trasko Bypass filter
Forced Induction
Stock CT26 for Break-in
Ceramic coated oil lines
Flowed & Cleaned stock 440cc Injectors
Aeromotive AFPR Kit
ETS Intercooler kit, with black powdercoated charge pipes, and black couplers
Tial (knockoff) BOV
Driveline / Suspension:
RPS Cyn-R-G Flywheel
ARP Flywheel bolts
ACT 6 Puck sprung clutch
New Toyota bearings, shims, spring washers, p.p. bolts
Aisin pressure plate
Goodridge SS Brake lines
OPParts Rotors
PBR XBG Semi-Metallic pads
New Aisin clutch master & slave cylinders
Electronics:
MAFT Pro with Speed Density, and boost control
Innovate LC-1 Wideband
Lotek 2 gauge A-Pillar pod
Prosport Peak/Hold Oil Pressure gauge
Prosport Peak/Hold Oil Temperature gauge
Prosport Peak/Hold Boost gauge
Body:
Last on the list, this is my last priority! Function before form!
The car is slowly going through a color change from maroon to Black cherry Metallic (206)
The engine bay has been stripped, prepped, and painted
The hatch and hood have been stripped, prepped, and painted
My machinist has finished his job, so i figured maybe it's time to start up a build thread!
I got my first supra almost 2 years ago, a 87 N/A, it has been my daily driver since, it has a messed up rear quarter panel though... it would need at least $2k in body work, so i figured i need to pick up another supra!
Meet the 87 Turbo! I picked her up for $700, as a car that doesnt really run, with lots of cranking and throttle it eventually started up, and as long as i held it above 2k rpm, stayed running, lol. Under load i had to keep it above 3000, or even if i floored it there would be no throttle response, and the engine wanted to bog down and die.
Since then, i have pulled the engine, i'll let the pictures do the rest of the talking :icon_razz
Current To-Do list to get it running!
http://www.supramania.com/forums/showpost.php?p=1048333&postcount=409
Current Modifications List Updated 8/28/08
Engine:
All New hoses, seals, bolts and hundreds of other new Toyota parts (not exclusive to engine)
Wiseco Forged Pistons & Wiseco Rings
ACL bearings
Fully balanced rotating assembly
Prepped stock rods & crank
ARP Main Studs
ARP Rod bolts
ARP Headstuds
Cometic 1.8mm MHG
Driftmotion large Exhaust stud upgrade
Walbro 255
Bic Divorced Downpipe
Bic Test Pipe
Cooleeze 3" Catback
Magnaflow 3" straight through muffler
Bic Semi-Solid mounts
LIPP Stainless Steel Spark Plug Valley Cover
Stainless allen head valve cover hardware
Oiling system:
ARZ Oil supply hardline
Toyota pump spec'd out and shimmed 5.5mm
B&M Supercooler, 70274
Permacool Dual oil filter mount, 3/4-16 thread
Canton 90* Billet oil filter adapter
Mocal 180* Thermostat, -10 fittings
Aeroquip -10 socketless hose
Mocal -10 hose ends, straight and 90*
Mocal 1/2" NPT to -10 adaptors
Aeroquip -10 Tee (plus other adaptors for oil press and temp sensors)
Trasko Bypass filter
Forced Induction
Stock CT26 for Break-in
Ceramic coated oil lines
Flowed & Cleaned stock 440cc Injectors
Aeromotive AFPR Kit
ETS Intercooler kit, with black powdercoated charge pipes, and black couplers
Tial (knockoff) BOV
Driveline / Suspension:
RPS Cyn-R-G Flywheel
ARP Flywheel bolts
ACT 6 Puck sprung clutch
New Toyota bearings, shims, spring washers, p.p. bolts
Aisin pressure plate
Goodridge SS Brake lines
OPParts Rotors
PBR XBG Semi-Metallic pads
New Aisin clutch master & slave cylinders
Electronics:
MAFT Pro with Speed Density, and boost control
Innovate LC-1 Wideband
Lotek 2 gauge A-Pillar pod
Prosport Peak/Hold Oil Pressure gauge
Prosport Peak/Hold Oil Temperature gauge
Prosport Peak/Hold Boost gauge
Body:
Last on the list, this is my last priority! Function before form!
The car is slowly going through a color change from maroon to Black cherry Metallic (206)
The engine bay has been stripped, prepped, and painted
The hatch and hood have been stripped, prepped, and painted
Attachments
Last edited:

")