
DO NOT ATTEMPT TO USE THESE CHEMICALS WITHOUT AN APPROPRIATE RESPIRATOR AND ADEQUATE VENTILATION. THEY CAN KILL YOU. ALWAYS FOLLOW THE RECOMMENDATION OF THE CLEAR COAT MANUFACTURER. APPROPRIATE EQUIPMENT IS REALLY NOT THAT EXPENSIVE SO JUST SPEND THE MONEY AND QUIT BEING A CHEAP ASS.
www.hotrodders.com and www.paintucation.com has a lot of good tips on their forums for how to paint. Look there for general practices and familiarize yourself with them.
Now that out of the way, lets get down to business. Here is what I used:
All of this stuff will cost about 100 bucks. The process can take up to 4 days so make sure you have the space available.
Ensure that your workbench or paint area is clean before starting this. Vacuum, hose on the floor, whatever. You get the idea. The room doesnt have to be perfect but it should be relatively clean to where you dont kick up a lot of dust by moving around or spraying. I like to vacuum with the shop vac first and lay down plastic on the work bench.
Remove your taillights from the car and separate the outer lens CAREFULLY from the back side.
I wear gloves when washing and after washing to ensure I dont get the lights oily!
Once they are separated, take the outer lenses to a utility or kitchen sink and scrub them clean using part of the scrub pad and Ajax. This will remove any garbage you have on the lights and roughen up the exterior surface to aid in the adhesion. The Ajax is preferred but not necessary. Just ensure that the soap you use dissolves without leaving a film. Ensure that You scrub every square inch of the exterior of the lens to include the black trim around the sides.
Once they have dried (air hose?) look over them to ensure that there is no gloss left on the surface. If there is, spot scrub/sand it. Dont worry about surface cracks too much. The clear will fill them in and minimize their appearance if they dont disappear altogether!
When they are properly prepped, lay the lenses out with their edges off of the flat surface you are using to rest them on. I like a bench better than the floor because there is less dust. Prop it up with whatever you may find. Just ensure it is clean. They should lay relatively parallel to the ground so that you can lay the clear on thick while minimizing runs.
Once everything is set up and you are satisfied with how they lay out on your work surface, go over the lenses lightly with your tack cloth to get off the dust. PUT ON YOUR RESPIRATOR AND ENSURE YOU HAVE ADEQUATE VENTILATION. Spray the plastic adhesion promoter according to the directions on the can. While it is setting on the lenses start mixing your clear coat.
The first coat of clear I sprayed was not tinted. I do not know how the tint would affect the adhesion of the first coat so I didnt try it. I recommend, because I know it works, to keep the first coat clear.
Once the clear has been mixed with the hardener, dump it in the gun and get ready. If you have never sprayed before I recommend trying it out on a junk piece of something to get a feel for it. Configure your gun to spray how you want it.
Lightly go over the lights again with a tack rag.
Spray a light coat of clear followed by a good wet coat of clear. Wait 20 minutes or so and then spray another coat of clear. I like to put the lights under or next to a halogen light in between coats to help it harden up and minimize runs. Ensure you have sprayed the entire exterior of the light to include the black edges. Dont freak out if you have some small dust particles in it. Hair, yes, get it out. You wont even be able to tell once you are all done with the process.
Take a look at your lights. They should look new! If they do not have a glossy appearance, chances are that you did not spray it on thick enough. Make sure you clean your gun out and remember not to stir up dust doing it.
Once this first set of coats has been completed, let it sit for about 12 hours or until the clear has hardened enough to sand without clumping. Go over the exterior of the lights again with your red 3m style pad and roughen it up for the next coat. You wont need the plastic adhesion promoter anymore.
I used the Omni Cleaner (NOT SOLVENT; they are two completely different things) to wipe the lights off prior to spraying to remove any suspected surface contaminants. You can use isopropyl alcohol too...
I had to put about 20 drops of black pigment per mix/application of clear to get the coats to make a difference in the tint appearance. You will get a feel for it after a few applications. Mix up the clear with the tint and repeat the previous.
You will keep applying tinted clear over the next couple of days until you are satisfied with the darkness of the lenses. Once they are dark enough spray a couple coats of UNTINTED clear. They should be dry and ready to put on in 24 hours.
After you are all done, wet sand as necessary. I wait until I put the lenses back on the car to sand and buff. When I put my lenses back together I applied some RTV where Toyota had their factory adhesive. It helps to eliminate vibration. You will know what im talking about when you take them apart.
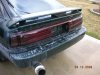
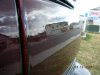
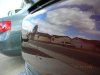
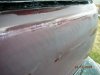
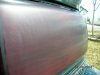
The attached pics are after the lights were completed and cured for a few months. The last one is what it looks like after 2000 grit sanding. You can see the orange peel on the passenger side lens - it will all come off. The drivers side lens came out very nice and flat.
Best of luck and please ask questions if you have them.
www.hotrodders.com and www.paintucation.com has a lot of good tips on their forums for how to paint. Look there for general practices and familiarize yourself with them.
Now that out of the way, lets get down to business. Here is what I used:
- Respirator with appropriate filter
- Ventilated, relatively dust free room (clean garage will do for these small items
- One $19.99 harbor freight detail gravity feed paint gun. Mine has a small .8 mm tip and is purple.
- An air compressor with an inline water separator/filter. Make sure it has enough cfm to run your gun
- One quart of PPG or Omni clear coat with hardener (Paint store)
- Small can of solvent to clean your paint gun (Paint store)
- Small can of cleaner or isopropyl alcohol to clean off grease/oil right before paint
- Some tint for the clear. I used some black pigment that I had them put in a drip bottle. You will need about 1/8 cup of this. (Paint store)
- A red, 3M scrub pad. (Paint store)
- Ajax powder cleaner
- Plastic adhesion promoter (Get at Paint store)
- Tack cloth (Paint store)
- Box of latex or nitrile gloves
- Roll of blue shop towels or equivalent lint free towels
All of this stuff will cost about 100 bucks. The process can take up to 4 days so make sure you have the space available.
Ensure that your workbench or paint area is clean before starting this. Vacuum, hose on the floor, whatever. You get the idea. The room doesnt have to be perfect but it should be relatively clean to where you dont kick up a lot of dust by moving around or spraying. I like to vacuum with the shop vac first and lay down plastic on the work bench.
Remove your taillights from the car and separate the outer lens CAREFULLY from the back side.
I wear gloves when washing and after washing to ensure I dont get the lights oily!
Once they are separated, take the outer lenses to a utility or kitchen sink and scrub them clean using part of the scrub pad and Ajax. This will remove any garbage you have on the lights and roughen up the exterior surface to aid in the adhesion. The Ajax is preferred but not necessary. Just ensure that the soap you use dissolves without leaving a film. Ensure that You scrub every square inch of the exterior of the lens to include the black trim around the sides.
Once they have dried (air hose?) look over them to ensure that there is no gloss left on the surface. If there is, spot scrub/sand it. Dont worry about surface cracks too much. The clear will fill them in and minimize their appearance if they dont disappear altogether!
When they are properly prepped, lay the lenses out with their edges off of the flat surface you are using to rest them on. I like a bench better than the floor because there is less dust. Prop it up with whatever you may find. Just ensure it is clean. They should lay relatively parallel to the ground so that you can lay the clear on thick while minimizing runs.
Once everything is set up and you are satisfied with how they lay out on your work surface, go over the lenses lightly with your tack cloth to get off the dust. PUT ON YOUR RESPIRATOR AND ENSURE YOU HAVE ADEQUATE VENTILATION. Spray the plastic adhesion promoter according to the directions on the can. While it is setting on the lenses start mixing your clear coat.
The first coat of clear I sprayed was not tinted. I do not know how the tint would affect the adhesion of the first coat so I didnt try it. I recommend, because I know it works, to keep the first coat clear.
Once the clear has been mixed with the hardener, dump it in the gun and get ready. If you have never sprayed before I recommend trying it out on a junk piece of something to get a feel for it. Configure your gun to spray how you want it.
Lightly go over the lights again with a tack rag.
Spray a light coat of clear followed by a good wet coat of clear. Wait 20 minutes or so and then spray another coat of clear. I like to put the lights under or next to a halogen light in between coats to help it harden up and minimize runs. Ensure you have sprayed the entire exterior of the light to include the black edges. Dont freak out if you have some small dust particles in it. Hair, yes, get it out. You wont even be able to tell once you are all done with the process.
Take a look at your lights. They should look new! If they do not have a glossy appearance, chances are that you did not spray it on thick enough. Make sure you clean your gun out and remember not to stir up dust doing it.
Once this first set of coats has been completed, let it sit for about 12 hours or until the clear has hardened enough to sand without clumping. Go over the exterior of the lights again with your red 3m style pad and roughen it up for the next coat. You wont need the plastic adhesion promoter anymore.
I used the Omni Cleaner (NOT SOLVENT; they are two completely different things) to wipe the lights off prior to spraying to remove any suspected surface contaminants. You can use isopropyl alcohol too...
I had to put about 20 drops of black pigment per mix/application of clear to get the coats to make a difference in the tint appearance. You will get a feel for it after a few applications. Mix up the clear with the tint and repeat the previous.
You will keep applying tinted clear over the next couple of days until you are satisfied with the darkness of the lenses. Once they are dark enough spray a couple coats of UNTINTED clear. They should be dry and ready to put on in 24 hours.
After you are all done, wet sand as necessary. I wait until I put the lenses back on the car to sand and buff. When I put my lenses back together I applied some RTV where Toyota had their factory adhesive. It helps to eliminate vibration. You will know what im talking about when you take them apart.
The attached pics are after the lights were completed and cured for a few months. The last one is what it looks like after 2000 grit sanding. You can see the orange peel on the passenger side lens - it will all come off. The drivers side lens came out very nice and flat.
Best of luck and please ask questions if you have them.
Attachments
Last edited: