Chrisco's 1992 Supra Build (PICTURE HEAVY)

TweeT91109

New Member
Jan 7, 2010
738
0
0
Tampa, Florida, United States
Chrisco;1777614 said:
ehdb84.jpg


jkbolk.jpg


2whnq6f.jpg


258perk.jpg


And then a friend of mine started taking a photography class and wanted to practice some night shots, so I figured I'd post up a few.
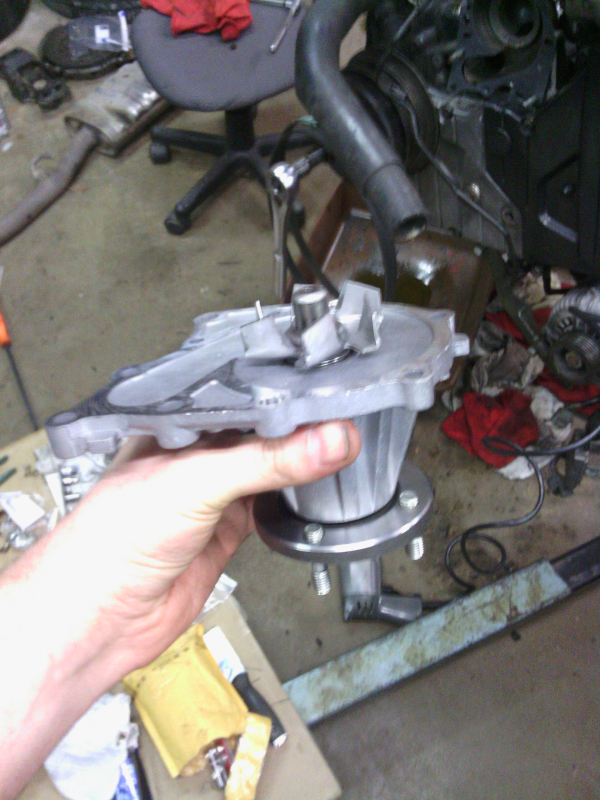
2v007zm.jpg


2v2y3xj.jpg


5ahkz4.jpg


fuc9dd.jpg


2rnj4ef.jpg


dwexoy.jpg

This thing looks great. Keep up the great work man.
 

Chrisco

Build in Progress
Jan 4, 2009
62
0
0
Downers Grove, IL
ForcedTorque;1786313 said:
Beautiful car! I have a suggestion for while the motor is out...................

That was $700 wasted, but it was beautiful. I gave that car to jugodegolf, and he had it painted by an idiot. He then gave up on trying to fix it. I gave up on that car when I got my 92. Anyway, the sun made the front half of that picture turn orange. It is the color of the firewall.


BTW.......let me know by PM if you would like to be a part of the 92 owners group on here.

I assume you're meant to paint the engine bay? I thought about pulling everything out and spraying a coat or two of clear, but really it doesn't need it and it's not going to be a show car. Really it just took about an hour of rubbin with some all-purpose cleaner and it shines beautifully in there. Yours looks great, though!

And thanks to everyone else for the compliments!
 

Chrisco

Build in Progress
Jan 4, 2009
62
0
0
Downers Grove, IL
lithium14;1786344 said:
what are your wheel specs? it looks damn near perfect

Wheels - Front: 17x8.5 +25 Offset - Rear: 17x10 +30 Offset

Tires - Front: 235/45/17 - Rear: 275/40/17

No rolling of the fenders. The fronts haven't rubbed at all, the left rear has rubbed a couple of times when hitting some larger bumps/potholes; but the car is on the original struts still. Minor rolling of the fenders would probably be necessary to step up the width at all, or run a lower profile (I prefer having a bit of sidewall).
 

SpecialK

...
Sep 1, 2008
25
0
1
Michigan
Its good to see another clean mk3 in the Chicago area!

Do you work a Navistar?

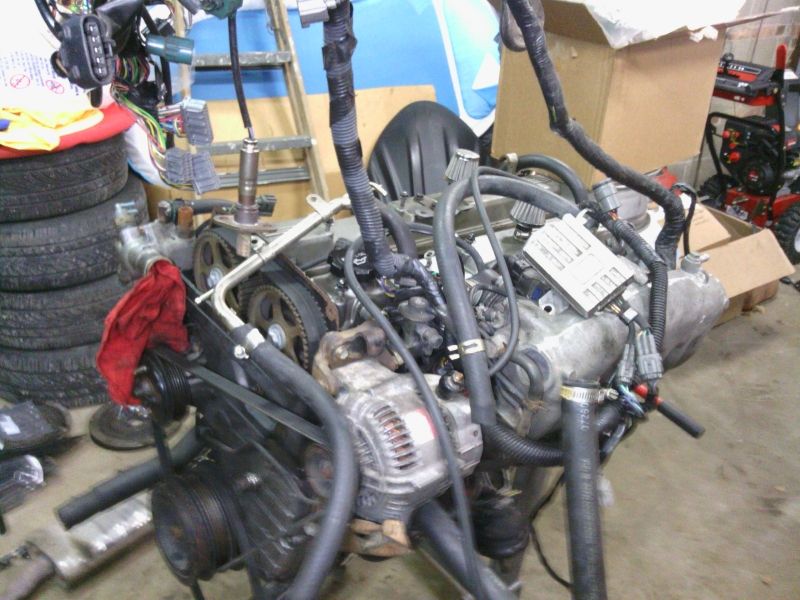
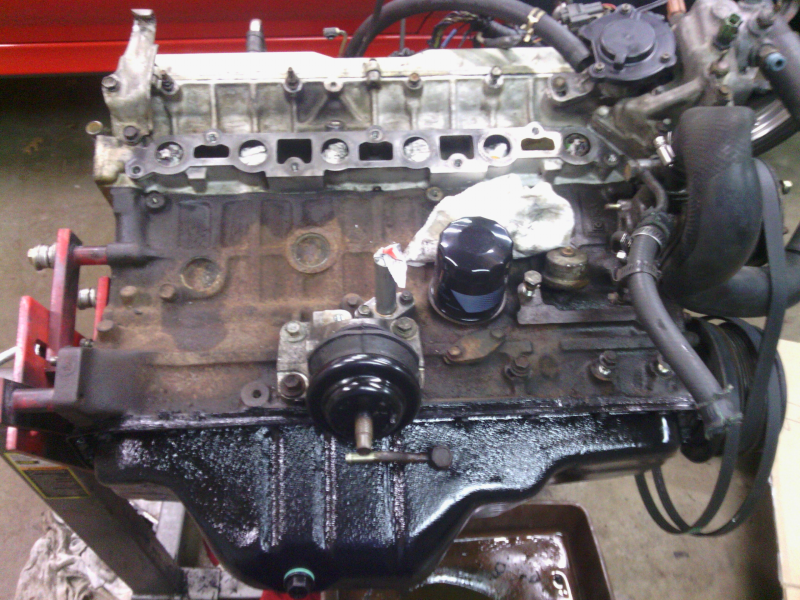
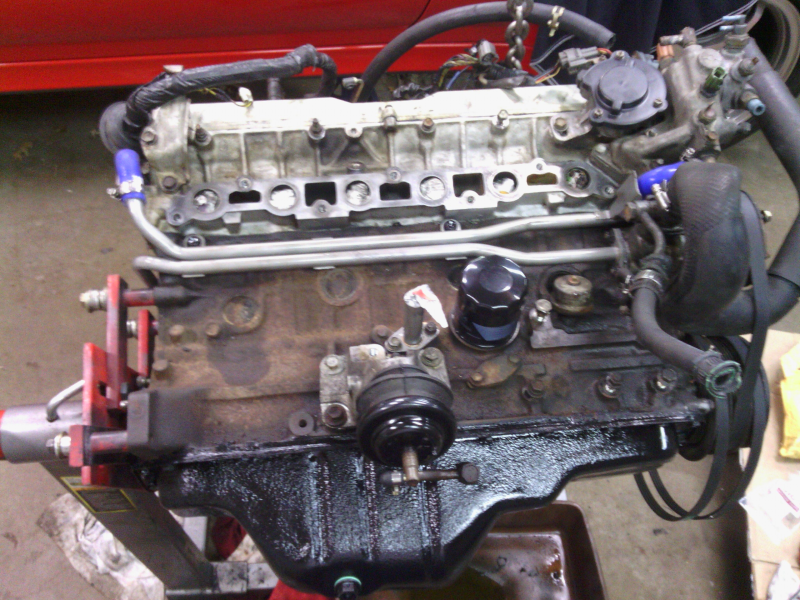
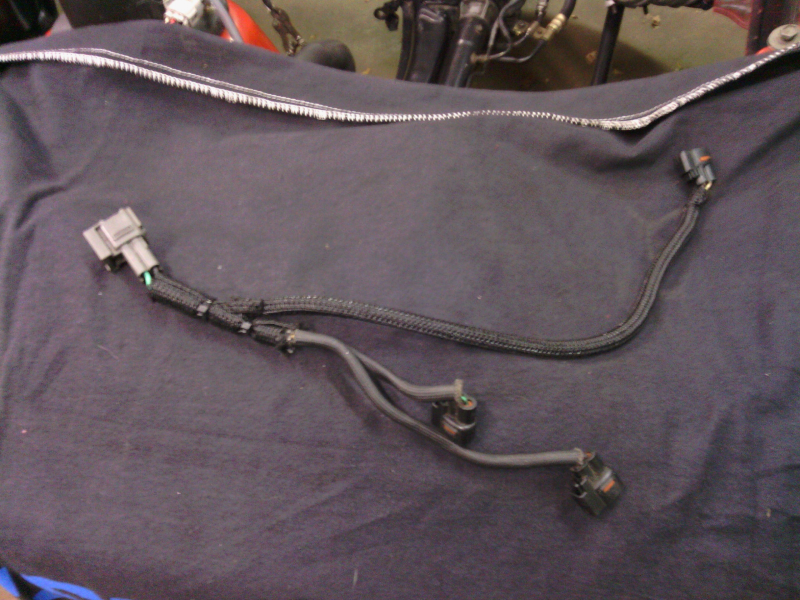
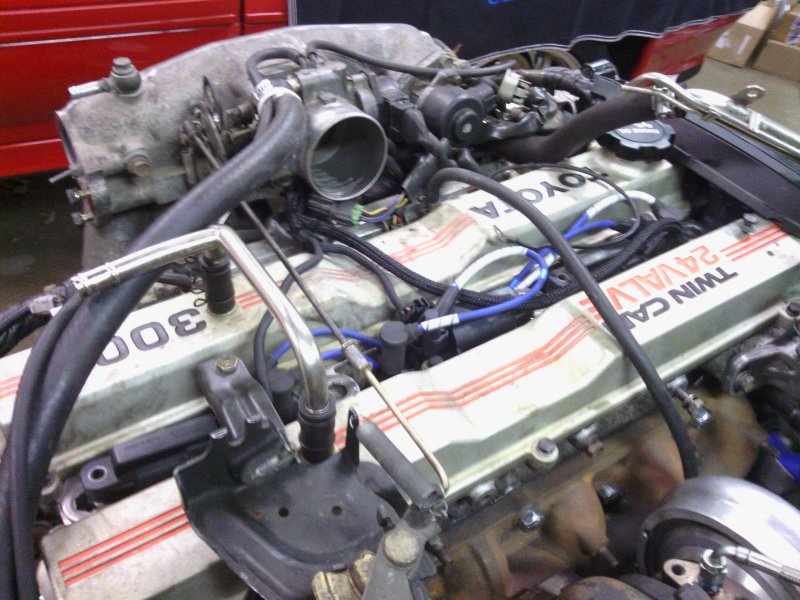
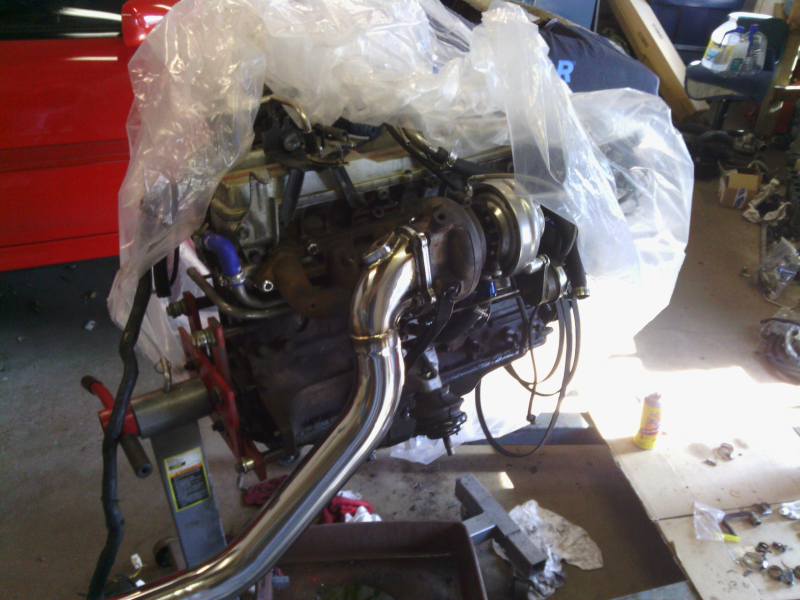
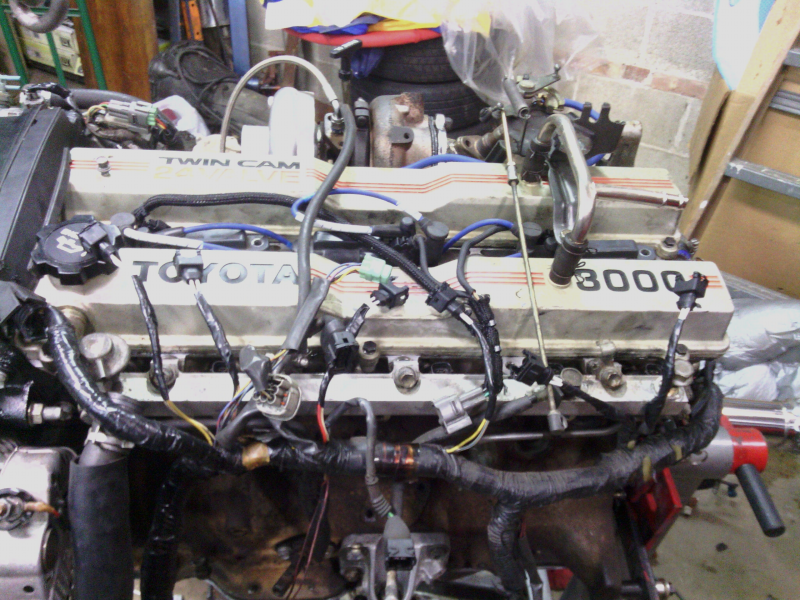
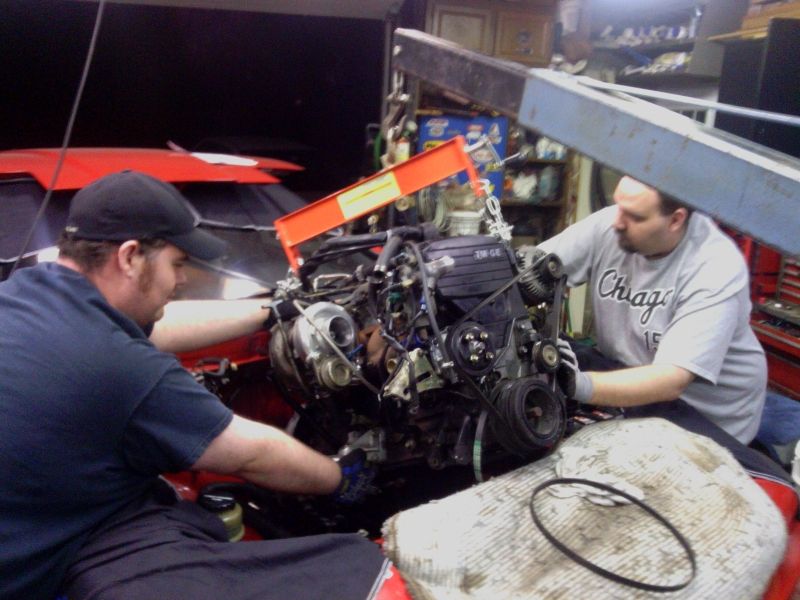
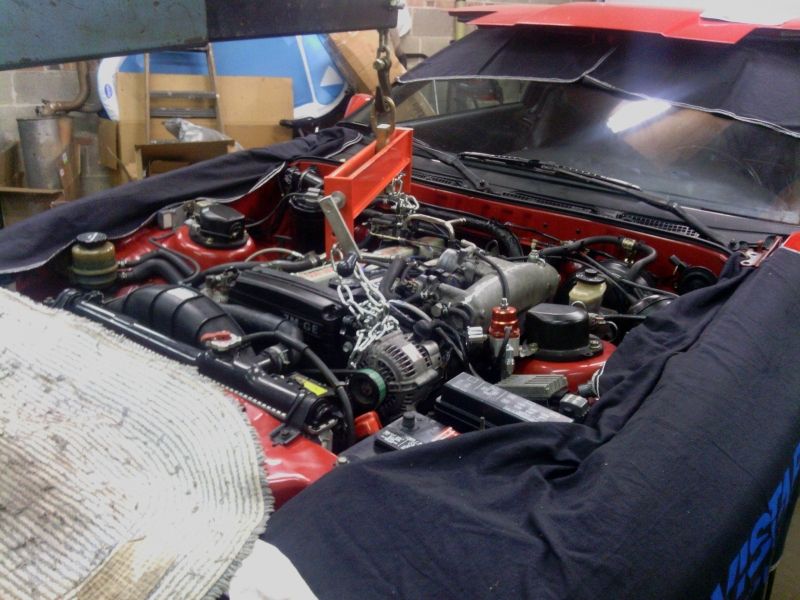
Chrisco;1777616 said:
6yf6hj.jpg


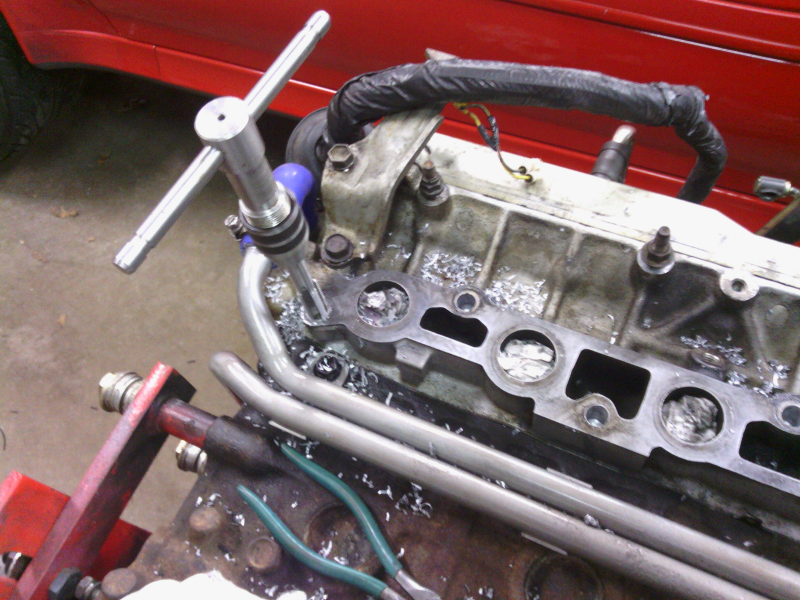
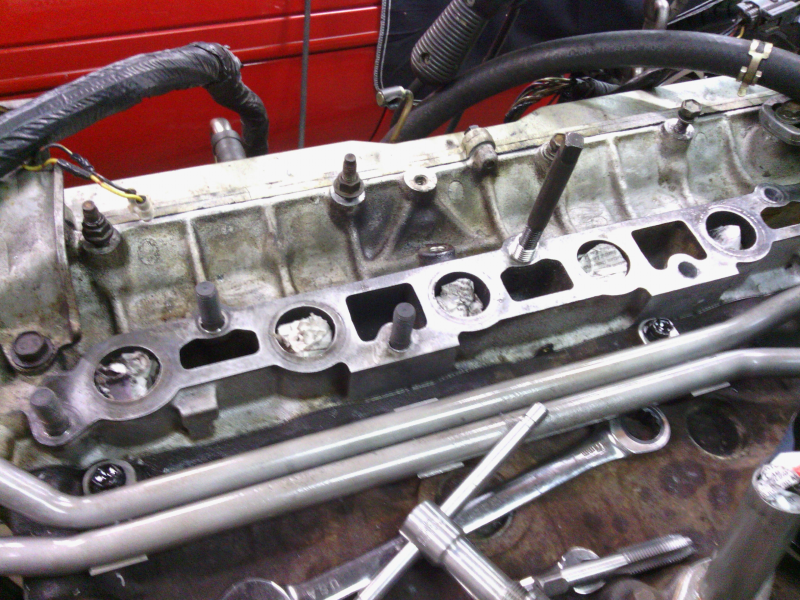
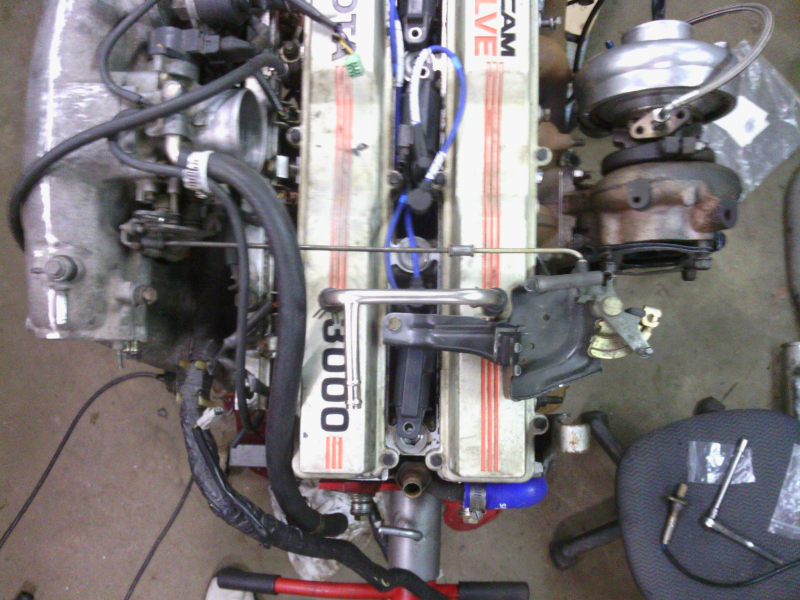
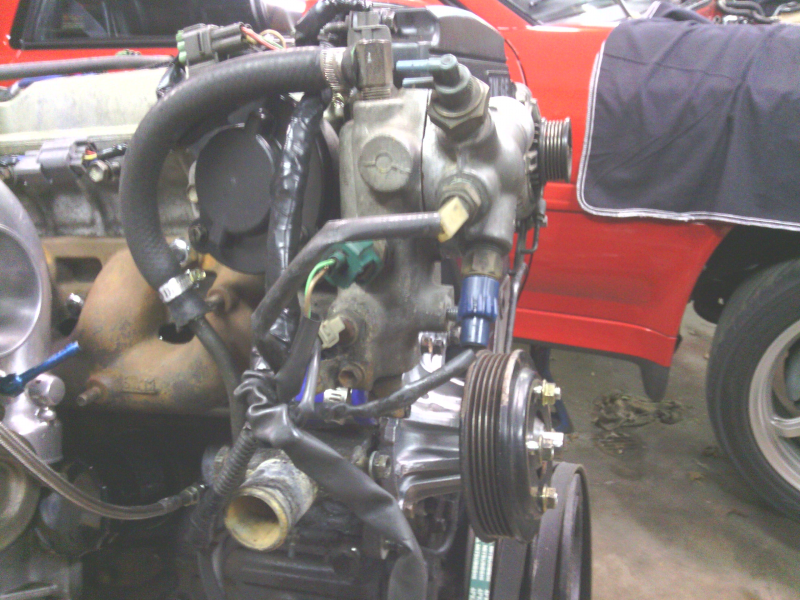
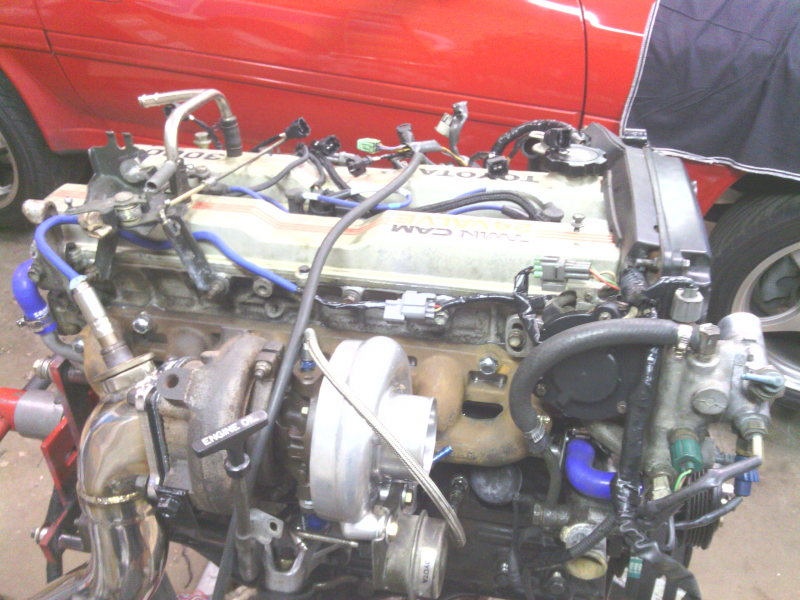
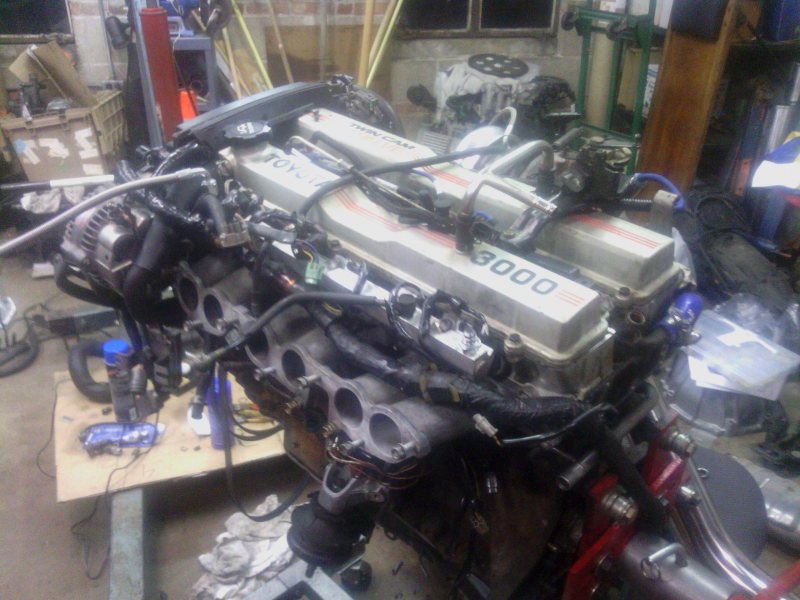
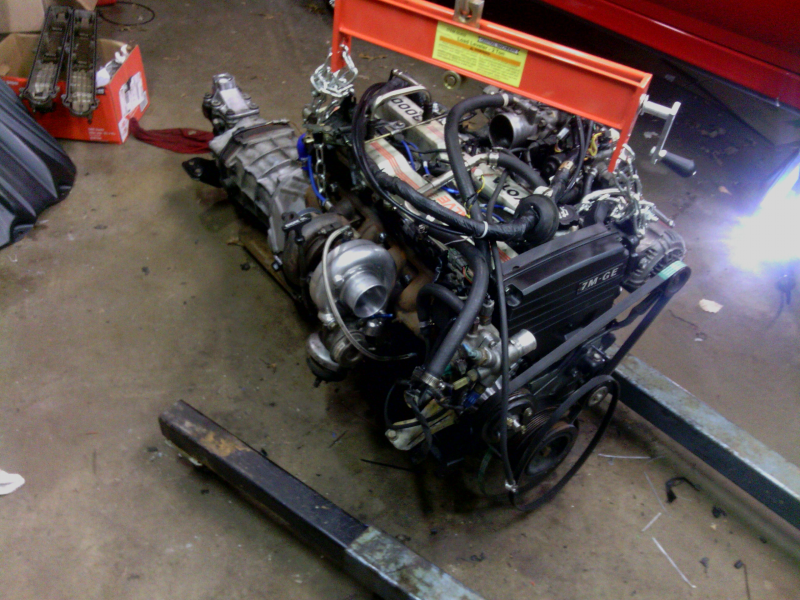
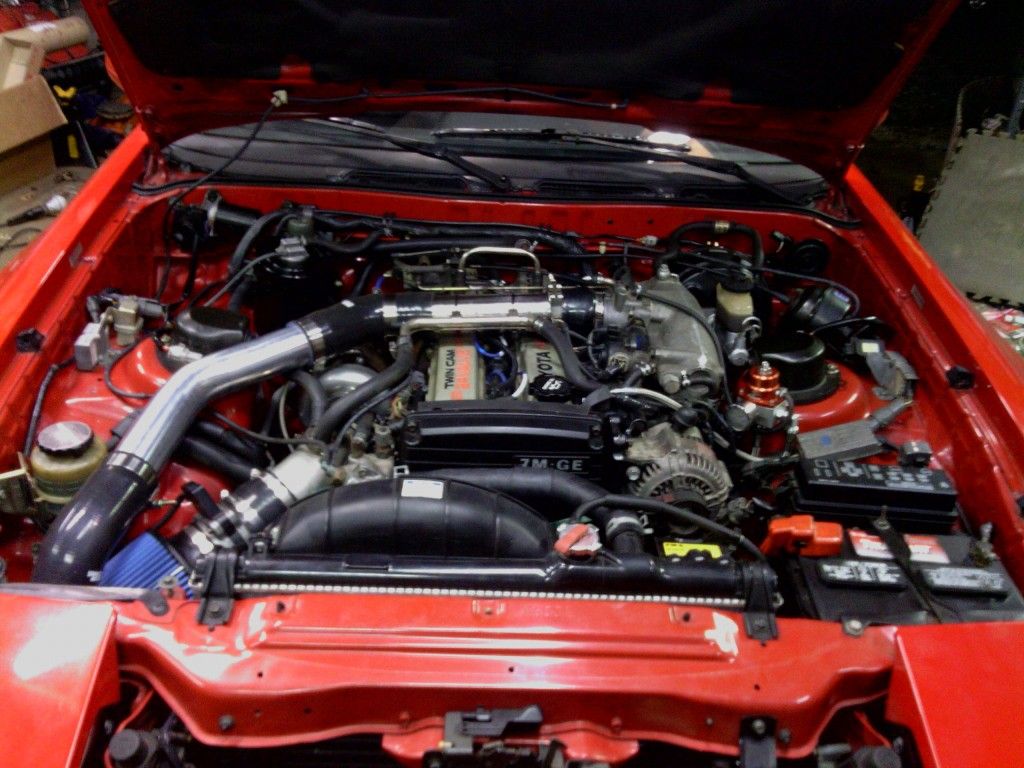
The stock 7MGE is about to come out and I sourced a good complete (ECU, harness, sensors, accessories and engine with an HKS MHG and ARP head studs) 7MGTE that will be going in within the week. Also have an R154 and aluminum 1 piece driveshaft that will go in at the same time.
 

Chrisco

Build in Progress
Jan 4, 2009
62
0
0
Downers Grove, IL
Update!

Over the last couple weeks...

Hot tanked, bead blasted, re-hot tanked, and painted the oil pan.
Installed AZP oil pump-to-block -8 feed line
Installed oil pan
Removed GTE Filter Housing
Installed GE Filter Union
Replaced water pump and gasket with OE Toyota
Replaced t-stat with OE Toyota
Replaced CPS cover, gasket, and O-ring
Modified Turbo coolant supply line for recirculation
Modified and installed stock CT oil drain with to be used with universal oil drain
Bead blasted, hot tanked, and painted the coolant pipe that runs from water pump around the side/back of the block and installed with silicone 90* hoses and new gasket
Removed the exhaust studs from the head
Drilled, tapped, and helicoiled the head and installed new 7/16 exhaust studs
Installed ported stock GTE turbo manifold with new gasket
Installed modified CT26 (Not sure what it is... uses modified comp and exhaust housings, comp and exhaust wheels, and uses a waterless center section... supposedly 57 trim).
Gasket matched turbo outlet gasket to turbine housing
Installed new block adapter and braided oil feed line for turbo
Removed EGR plate from back of head and tapped/plugged the EGR outlet port
Installed GE valve covers
Modified GE and GTE throttle linkage to use GE throttle bracket with
GTE intake manifold and throttle body
Installed IS300 2JZ VVTI coils and wires
Extended coil harness for 2JZ VVTI coils
Modified J-tube plate to use as block off plate for the block
Bead blasted and painted upper alternator bracket and engine lift hook
Replaced vacuum tube that runs along the front of the block with
clean/rust free version

Still lots more left to do! Pictures to come!
 

Chrisco

Build in Progress
Jan 4, 2009
62
0
0
Downers Grove, IL
Mod/Build List:

Engine:

Remove Original 86k mile ’92 7MGE (Non-Turbo)
Tear down ’91 7MGTE engine to base longblock
Verify Install of Metal Head Gasket and ARP Head Studs
Re-Torque ARP Head Studs to 85 ft./lbs.
Inspect and clean Cams and Cam Journals
Install 7MGE Valve covers with new bolts and Toyota Sealer
Inspect Timing Belt
Remove cut/mangled 7MGTE Upper Timing Cover
Install 7MGE Upper Timing Cover
Install -8 Stainless Braided Oil Feed Line from Oil Pump to Block
Sand Blast and Paint Oil Pan and Oil Pan Bolts
Reseal/Install Oil Pan with Toyota Sealer
Block Off Factory Oil Cooler Return
Remove Factory Oil Filter Housing to Eliminate Factory Oil Cooler
Install Non-Turbo Oil Filter Union
Sand Blast and Paint Water Pipe from Tstat
Install silicone hoses on front and back of water pipe
Replace Coolant Temp sensors
Install new OEM Water Pump
Install new OEM Tstat and Tstat housing
Install new OEM Cam Position Sensor O-ring, CPS Cover and CPS Cover seal
Re-time the Engine
Remove all EGR Components
Tap and Plug EGR outlet port on back of head
Install Block-off plate for EGR inlet on Intake Manifold
Remove Exhaust Manifold Studs from Head
Drill/Tap/Helicoil Head for 7/16 Exhaust Studs
Install 7/16 Exhaust Studs
Install Ported Factory Exhaust Manifold with OEM Toyota Gasket
Install Modified 57 Trim CT-26 Turbo with Garret Center Section and OEM Toyota Gasket
Install Braided Oil Feed Line from block to turbo
Modify Factory Turbo Oil Return and install Silicone Oil Return Hose from Turbo
Modify Factory Turbo Coolant Supply line and route back to water neck
Gasket Match Turbine Outlet Gasket with Turbine Housing
Sand Blast and Paint Turbo Support Bracket
Remove J-pipe and Install Block-off
Remove Fuel Damper
Remove and Clean Fuel Rail
Install Precision 550cc Injectors
Install Aeromotive Adjustable Fuel Pressure Regulator
Install -6 fittings and lines to/from Fuel Rail Inlet, Fuel Pressure Regulator, and Fuel Return
Install 2 New 92+ Knock Sensors
Knock sensor rewire using shielded coax cable from sensor to ECU with additional chassis ground for shielding
Fix/Rewire Every Connector on Engine Harness
Install Injector Connectors/Clips for 550cc injectors
Remove and Clean Cold Start Injector and Re-install
Install Walbro 255 lph Fuel Pump
Rewire Fuel Pump for factory computer control of 75amp relay supplying full 12V
Re-seal Intake Manifold with all new OEM Toyota Gaskets and Install Manifold
Install Throttle Body with new OEM Toyota Gasket
Bypass Coolant lines to Throttle Body
Swap from 7MGTE to 7MGE Throttle Linkage Bracket
Modify Throttle Linkage to work with 7MGE Bracket and 7MGTE Throttle Body
Install NGK Iridium Spark Plugs
Install 2JZ VVTi Coil-On-Plug ignition (remove 7MGTE coil assembly)
Extend Ignition Coil Harness for 2JZ Coils
Remove Factory AFM (Air Flow Meter)
Install MAF Translator and GM 3.5” MAF Sensor
Install SPEARCO Front Mount Intercooler
Install 2.5” Intercooler pipes from Intercooler to Throttle Body
Remove Factory Turbo Elbow and Install 3” Downpipe to 3” electronic exhaust cutout to factory cat-back exhaust
Exhaust Scavenger in Downpipe for PCV
Rewire Factory Non-Turbo Tach for Turbo ECU (replaced 4 resistors with required value resistors)

Transmission/Driveline:

Remove Original 86k mile W58 to swap to R154
Install Marlin Crawler R154 Shifter bushings
Install new OEM Toyota Input and Output shaft seals
Remove and Sandblast Bellhousing
Sand Blast and Paint Clutch Release Fork
Sand Blast Paint, and Install Upper Bellhousing/Block Sandwich Plate
Install Lightweight Flywheel (Brand unknown) with ARP Flywheel Bolts
Install OEM Toyota Clutch and Pressure Plate with New OEM Toyota Release Hub and Throwout Bearing
Install New OEM Toyota Pilot Bearing
Install New AISEN Clutch Slave Cylinder
Install New OEM Slave Cylinder Hard Line
Install Steel Braided Slave Cylinder Soft Line
Remove Factory Non-Turbo 4.30 Differential
Install Factory 89+ Turbo 3.73 LSD Differential
Install ShaftMasters One-Piece Aluminum Driveshaft

Soooo… for those of you who have been wondering where I’ve been… now ya know!

As it was when I bought it from a local guy...

p1820813_1.jpg


Build Pics (sorry for the crappy cell phone quality)...


p1820813_2.jpg

p1820813_3.png

p1820813_4.png

p1820813_5.png

p1820813_6.png

p1820813_7.png

p1820813_8.png

p1820813_9.png

p1820813_10.png

p1820813_11.png

p1820813_12.png

p1820813_13.png

p1820813_14.png

p1820813_15.png

p1820813_16.png

p1820813_17.png

p1820813_18.png

p1820813_19.png


My Happy Helpers!

p1820813_20.jpg

p1820813_21.jpg

p1820813_22.jpg


As it sits right now...

p1820813_23.jpg


Ran into a snag with the Transmission Wing Bracket on the pass side being for a pre-89, so I gave it and the pass side engine mount to a buddy to machine. Should be up and running by next weekend :)
 

Chrisco

Build in Progress
Jan 4, 2009
62
0
0
Downers Grove, IL
ahmedootie;1820850 said:
OMG Chrisco is back in a supra!
Whats up dude!?
I used to stare at your maroon car for days at a time hahahah

Haha hey man! Yeah it's been a long time, been through a few different cars over the last 5-6 years since selling the '87, but I couldn't stay away. I see you're down in Florida now, eh? Hope all is well, and thanks for the kind memories of the maroon car :)

I updated the first couple posts in the thread to reflect the full timeline of the current build.
 

Chrisco

Build in Progress
Jan 4, 2009
62
0
0
Downers Grove, IL
Quick update...

Last weekend I dropped in the newly rebuilt/sealed, wiring harness-repaired, coax cable knock sensor wired, 91 7MGTE and R154 into my '92 N/A. This past saturday I installed the 3.73 diff, shaftmaster's 1 piece aluminum driveshaft, honed out the cig lighter in the center consel for a 52mm boost gauge, filled the engine/trans/diff with fluids, mocked up the Spearco factory replacement FMIC, started plumbing the IC piping, swapped the circuit board from a Turbo tach to the one in my N/A.

Last night I worked on the car for 9 hours after a 9 hour work day. Modified some brackets and drilled/tapped the mounting flanges on my Spearco FMIC; mounted the IC; plumbed full 2.5" IC piping (minus the factory turbo outlet hose, still had to use that); drilled/tapped a stripped transmission xmember mount hole in the chassis; bled the clutch; modified intake elbow for PS provisions (Idle up); routed the rest of my vacuum hoses (except one that I still need to run to a center consel mounted boost gauge); mocked up test/y-pipe w/ electric cutout; installed front xmember brace; mocked up exhaust scavenger for PCV.

Tonight's agenda is install and wire a walbro 255lph fuel pump, wire in a MAFT; pick up some 3" exhaust gaskets; run wiring/switch for exhaust e-cutout; install catback exhaust; button up the interior; fill the cooling system; and start the b!tch. If all goes as planned, it'll be the first time since pulling the 7MGE 5 months ago and installing the GTE and bpu mods.
 

Chrisco

Build in Progress
Jan 4, 2009
62
0
0
Downers Grove, IL
p1824513_1.jpg


It's alive! Starts and idles beautifully, however I think I may have fubarred something in the wiring of the MAFT because it stumbles terribly and won't really raise RPM when slowly depressing the throttle; it also runs real rich at this time (sorta runs like I remember my old '87 running with AFM electronics unplugged). A quick, hard, punch of the throttle causes it to die. I'll sort all that out after work this afternoon. Can't wait to get her back on the road!
 

toyota kid

New Member
Oct 8, 2011
19
0
1
Los Angeles
Hold up off topic!! really nice ride n all but i noticed from the first few pics that it came with the 3 piece wing and its originally NA. WTF my 92 NA came wingless, or maybe someone added the wing on this one? i though only the turbbos came with the wing, anyone?

nice car once again...:icon_bigg
 

supra1008

Active Member
May 2, 2007
1,179
0
36
Philadelphia
toyota kid;1843849 said:
Hold up off topic!! really nice ride n all but i noticed from the first few pics that it came with the 3 piece wing and its originally NA. WTF my 92 NA came wingless, or maybe someone added the wing on this one? i though only the turbbos came with the wing, anyone?

nice car once again...:icon_bigg

No I believe 89+ had some kind of sports package option on some NA's available. My old 90 na auto came with a 3pc wing.

Chrisco. lcar ooks great!
 

Chrisco

Build in Progress
Jan 4, 2009
62
0
0
Downers Grove, IL
toyota kid;1843849 said:
Hold up off topic!! really nice ride n all but i noticed from the first few pics that it came with the 3 piece wing and its originally NA. WTF my 92 NA came wingless, or maybe someone added the wing on this one? i though only the turbbos came with the wing, anyone?

nice car once again...:icon_bigg

Thank you for the compliments! I don't honestly know if it was dealer installed, or installed by a previous owner; but I do know that it was not factory installed because the car also has the wingless third brake light inside the hatch. Also, the spoiler install was done somewhat poorly. Looks good from 5+ feet, but when you get up close you see that the installer did a poor job of alignment with the outside pieces.

nrdriver;1843864 said:
i just glanced but vacum leak!!!!!!

What?! Where!? (I've re-run several vacuum lines since that picture was taken [namely an actual vacuum source for the AFPR, rather than a venturi], so whatever you see may have been fixed... I hope!)

supra1008;1843897 said:
No I believe 89+ had some kind of sports package option on some NA's available. My old 90 na auto came with a 3pc wing.

Chrisco. lcar ooks great!

I've heard that as well, but don't know for sure. Just as I mentioned above that I can tell the one installed on my car was not from the factory. And thank you for the compliment!

I haven't had a chance to work on the car much over the last month and still have a fuel system issue to resolve; but otherwise the car is alive and (mostly) well!
 

toyota kid

New Member
Oct 8, 2011
19
0
1
Los Angeles
Hmm the sports package could be true but who knows but if you said it looks poorly installed by someone else then hey your lucky you got the 3piece wing at the end of the day! Keep up the good work!