At last, after working on the restoration of a 86 for 5 years, we are starting
our first build thread.
Some members elect to start as soon as they get their car started and
some elect to post further along the build process, which we are doing.
The Story
Many years ago, my dad had a 84 and then a 86 Supra.
We do not have any photos of the 84 but we do have one of me standing
beside the 86, so thought it would be a good place to start this thread.
Since we both love cars and I restore cars as a hobby, mostly 240's, we
decided approximately 5 years ago to find an old Supra and do a restoration.
Being from Ontario Canada it is difficult to find a decent car that can be restored
without having to totally rebuild from the ground up.
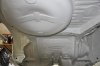
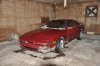
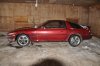
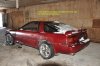
Long story short, we did locate a car in Toronto for $500, ( in the winter and lots of snow
on the ground so we did not inspect as closely as we should of ) and which we thought at
the time may be suitable for restoration. Just clean it up, repair some rust and make it into
a weekend driver.
WRONG !
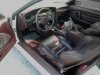
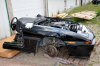
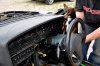
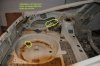
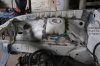
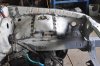
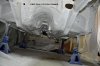
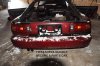
After bringing it back to our shop and inspecting it more closely, it quickly became evident
that the car was not worth investing any time, effort or money. Age and the salt that is
applied to our roads had done far more damage to the underside than was evident from first
looking at the car in freezy snow.
We decided to keep it as a donor / parts car and continue searching for a Supra in
better condition.
After several months looking we were able to find a rolling shell in Leamington Ontario,
about a 3 hour drive from Cambridge.
Learning from our first misadventure, we were now more critical in examining the underside
and body for major rust. There was some typical bad rust spots that Supras are known for but
overall nothing that could not be repaired. Overall for a Canadian car that had seen many winters,
it was in relatively good shape.
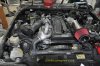
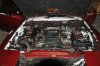
We now had a pretty good Supra, no engine or tranny, to start the rebuild.
We did consider using the engine and tranny from the donor but with over 230,000 km
on the 7M, we decided to find a low km engine and tranny from a Toronto Japanese
engine importer.
In our next thread, we will continue our rebuild posting with our 1/2 cut 1JZGT.
Also this is likely 2010- judging from the empty shop, I moved across the farm from a 4000sq/ft (four people shop - 2 unemployed nonpaying) to a 950sq/ft 1 person shop. I thought 950 would be plenty (wait for 2014 photos, I was wrong)
Darian and Doug (EDIT - title change)
our first build thread.
Some members elect to start as soon as they get their car started and
some elect to post further along the build process, which we are doing.
The Story
Many years ago, my dad had a 84 and then a 86 Supra.
We do not have any photos of the 84 but we do have one of me standing
beside the 86, so thought it would be a good place to start this thread.
Since we both love cars and I restore cars as a hobby, mostly 240's, we
decided approximately 5 years ago to find an old Supra and do a restoration.
Being from Ontario Canada it is difficult to find a decent car that can be restored
without having to totally rebuild from the ground up.
Long story short, we did locate a car in Toronto for $500, ( in the winter and lots of snow
on the ground so we did not inspect as closely as we should of ) and which we thought at
the time may be suitable for restoration. Just clean it up, repair some rust and make it into
a weekend driver.
WRONG !
After bringing it back to our shop and inspecting it more closely, it quickly became evident
that the car was not worth investing any time, effort or money. Age and the salt that is
applied to our roads had done far more damage to the underside than was evident from first
looking at the car in freezy snow.
We decided to keep it as a donor / parts car and continue searching for a Supra in
better condition.
After several months looking we were able to find a rolling shell in Leamington Ontario,
about a 3 hour drive from Cambridge.
Learning from our first misadventure, we were now more critical in examining the underside
and body for major rust. There was some typical bad rust spots that Supras are known for but
overall nothing that could not be repaired. Overall for a Canadian car that had seen many winters,
it was in relatively good shape.
We now had a pretty good Supra, no engine or tranny, to start the rebuild.
We did consider using the engine and tranny from the donor but with over 230,000 km
on the 7M, we decided to find a low km engine and tranny from a Toronto Japanese
engine importer.
In our next thread, we will continue our rebuild posting with our 1/2 cut 1JZGT.
Also this is likely 2010- judging from the empty shop, I moved across the farm from a 4000sq/ft (four people shop - 2 unemployed nonpaying) to a 950sq/ft 1 person shop. I thought 950 would be plenty (wait for 2014 photos, I was wrong)
Darian and Doug (EDIT - title change)
Attachments
-
 darian larger_edited-1r_edited-2.jpg280.1 KB · Views: 43
 -
 FIRST SUPRA BECAME PARTS CAR 1.jpg247.1 KB · Views: 37
 -
 FIRST SUPRA BECAME A PARTS CAR 8.jpg245.8 KB · Views: 39
 -
 FIRST SUPRA BECAME A PARTS CAR 9.jpg288.3 KB · Views: 37
 -
 FIRST SUPRA BECAME A PARTS CAR 12.jpg250 KB · Views: 41
 -
 FIRST SUPRA BECAME A PARTS CAR 14.jpg244.6 KB · Views: 35
 -
 FIRST SUPRA BECAME A PARTS CAR 3.jpg222.9 KB · Views: 45
 -
 FIRST SUPRA BECAME A PARTS CAR 8.jpg243.7 KB · Views: 42
Last edited: