Removing and reinstalling rear CV shaft

alcyon

Active Member
Jun 15, 2017
161
35
28
Kuala Lumpur
While looking at the TSRM, I noticed it says we need to level the suspension arm before removing and installing the CV joint.
1652152557951.png
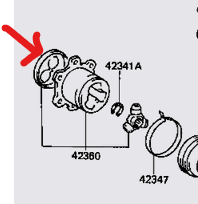
What is the reason for this ? Also I made the mistake of not making a mark on the CV joint to the differential side gear flange when I removed the diff. Is this really a must, or it doesn't really matter, as long as i get the 3 clover leaf pattern end to go in the diff side gear properly ?

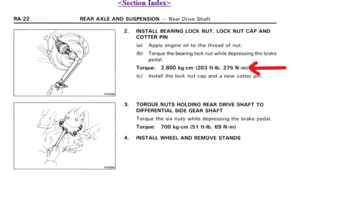
lastly, it just says tighten the main nut to 275Nm, so there is no need to do a shimmy shake test like the front bearings? Just torque and forget ?
 

Attachments

  • 1652152713877.png
    1652152713877.png
    21.3 KB · Views: 2
  • 1652152736129.png
    1652152736129.png
    21.3 KB · Views: 2
  • 1652153037519.png
    1652153037519.png
    43.1 KB · Views: 2

Asterix

Lurker of Power
Mar 31, 2005
460
30
28
Vienna, VA
It's easier to remove the axle when it's straight, because the boots won't be pulling unevenly on the joints. It's still possible to get the axles out with the suspension drooped all the way, so it's not super-important.

Don't worry about not making the match marks on the differential side flanges, but I would worry about getting the inner joints back together the same way they came apart.

Not sure what you mean by a "shimmy shake test". It's a good time to check the rear wheel bearings if you already have the axles off since you can actually feel them. I usually torque the axle nut last after the car is on the ground.
 
  • Like
Reactions: alcyon

alcyon

Active Member
Jun 15, 2017
161
35
28
Kuala Lumpur
It's easier to remove the axle when it's straight, because the boots won't be pulling unevenly on the joints. It's still possible to get the axles out with the suspension drooped all the way, so it's not super-important.

Don't worry about not making the match marks on the differential side flanges, but I would worry about getting the inner joints back together the same way they came apart.

Not sure what you mean by a "shimmy shake test". It's a good time to check the rear wheel bearings if you already have the axles off since you can actually feel them. I usually torque the axle nut last after the car is on the ground.
A thought just crossed my mind about the suspension arm, perhaps toyota also didnt want to subject the absorber to a great pull down force when loosening the nut ? Btw is the nut size 32mm ?
Also, having the wheel nuts on tight on the rotor with hbrake on should do , instead of having some one press the brake while trying remove the nut ?

Its a relief not having to match back the flange to the side gear, point taken on the internal matching.

As for the shimmy shake, I remembered for my other car, I had to tighten the nut little by little , with the tyre on the hub but off the ground, and shake the tyre with my hands at 9-3 and 12-6 position, until the shimmy shake is almost imperceptible .

I will be removing the rubber boots and cleaning off the 33 year old CV grease and perhaps put in redline CV grease. I will also try to get rubber boots locally that has the approximate dimensions of the old ones. Supra parts are very hard to come by where I am, hopefully boots from a Camry or hilux would fit. If all else fails, just clean and condition the old one , since it seems to be intact.

BTW I found some info this dude on celicasupra.com posted. Very eye opening.
1652236370524.png
 
Last edited:

Asterix

Lurker of Power
Mar 31, 2005
460
30
28
Vienna, VA
I forget the size of the axle nut, but it could be 32mm. It's the highest torque of any fastener on this car, and I've never thought the handbrake sufficient to hold that large torque. It'd be best if you had a friend push the brake pedal hard while you torqued the nut if you want to do it while the car is up in the air.

It could be what Toyota thought about not pulling down on the drooped suspension. You could always put a jack stand under the brake rotor to take the force rather than the droop stop.

Ah, that shimmy shake. That sounds like your other car has tapered roller bearings for the wheel bearings. You have to get them preloaded just right, which you can do by hand. The Supra has ball bearings all around, so there's none of that. Read the TSRM section on replacing the wheel bearings to see what's going on.
 
  • Like
Reactions: alcyon

alcyon

Active Member
Jun 15, 2017
161
35
28
Kuala Lumpur
Ok confirmed it is 32mm. I managed to loosen and remove the nut, ironically with the handbrake pulled all the way up. I asked my wife to press the brakes hard, the rotor still moved, perhaps her legs aren't strong enough. I sprayed WD40 into the splines and proceed to knock on the CV joint end with a block of wood and hammer but it wouldn't budge. So i sprayed more WD40 in the splines and will try tonight after work again. Hopefully it will come off.
I was thinking of buying a hub pusher, and saw this guy's review, my feelings exactly.

1652413159018.png
 
Last edited:

Asterix

Lurker of Power
Mar 31, 2005
460
30
28
Vienna, VA
My axles have always come out easily, but that doesn't mean yours will. Just don't beat on it so hard that you mess up the threads on the end. Splines can stick. I also suggest using a better penetrating oil, such as PB Blaster.

If you have an air compressor, get an air hammer and a blunt-nosed bit. It can hit something hundreds of times in only a couple seconds.
 
  • Like
Reactions: alcyon

alcyon

Active Member
Jun 15, 2017
161
35
28
Kuala Lumpur
Over the weekend, I managed to get a large gear puller, it is a 3 jaw type. I removed the caliper and then rotor, then I positioned the jaws around the inner flange that holds the wheel studs, after some huffing and puffing I managed to push the right side CV axle out. I proceed to clean the splines in the hub, and place anti seize in there. I took my time cleaning out the old melted 33 year old grease from the outer and inner joint, refurbished the old boots which are undamaged, get new clips, and repack the outer and inner joints with redline CV-2. It seems like the tub of grease I have might not be enough for both axles, so have a look at these videos and let me know if I have put enough grease on the inner joint, I uploaded 2 short videos, I plan to make a long video from start to finish later.


Is this enough grease , or should I add more, perhaps up to the brim, or even in the boots ?

Next, while I was trying to push out the CV axle on the left side, while I was cranking down hard on the jaw puller, suddenly the puller broke, and since I was cranking hard backwards, I fell onto the rear fender hitting my left cheek on the fender. Luckily no injury or bloodletting from that. I am putting the left side CV on hold, ordering a different type of puller, that goes over the rotor, and uses the wheel studs and nuts to hold it in place, with large center bolt in the middle to push out CV axle. It should come by the end of the week. I am taking a break for now.
Good news is the right side refurbished CV slid right in the splines beautifully, with some permatex anti seize of course.

Hopefully I can the left side settled by the coming weekend, and put get back my rebuilt diff and prop shaft from my mechanic.

Update : I decide to use up a tub of grease per CV joint, since TSRM says the inner tulip needs 270g and outer needs 150g of grease which adds up to 420g, but the tub is 400g, so so its close enough.
 
Last edited:

alcyon

Active Member
Jun 15, 2017
161
35
28
Kuala Lumpur
Pics of the diff internals, Ring and Pinion are fine, seems the side flange splines are little crooked. I will be filling the diff with AMSOIL Severe Gear 75W-110
1652932023196.png
1652932048383.png
1652932081054.png
1652932107389.png
1652932128910.png
1652932156320.png
 

Piratetip

Far From Maddening Crowds
Staff member
Super Moderator
Dec 30, 2005
1,177
69
48
38
MKE, WI
I don't see anything crooked here.
What are you referring to?
 

alcyon

Active Member
Jun 15, 2017
161
35
28
Kuala Lumpur
I don't see anything crooked here.
What are you referring to?
In the second pic on the short splines rebuilder says some splines are not exactly straight, I cant really see it myself I admit.
However when I zoom the internal splines I do see some scuff wear on the leading edges, I marked a few but I think all of the splines have the marks.
1653015339688.png
The rebuilder says he has a machinist that can refurbish the splines, lets see how it goes.
 

Piratetip

Far From Maddening Crowds
Staff member
Super Moderator
Dec 30, 2005
1,177
69
48
38
MKE, WI
Hmm..odd.
Might be due to the weaker material choices used for the open diff center.
Not sure, can't say I've ever seen that before.

I'd recommend just putting the money toward a factory LSD center, upgrade it to Weir stage 1
Last time I looked there were a couple LSD center's on ebay.

Just a thought before trying to dump machining cost into an open center.

Make sure your rebuilder has most of the factory side shim thicknesses on hand, you cannot re-use the ones it was disassembled with.
It will never set up properly in spec, backlash, bearing preload ect..

Rebuilding one of these differentials properly is a long tedious process.
 
  • Like
Reactions: Asterix and alcyon

alcyon

Active Member
Jun 15, 2017
161
35
28
Kuala Lumpur
Yes the rebuilder is using a solid spacer, machining costs over here is not expensive, a LSD is very expensive here. My guess is the rebuild cost is about 1/6th the cost of a LSD center.