
iamsuprman13's 91' MKIII Build
- Thread starter iamsuprman13
- Start date
You are using an out of date browser. It may not display this or other websites correctly.
You should upgrade or use an alternative browser.
You should upgrade or use an alternative browser.
I uploaded the SC manual I have, check out the procedure for head removal:
https://docs.google.com/open?id=0B4bxOSpPTCkEaTdrVThuNGdKZ2s
https://docs.google.com/open?id=0B4bxOSpPTCkEaTdrVThuNGdKZ2s
I would love to hear how the EBay(thailand) bell housing works out for you if you get it . I haven't heard of anyone using this kit yet.
I like where this build is going. Im starting to like the 1uz idea. Any goodies going to be added with the swap?
Yeah I cant wait to get this thing running. No extra goodies for now. I am just gonna get this thing running and then start working on it. Adding all my little goodies and extras that i have been looking at. Wheels maybe a body kit...although i am seriously considering leaving the body mostly stock. Since I really like the look as it is. But eventually a spoiler. Some carbon fiber replacements to lighten her up some more. Eventually i would like to start some legit racing. I am thinking maybe autox or something but i know i want to do something. But my ideas are all over the place. I would like to go twin turbo with it someday. So yeah eventually i will do some stuff.
After you get your engine in and running work on suspension right after that. If you plan on doing autocross and the like; coil overs, poly bushings, steering rack spacers, LSD rear, tires, etc... would be your best investment. BUT, it is your car and your money so do what ever you want in what ever order.
Awesome build.
I always wanted to do a 1UZ swap. Just nice and simple; no turbos, no intercoolers, none of that piping, or piggyback wiring.
Just a nice torquey cruiser with an auto, no less.
But not for my current car, for the next one.")
Ps- if you really want to eventually do auto-X, etc., definitely do your front subframe and steering bushings now, while its super accessible!
I always wanted to do a 1UZ swap. Just nice and simple; no turbos, no intercoolers, none of that piping, or piggyback wiring.
Just a nice torquey cruiser with an auto, no less.
But not for my current car, for the next one.
Ps- if you really want to eventually do auto-X, etc., definitely do your front subframe and steering bushings now, while its super accessible!
What exactly should I do to the subframe? I plan on doing a full suspension bushing replacement. Probably Energy Suspension. I am fairly certain that the coilovers are the originals from 91'...lmao. So those will definitely get replaced soon. Is the stock LSD any good? Thanks guys.
Awesome build, always wanted a 1uz ever since I seen the one twin turbo 1uz supra mk3 pop up for sale. Your build looks nice, excited to see some updates.
claytonwes_2;1878575 said:stock lsd is awesome if you get the weir performance max grip kit
I did that mod as well.
As for the bushings, yes- energy suspension in black(they're graphite impregnated, unlike the red ones), and i might suggest
Ronnie K. Subframe and steering rack bushings. This is the route i went. In the back, reinforce the rear subframe to avoid future cracks above the diff. Chances are, you already have cracks there.
See my thread for pics of bushings and subrame.
http://www.supramania.com/forums/sh...t-Git-er-done-before-the-Mayans-come!-Stage-1...
Thanks guys, this is really what I am looking into. I really want to get into some kind of legit racing. So this kind of stuff really helps. Thanks.
So, here is the next update. Later than I would have liked, but I have been super busy, and the weather wasn't on my side.
So the first part of me being super busy, even though I am on leave is although I am on leave my job as a NCO never ends. I am still working to help my soldiers with their problems. So that is a never ending process.
Another thing keeping me busy is my birthday present from my wife.

I have wanted a Siberian Husky my whole life. They are absolutely my favorite dogs and my wife knows this. Of course we never really had the opportunity to have one. They are alot of work and because I am a full time soldier, my wife would end up taking alot of the responsibility. So she decided that I couldn't have one until I would be batter able to be responsible for it's daily needs...basically when I got out of the army...lmao
However, after my second deployment my wife decided that as my late birthday present, she was going to get me one. He is about eight weeks old definitely a handful. I am glad that I am on leave right now. Because even though she has finally agreed to help take care of him, he is a pain right now.
Anyway....on to the car update.
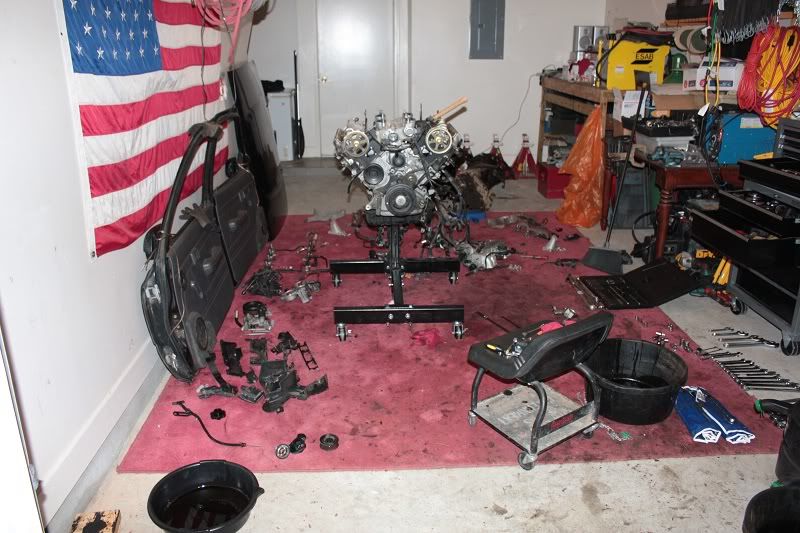
So I continued by tearing out everything in the engine bay. And I had a little helper.
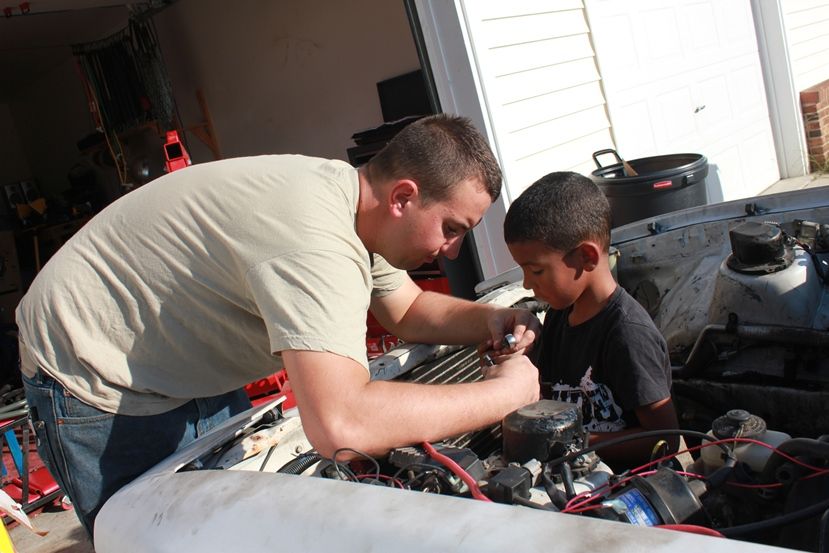

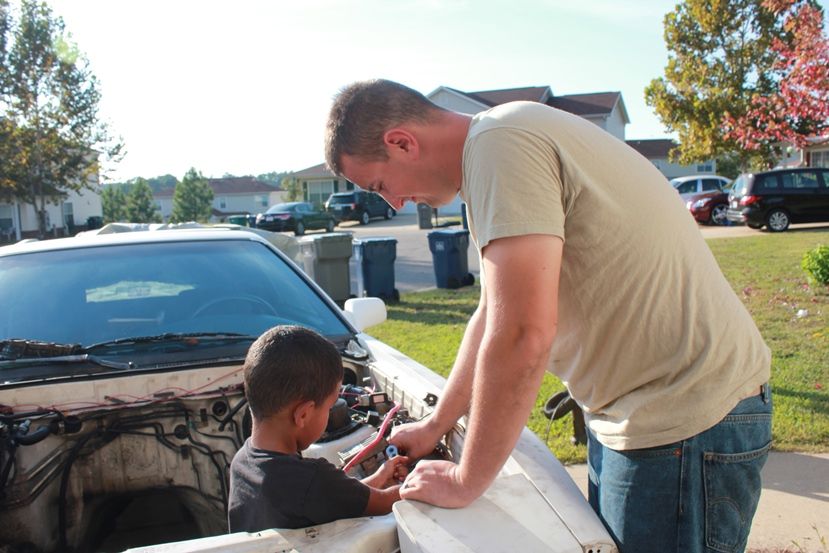
I had my son out helping me...so yeah naturally everything took twice as long, but it was awesome having him out there to spend time with him. Well I got most of the wiring in the bay undone. And I got the driver's side fender off so I could start working the wiring out from the cab. Then I started working on tearing into the dash so that I could get to all the wiring. My wife came out to help me with that, usually she will come out and sit by while I work. But this time she decided she wanted to help me work on it. That is a very rare occasion. So I naturally took advantage of it. Sadly no pictures of that progress, with my son and my wife helping me I totally lost track of the camera.
However I do have a question. How do you get the dash out? I got everything unbolted but I can't get it to come loose. I even went so far as to pull the FSM out to make sure I got all the bolts, and I still can't get it out. Has anyone else had this problem? Is there some special trick I am missing? Thanks guys.
Well that was all for that day, just wiring in the bay and dash in the cab.
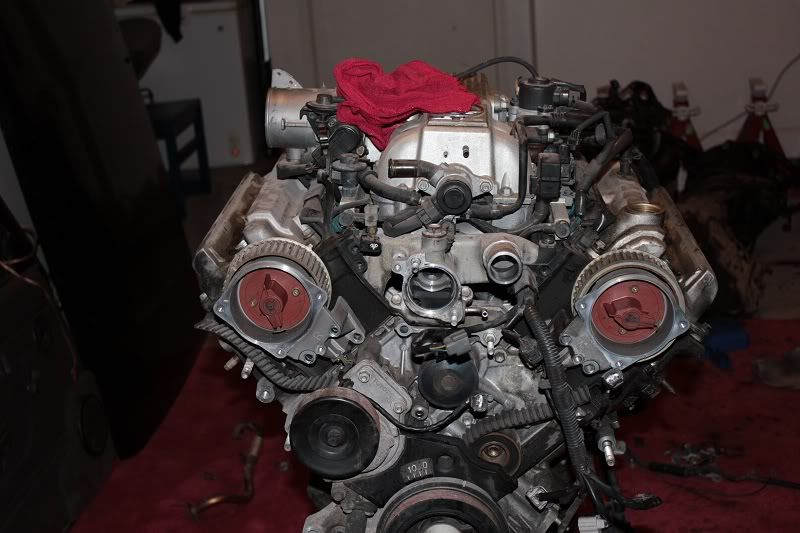
The next couple of days was a bunch of terrible weather and puppy care. So I decided I would get back to work, but I would take care of the engine while the weather is being uncooperative. So before I show you guys the progress I made on the engine in the last two days, I would show you what I had already done with it, before I deployed, when I was getting it ready for the truck....
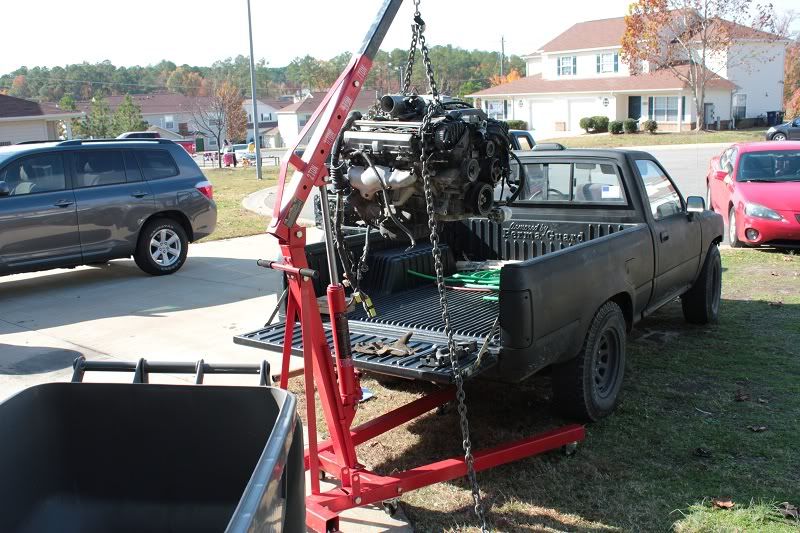
When I brough it home. I still had my other truck back then. I love my Yotas...lmao I have had three of those exact same trucks, 94 Pickup 2WD 4-banger single cab...the one in the garage that I am building is a 93 Pickup 4WD V6 extracab...now I have my supra, and my wife has her corolla...I am a toyota lover.
Anyway...
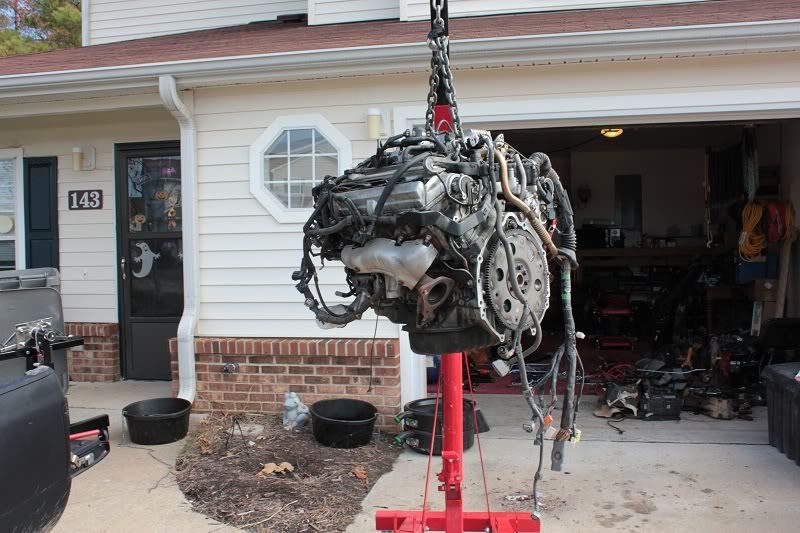

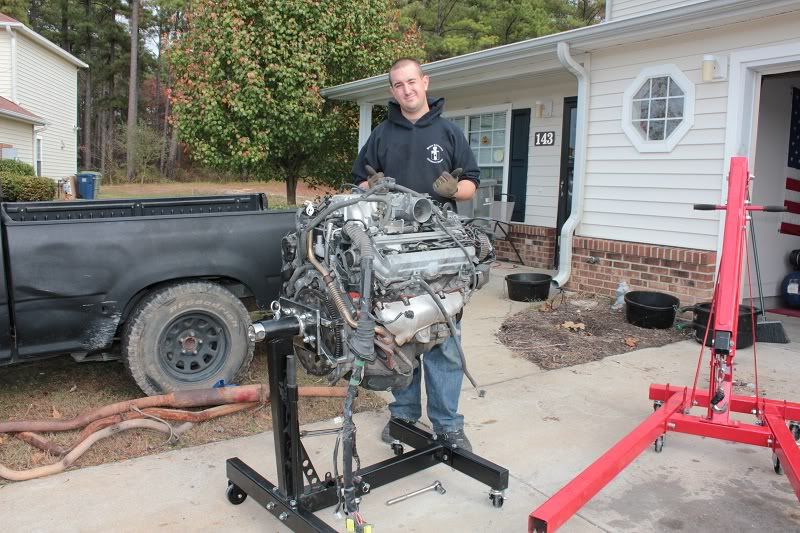
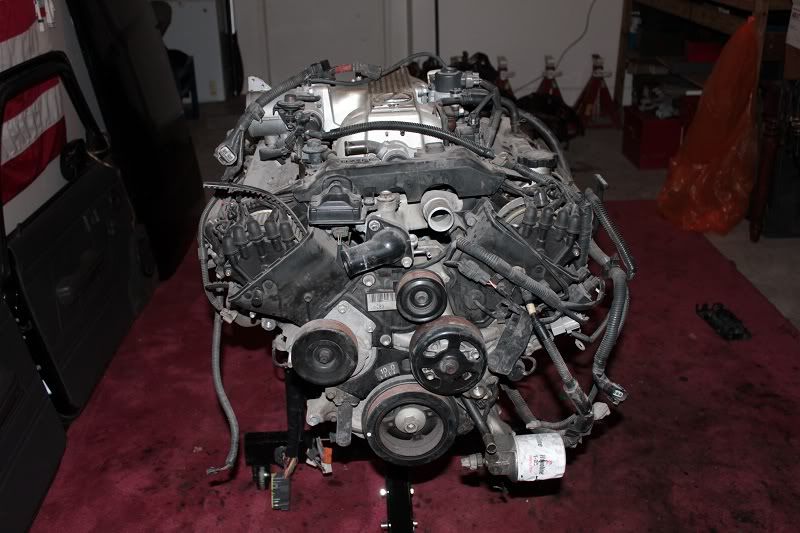
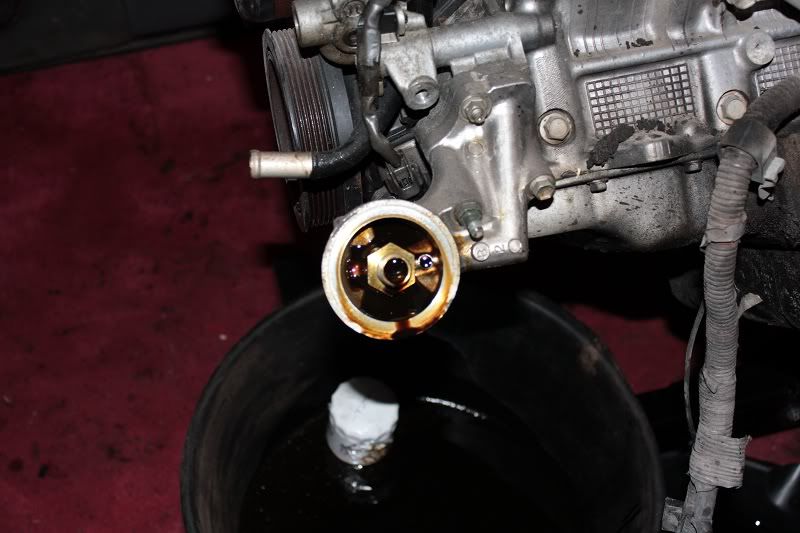
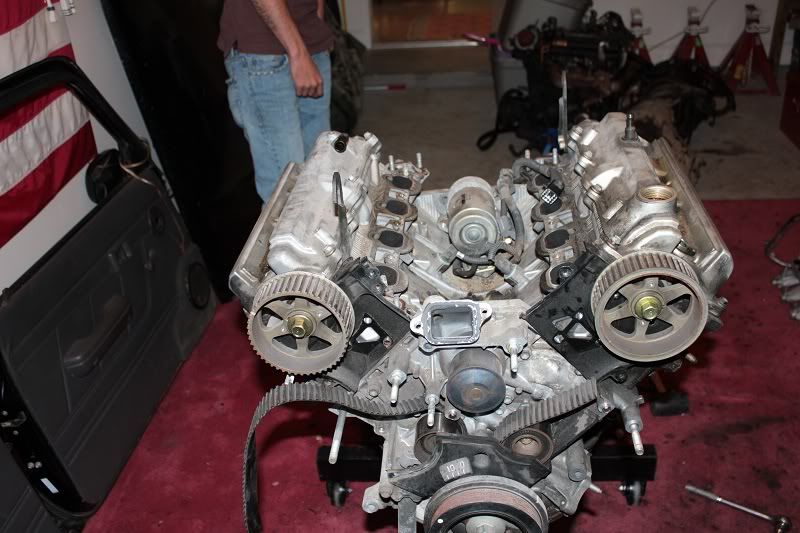
So I had the engine on the stand ready to get worked on, and I went to work just tearing her down.


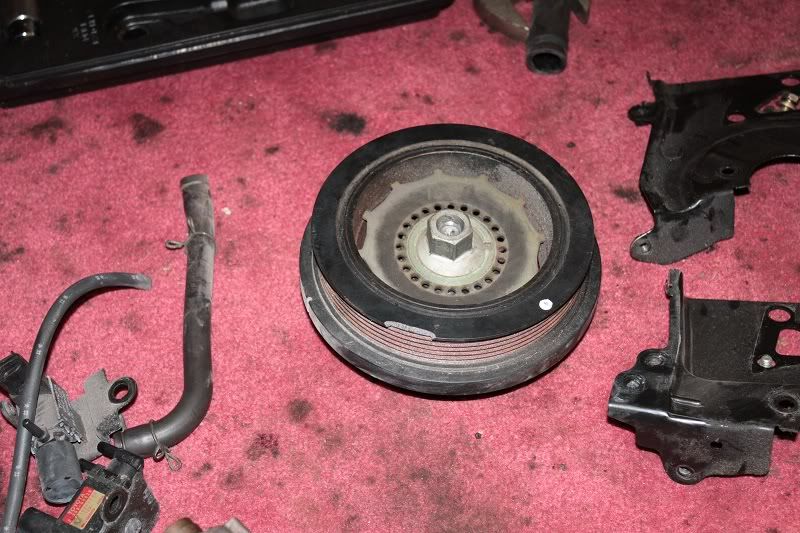
I chipped the edge off of the crank pulley by putting the puller on the wrong spot. I hate making rookie mistakes when I am absolutely not a rookie. I mean, this is what I do for a living...lmao I am a mechanic.
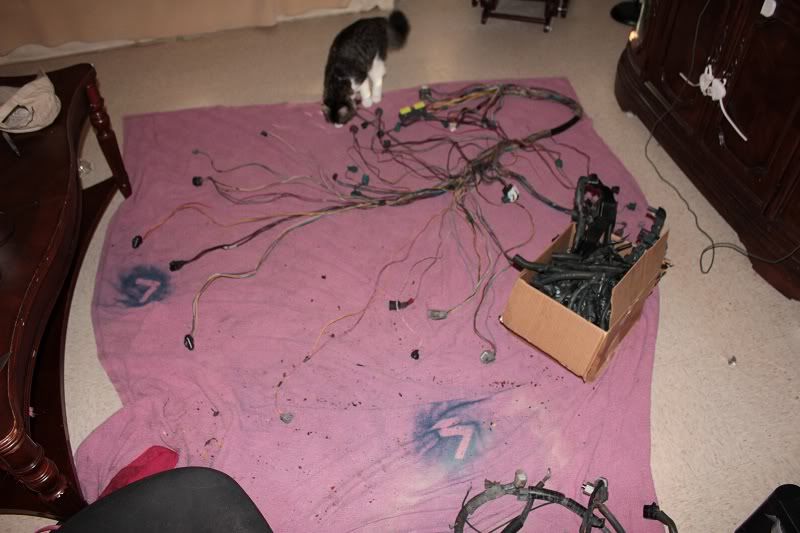
Started working on the wiring harness as well. But I put that away quickly to get back to work on the engine itself.
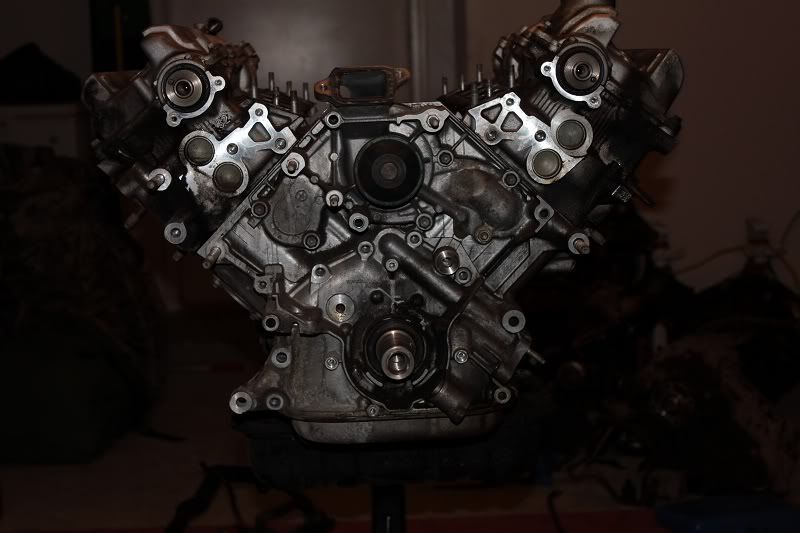
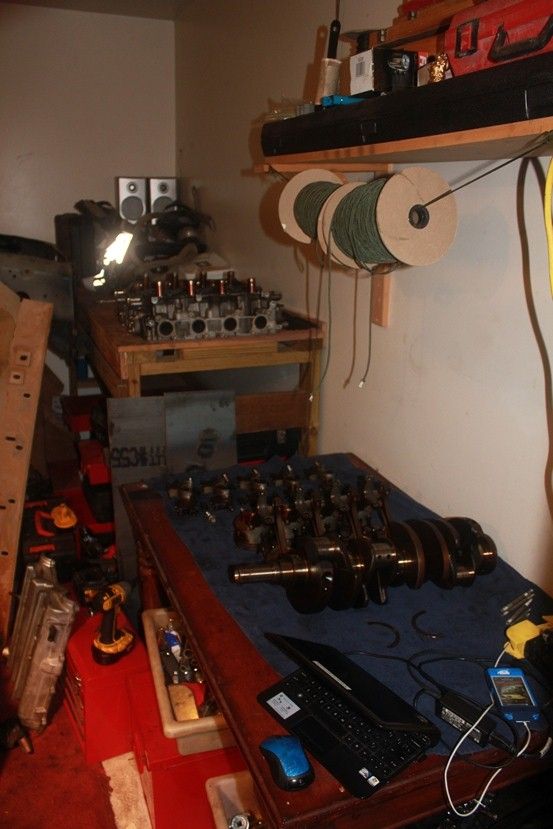
So this is where I can show you my current progress. Like I was saying before, I planned on rebuilding this motor from the ground up anyway. Not to give it more performance, not yet. But because I wanted to check out every inch of the motor, to make sure it was good. Since he threw a timing belt, I wanted to make sure the valves are all good, and just basically start fresh. It only had 50+ K on it, but I am still gonna do the rebuild. So that is what all those parts are for. Eventually I will work on performance with it. But until then I want to make sure the internals are solid.
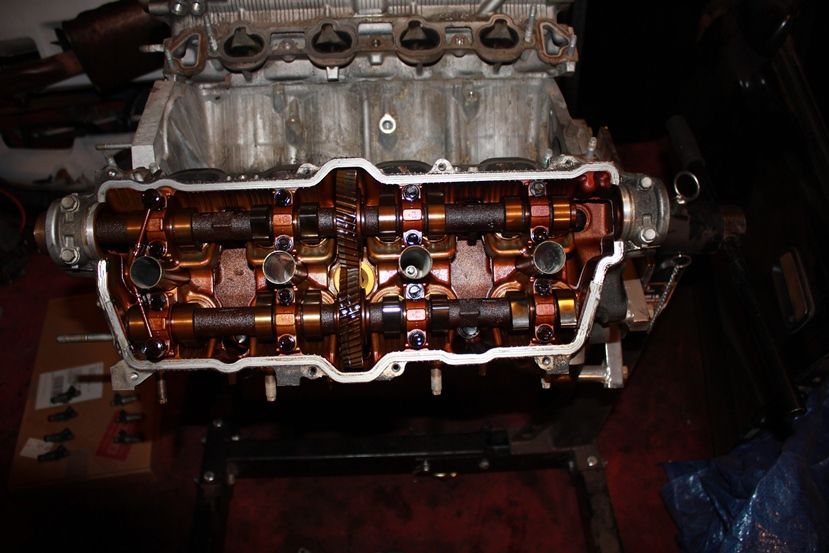
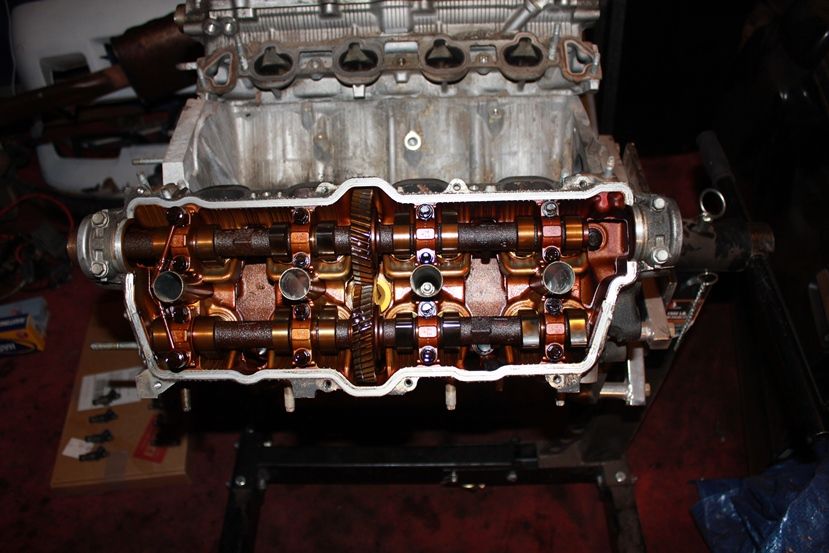
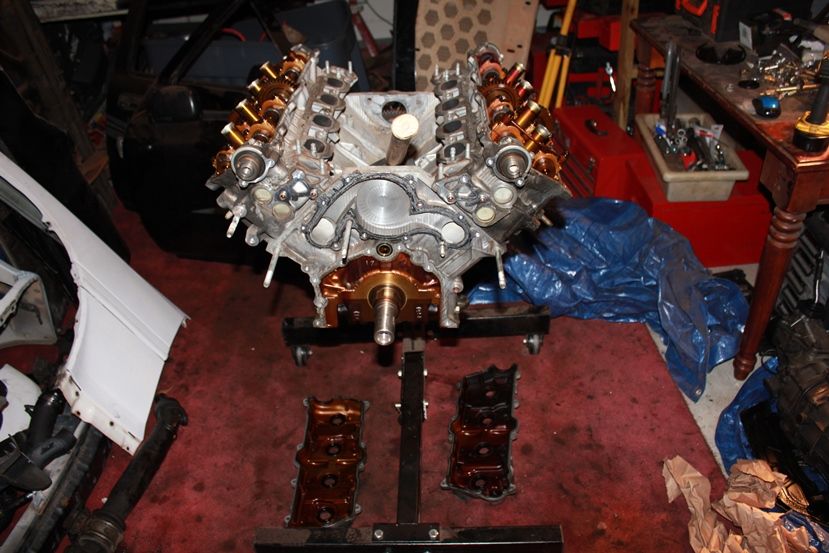
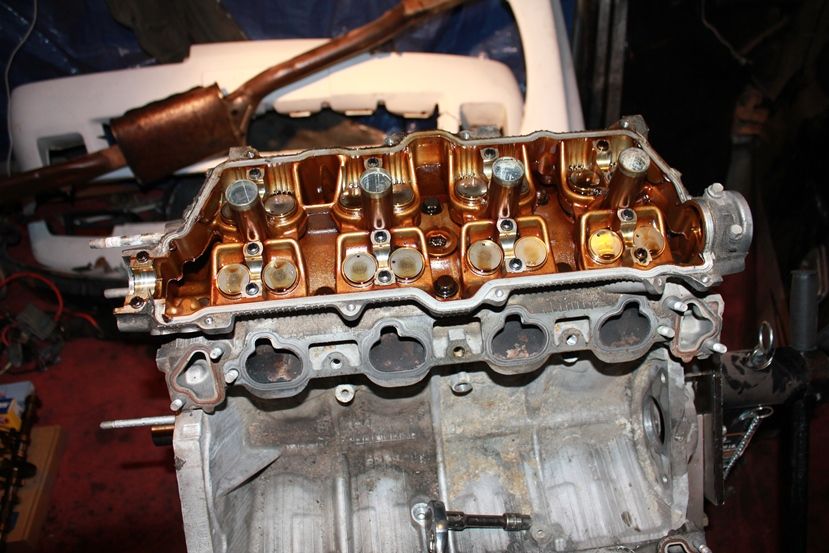
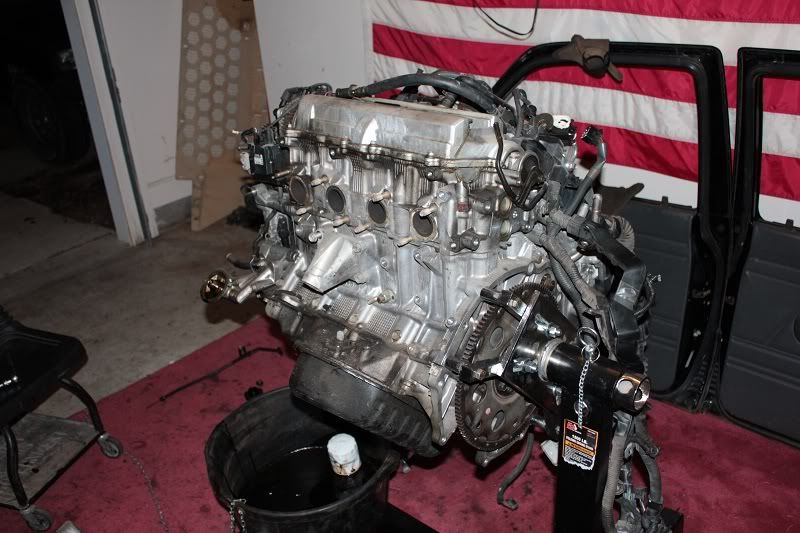
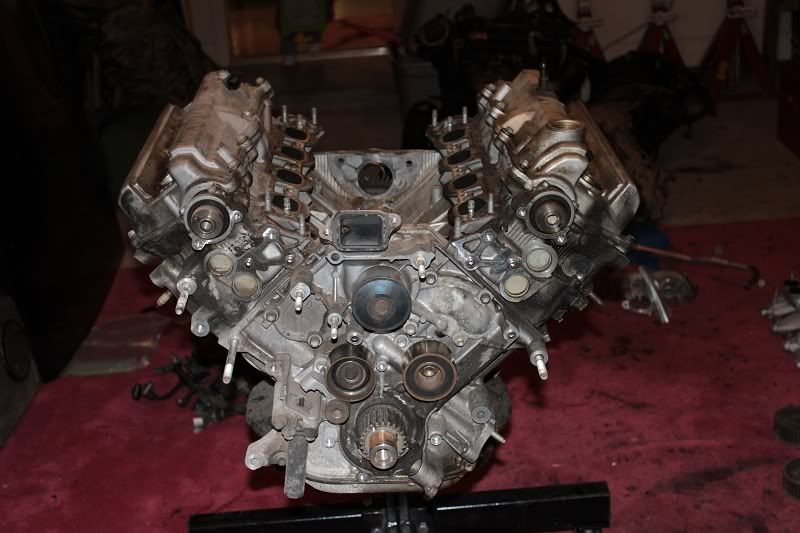
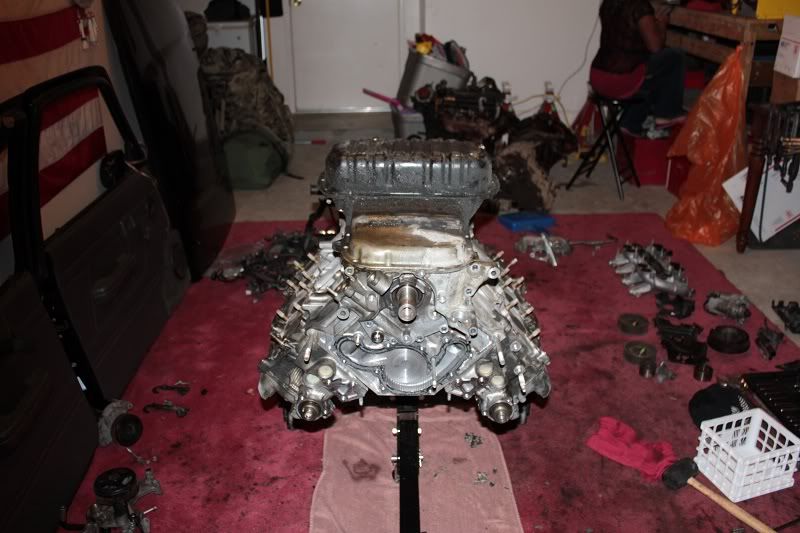
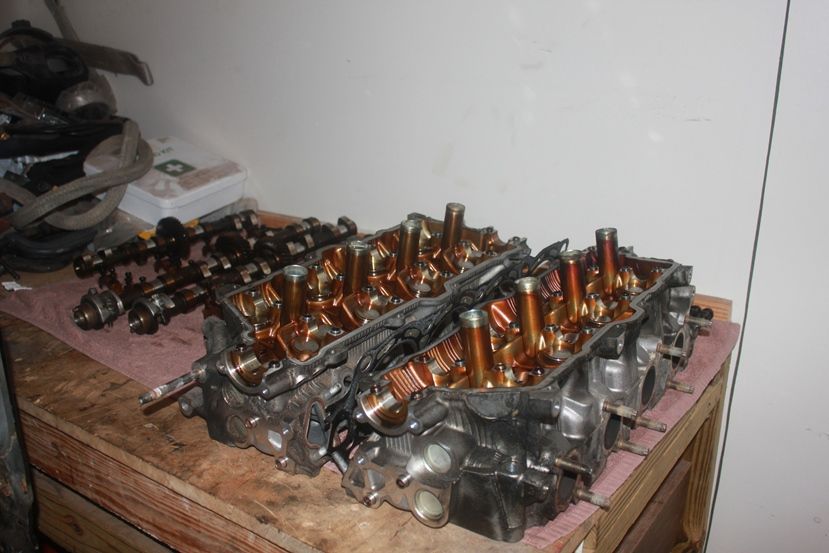
Got the camshafts and heads out first. However I decided to wait until I had the block completely broken down before I would disassemble the heads, camshafts, or the pistons.
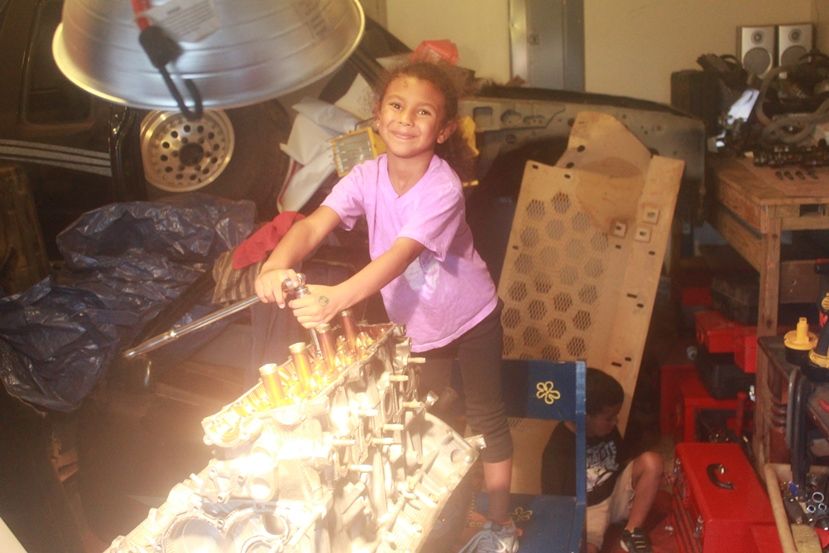

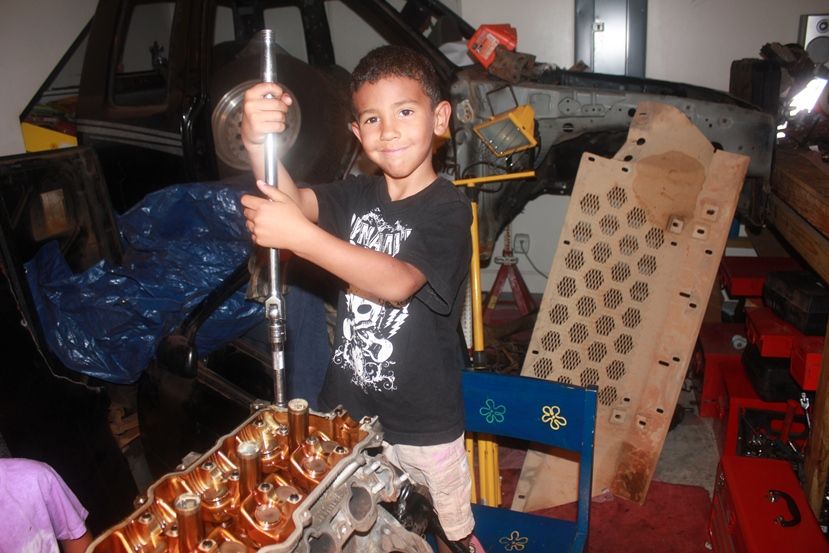
This kids were in the garage with me, helping me remove the heads. Like I said, being able to spend time with them is very important to me. Of course, the fact that my kids are so syked to help me work on my car is even better. Who doesn't want their kids to be into their own hobbies. Right.
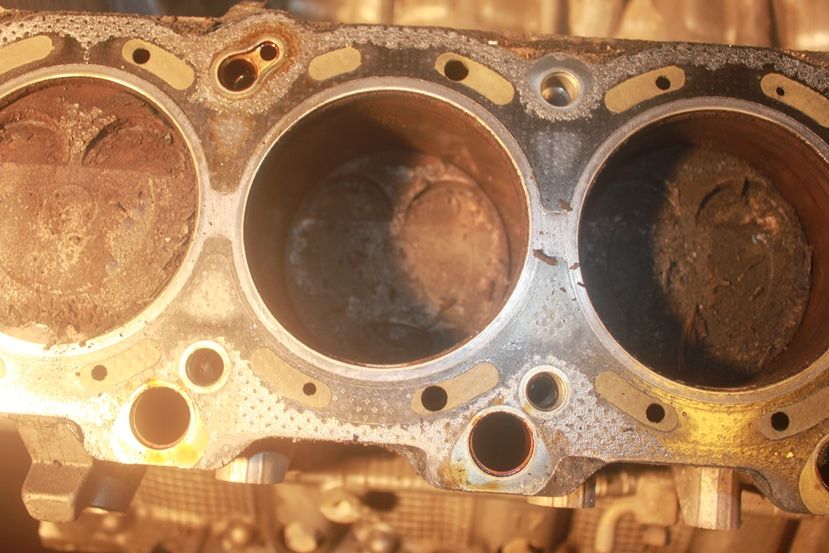
Oh, and did you see that carbon build up...ugh...
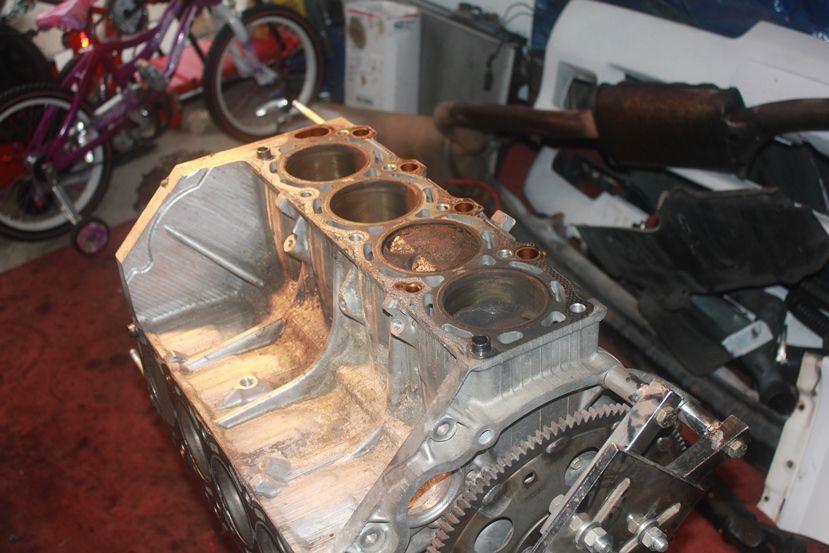
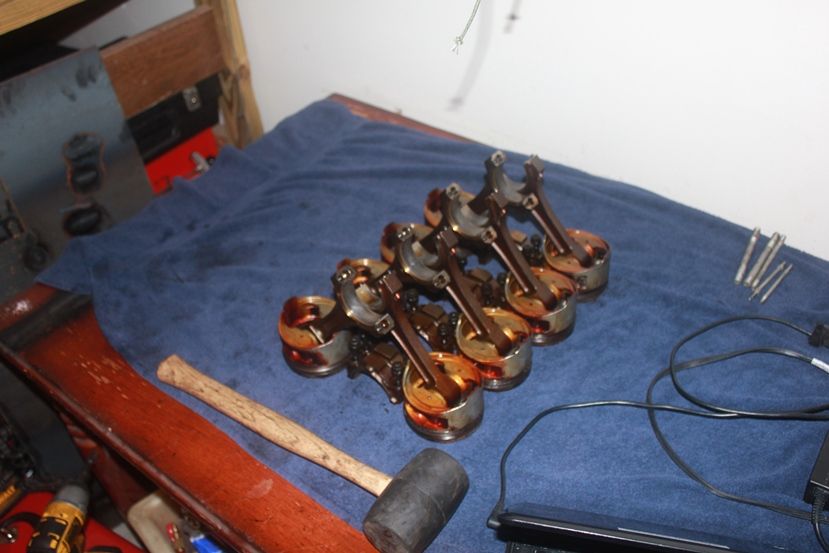
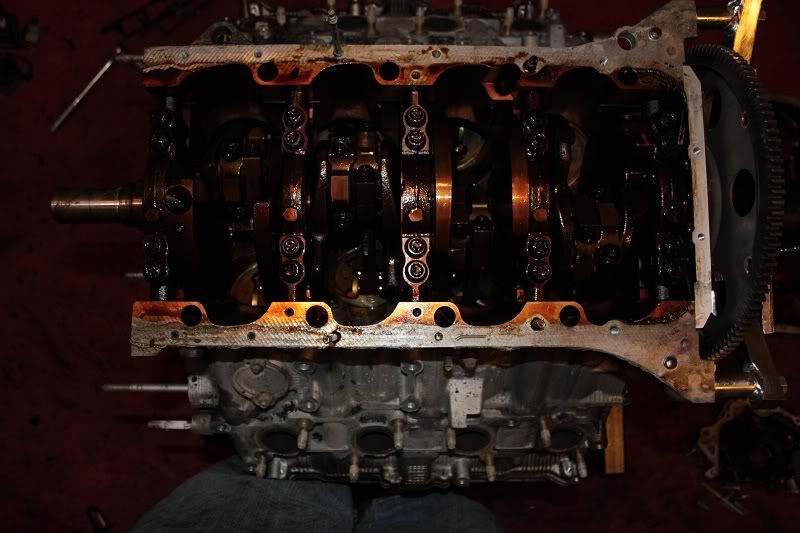
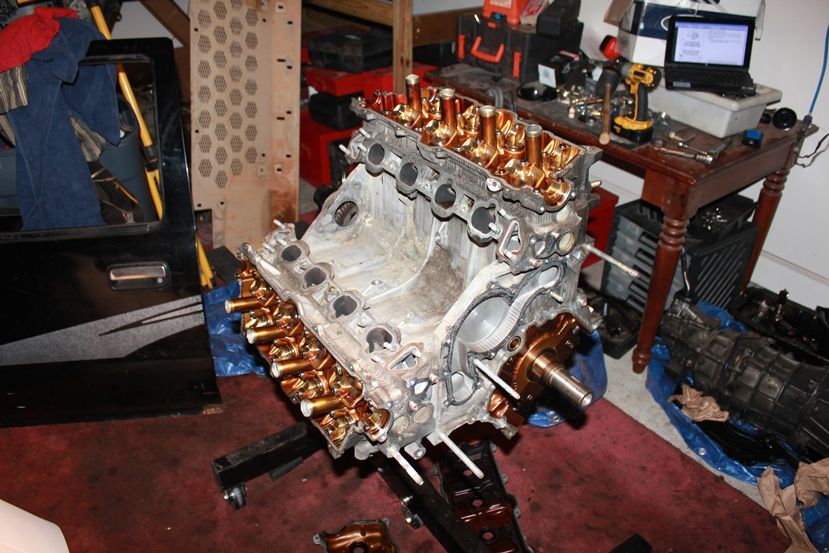
Got the pistons pulled.
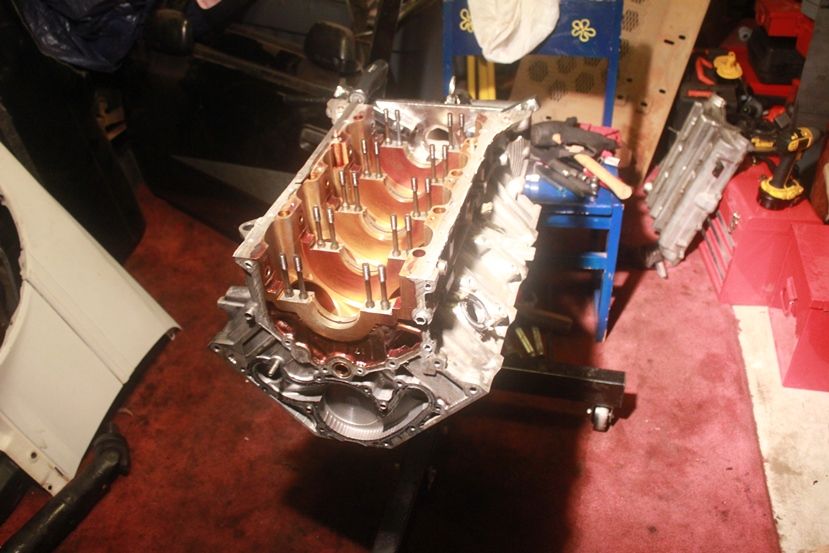
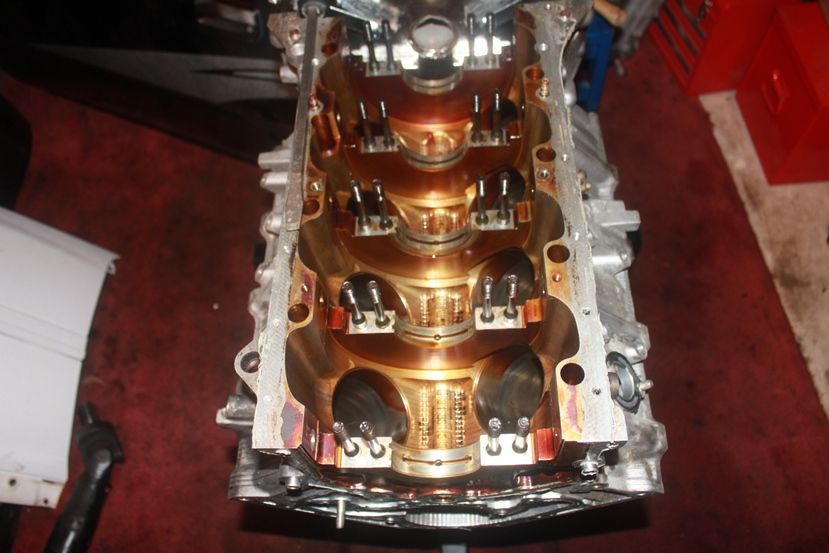
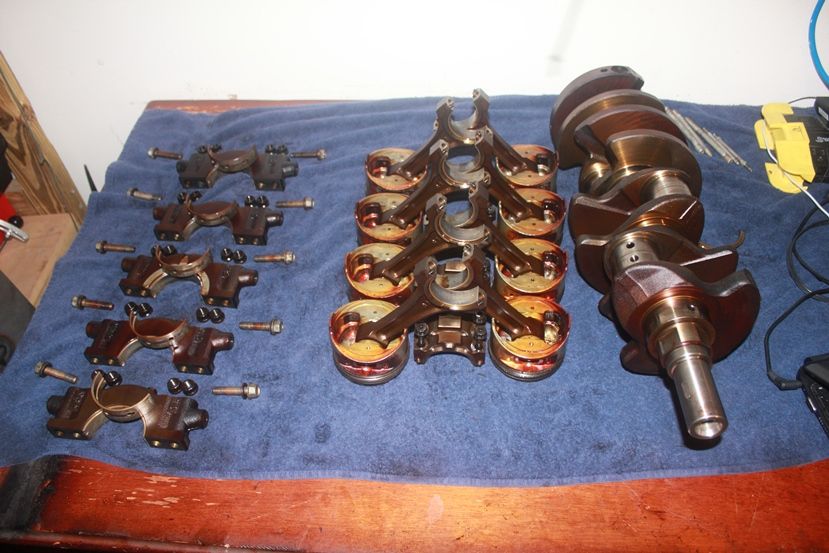
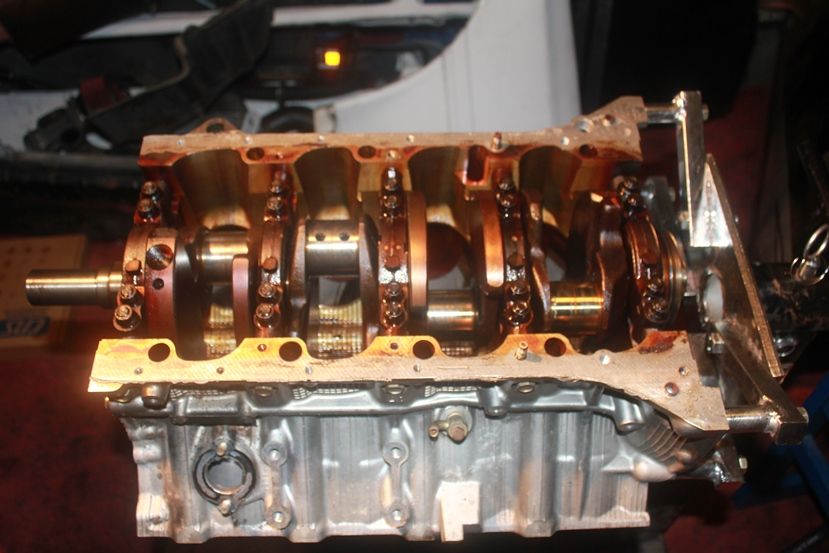
So there it is. Everything is out of the block except for the main studs and a few other attachment studs.
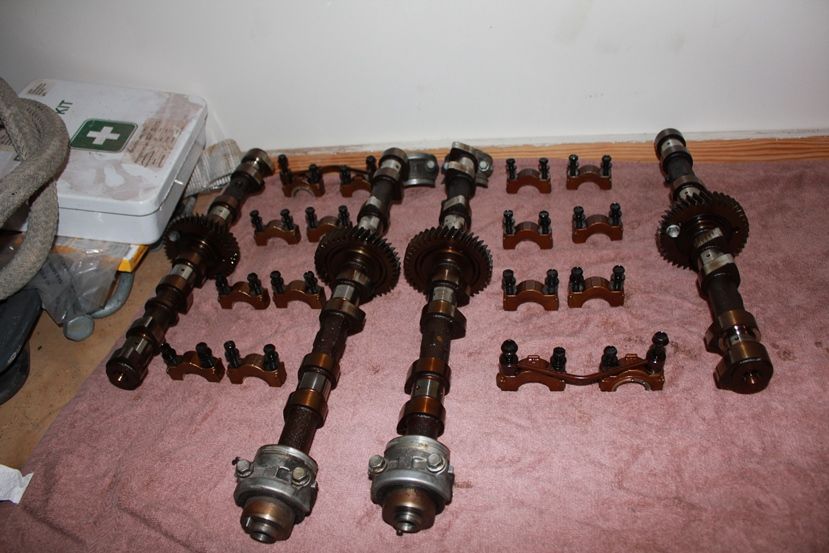
From here I need to completely disassemble the valvetrain, the camshafts, and the pistons. Then I am going to check everything, and make sure it will all be good. I hope that all goes well...I am crossing my fingers for that. Especially the valves, which I have heard can get bent when you throw a timing belt. I hope not. After that I am going to clean everything up, and paint what I need to. What do you guys think is the best way to clean the block? Should I just pressure wash it, or should I get it cleaned some other way? What do you guys think?
After that I can put it all back together, and get it ready to run. Then wiring, and as soon as I get my bellhousing I can put it all together. Thanks guys for following the progress.
So the first part of me being super busy, even though I am on leave is although I am on leave my job as a NCO never ends. I am still working to help my soldiers with their problems. So that is a never ending process.
Another thing keeping me busy is my birthday present from my wife.
I have wanted a Siberian Husky my whole life. They are absolutely my favorite dogs and my wife knows this. Of course we never really had the opportunity to have one. They are alot of work and because I am a full time soldier, my wife would end up taking alot of the responsibility. So she decided that I couldn't have one until I would be batter able to be responsible for it's daily needs...basically when I got out of the army...lmao
However, after my second deployment my wife decided that as my late birthday present, she was going to get me one. He is about eight weeks old definitely a handful. I am glad that I am on leave right now. Because even though she has finally agreed to help take care of him, he is a pain right now.
Anyway....on to the car update.
So I continued by tearing out everything in the engine bay. And I had a little helper.
I had my son out helping me...so yeah naturally everything took twice as long, but it was awesome having him out there to spend time with him. Well I got most of the wiring in the bay undone. And I got the driver's side fender off so I could start working the wiring out from the cab. Then I started working on tearing into the dash so that I could get to all the wiring. My wife came out to help me with that, usually she will come out and sit by while I work. But this time she decided she wanted to help me work on it. That is a very rare occasion. So I naturally took advantage of it. Sadly no pictures of that progress, with my son and my wife helping me I totally lost track of the camera.
However I do have a question. How do you get the dash out? I got everything unbolted but I can't get it to come loose. I even went so far as to pull the FSM out to make sure I got all the bolts, and I still can't get it out. Has anyone else had this problem? Is there some special trick I am missing? Thanks guys.
Well that was all for that day, just wiring in the bay and dash in the cab.
The next couple of days was a bunch of terrible weather and puppy care. So I decided I would get back to work, but I would take care of the engine while the weather is being uncooperative. So before I show you guys the progress I made on the engine in the last two days, I would show you what I had already done with it, before I deployed, when I was getting it ready for the truck....
When I brough it home. I still had my other truck back then. I love my Yotas...lmao I have had three of those exact same trucks, 94 Pickup 2WD 4-banger single cab...the one in the garage that I am building is a 93 Pickup 4WD V6 extracab...now I have my supra, and my wife has her corolla...I am a toyota lover.
Anyway...
So I had the engine on the stand ready to get worked on, and I went to work just tearing her down.
I chipped the edge off of the crank pulley by putting the puller on the wrong spot. I hate making rookie mistakes when I am absolutely not a rookie. I mean, this is what I do for a living...lmao I am a mechanic.
Started working on the wiring harness as well. But I put that away quickly to get back to work on the engine itself.
So this is where I can show you my current progress. Like I was saying before, I planned on rebuilding this motor from the ground up anyway. Not to give it more performance, not yet. But because I wanted to check out every inch of the motor, to make sure it was good. Since he threw a timing belt, I wanted to make sure the valves are all good, and just basically start fresh. It only had 50+ K on it, but I am still gonna do the rebuild. So that is what all those parts are for. Eventually I will work on performance with it. But until then I want to make sure the internals are solid.
Got the camshafts and heads out first. However I decided to wait until I had the block completely broken down before I would disassemble the heads, camshafts, or the pistons.
This kids were in the garage with me, helping me remove the heads. Like I said, being able to spend time with them is very important to me. Of course, the fact that my kids are so syked to help me work on my car is even better. Who doesn't want their kids to be into their own hobbies. Right.
Oh, and did you see that carbon build up...ugh...
Got the pistons pulled.
So there it is. Everything is out of the block except for the main studs and a few other attachment studs.
From here I need to completely disassemble the valvetrain, the camshafts, and the pistons. Then I am going to check everything, and make sure it will all be good. I hope that all goes well...I am crossing my fingers for that. Especially the valves, which I have heard can get bent when you throw a timing belt. I hope not. After that I am going to clean everything up, and paint what I need to. What do you guys think is the best way to clean the block? Should I just pressure wash it, or should I get it cleaned some other way? What do you guys think?
After that I can put it all back together, and get it ready to run. Then wiring, and as soon as I get my bellhousing I can put it all together. Thanks guys for following the progress.
When I need to clean any parts I use simple green/ marine clean, wire brush, water, and a bunch of junk towels/ paper towels. But the best way would be to tank it in a cleaning solution, any machine shop that does engine work should have a parts cleaner or know somone who does.
Progress looks good, did that PDF help out?
Progress looks good, did that PDF help out?
Yes thank you...it turns out the one i have is for a vvti engine and they just dont match...lmao
So you giving me that manual was a godsend thank you very much.
So you giving me that manual was a godsend thank you very much.
You're welcome, yea the VVTI engines are way off vs the non VVTI ones.
If you havent allready, check out the links in my sig for help wiring etc. But I'm on here often and can awnser questions directly too. Been rocking the 1UZ in my Supra for over 30k miles now. Shooting to make some real power here soon.
If you havent allready, check out the links in my sig for help wiring etc. But I'm on here often and can awnser questions directly too. Been rocking the 1UZ in my Supra for over 30k miles now. Shooting to make some real power here soon.
Are you using new piston rings when you put it back together?
Regardless, I might suggest honing the cylinders just a bit, unless the crosshatch is still very visible.
Regardless, I might suggest honing the cylinders just a bit, unless the crosshatch is still very visible.
Yes I am using new piston rings...I am replacing the main bearings, rod bearings, thrust washers, piston pin bushings, piston rings, full gasket and seal set, ignition wires, distributor caps and rotors, spark plugs, water pump, timing belt kit, oil pump, possibly ignitors...when I disassemble the valve train I will find out whether or not I need to replace anything in the heads.
Now I have everything I need to rebuild it except for the oil pump, and I have to replace the wireset, I accidentally bought the universal set, and I don't want to build my own, so I am returning it for the NGK wireset.
I wasn't going to replace the oil pump, but since I am replacing everything else, I don't know why I wouldn't.
However, speaking of the crosshatch...it looks really good...but I will probably hone it up a little anyway...
What do you guys think the best way to scrape gaskets off the aluminum is. I am afraid that the gasket scrapers might do damage...I have been using a straight razor, but just wondering if you guys have a better way, let me know.
Cool! If you haven’t yet, check out Rockauto.com. They have a lot of parts for the 1UZ (SC400), I get my tune up parts (plugs/wires/cap/rotors/oil filters) there. And the NGK wire set is a good investment, quality is good and they go right where the factory ones go.
Look into a brass scraper, or using gasket remover. That will be the best way. I usually just use a flat razor though.
Look into a brass scraper, or using gasket remover. That will be the best way. I usually just use a flat razor though.