
If you want to check on the general status of your engine's health or have a problem and want to narrow down the cause (e.g. a suspect blown head gasket), you can perform a compression test. The purpose of the test is to determine whether each cylinder is holding pressure correctly by fitting a pressure gauge then charging the cylinder with air.
The only thing you need to buy is the tester itself which should cost you around £15, in my opinion there's little benefit in getting a snap on one as opposed to a cheap and cheerful unit, you won't use it often and a basic unit will be accurate enough.
As your piston moves up and down in the cylinder, air is sucked in and compressed as part of the four stroke cycle. If we measure the peak cylinder pressure recorded we can get a rough insight into the condition of the engine. If the pressure fails to hold it could indicate worn/damaged piston rings, poor valve seals or other internal damage. The precise cause is not always revealed by this test but it does give a big clue as to whether one or more cylinders are not performing and is very simple to do so I recommend you invest in the tester and give it a try.
You will be using the starter motor to rotate the engine which puts quite a load on the battery so you need to make sure it is in good shape to do the test. You can't have the engine turning over slowly for the last cylinder for example or you will get a false reading.
Note this is performed on a warm engine or you will get lower readings.
Step 1 - Follow the guide for removing the coil pack.
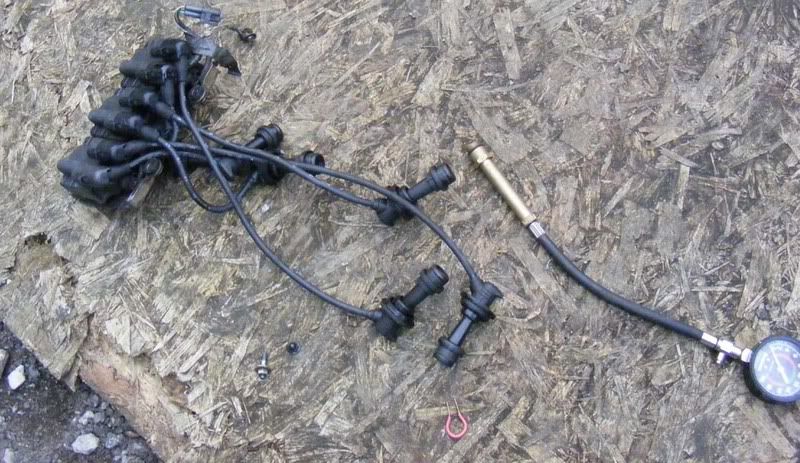
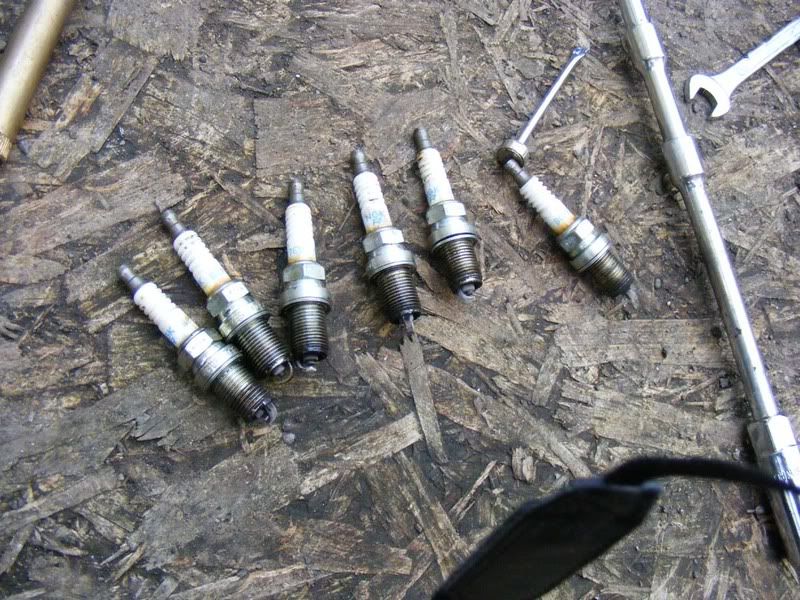
Step 2 - Remove all six spark plugs

Step 3 - Always examine the plugs on removal and look for signs of engine problems, basically if one or two plugs look different to the rest then you may have an issue with that cylinder
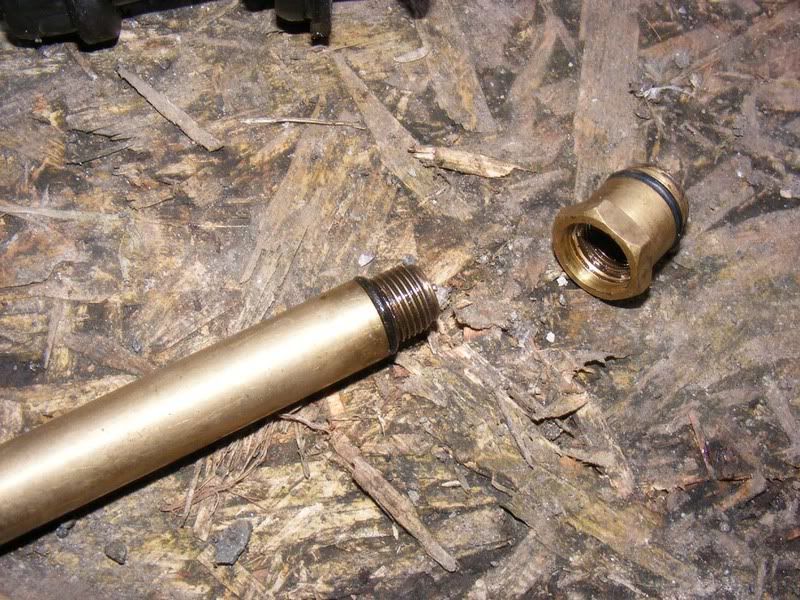
Step 4 - You will want to use the narrow fitting for your compression tester on the Supra's engine, typically you have a screw on adaptor for larger bore plug holes as shown
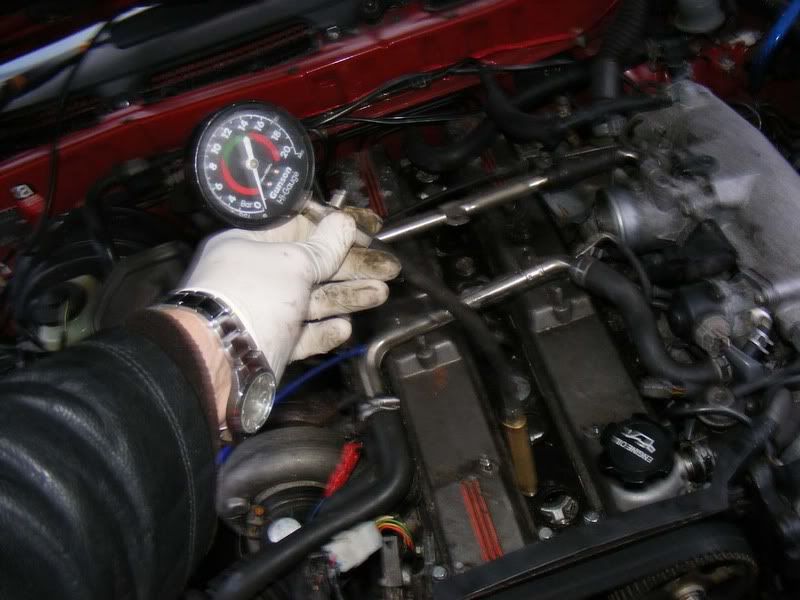
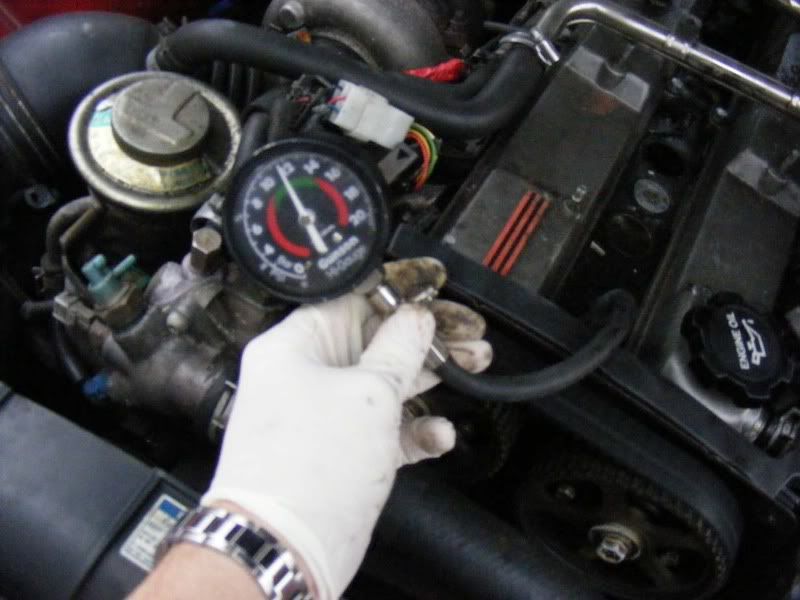
Step 5 - Here you can see the tester in full, the metal part screws into the spark plug hole (I just spin it using the gauge and never had a problem with it leaking, just make sure it's pinched tight-no need to start attacking it with mole grips etc!), the gauge shows the pressure and there is a metal button just by my index finger, this is to release the pressure once the test is completed
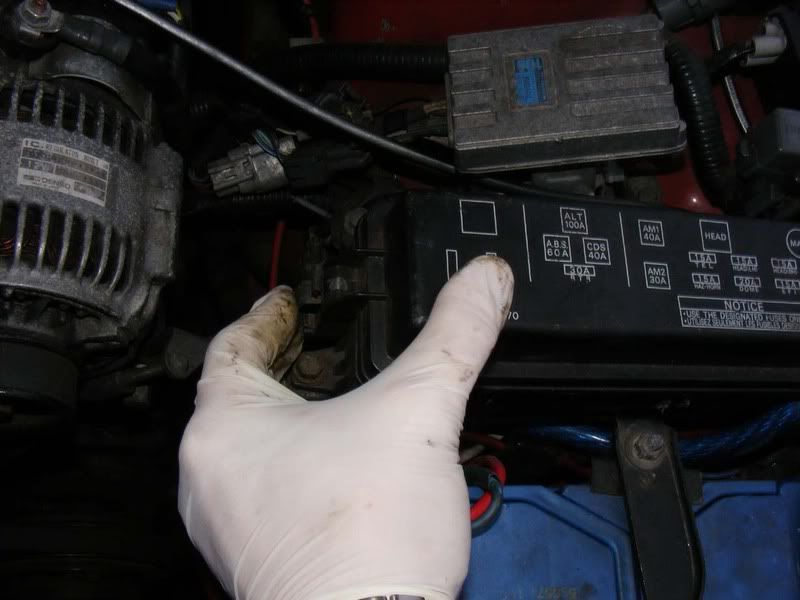
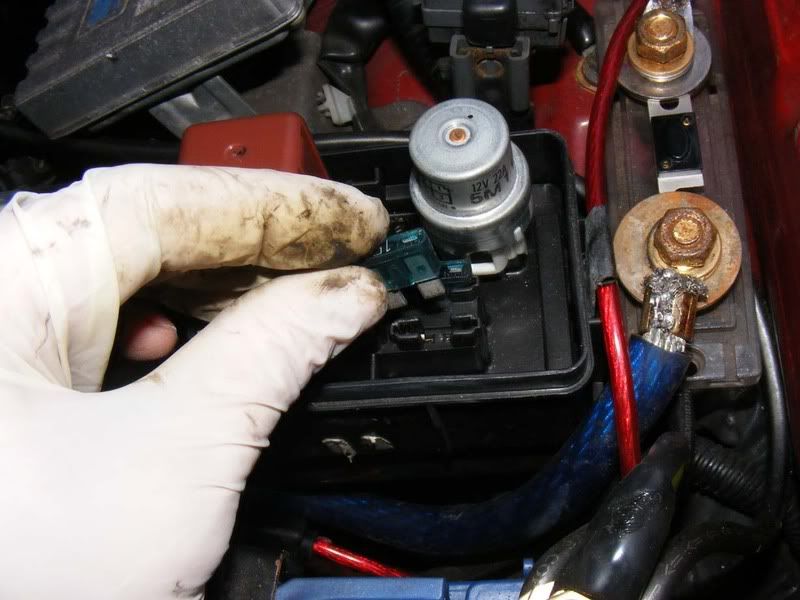
Step 6 - Remove the fuse box cover next to the battery
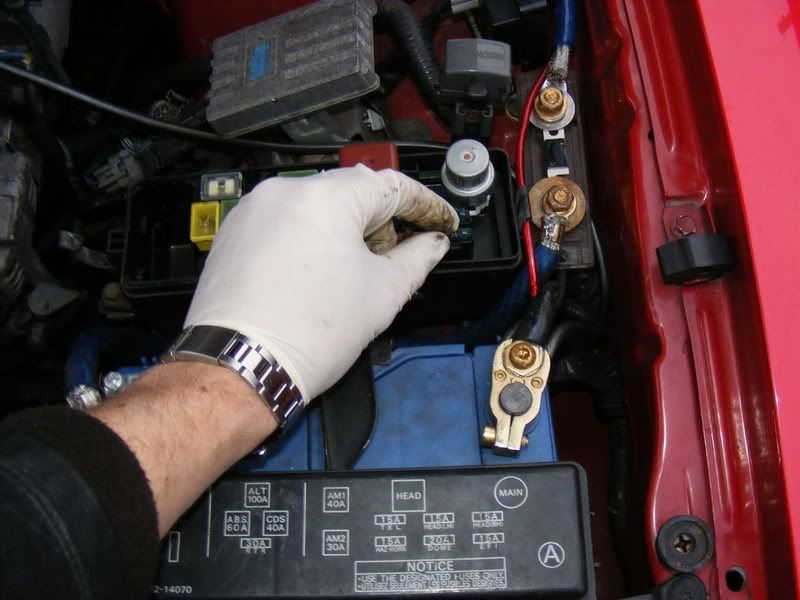
Step 7 - Remove the 15 amp fuse at the bottom right hand corner, this is for the fuel pump. With no coil packs and no fuel pump you will have no issues with sparking or dumping unburnt fuel into the cylinder (or catalytic converter where fitted). You can also disconnect the CPS wiring at this point which is a simple plastic connector on the CPS itself
Step 8 - Hold your foot down on the throttle (right to the floor so air can get into the cylinders without restriction) and crank the engine over a number of times. Pick a number of revolutions and stick with it for all cylinders, at least 5 but no more than 10 is fine.
If you have an assistant then get them to floor the throttle and crank the engine so you can watch the gauge and see how the pressure builds - importantly, do all cylinders build pressure in the same manner. If you are using an assistant then you can tell them to stop cranking once the gauge stops rising, should still be no more than 10 revolutions though
Ideally all cylinders will be identical but this is often not the case. If the engine is in good condition then it will quickly build pressure (something around 60% on the first compression stroke i.e. the first jump of the needle and then the rest within about 3 cycles). Worn rings may be indicated by a slow build up in jumps of a few tens of psi each time.
Step 9 - After each cylinder has been cranked go and check the pressure on the gauge as accurately as you can before releasing the pressure with the metal button as shown. The cylinder pressures should be as follows:
1. Normally greater than or equal to 142 psi in each cylinder
2. At a minimum 128 psi in the cylinder or you have to investigate further
3. No more than 14 psi difference between each cylinder
If your gauge is only marked in bars as opposed to psi then multiply by 14.5 to convert e.g. 2 bar = 2x14.5 = 29 psi
Step 10 - Record readings for each cylinder as you progress through the test. If any single cylinder is low (more than 14 psi lesss than any other cylinder), try putting a few drops of oil down the spark plug hole and then repeat the test. If this improves the results then you are probably looking at worn piston rings, if not you need to investigate further with something like a leakdown test for valve problems.
If you put oil in the plug hole then do the test it is often referred to as a 'wet' compression test as opposed to the 'dry' test we do without oil.
Step 11 - Once finished, replace the fuel pump fuse and the fuse box cover. Removing this fuse for > 30 seconds will reset the ECU which means you will have wiped any stored error codes and also the ECU will need to go through it's self learning phase for a few miles so expect the car to run a little rough for up to 30 minutes or so. Just take it out for a nice long drive
Step 12 - Replace each spark plug and torque them up as shown (13 ft/lbs)
Step 13 - Refit the coil pack and then you can analyse the results in more detail. If you find two adjacent cylinders are low on pressure then it's possible the head gasket seal has failed between the two cylinders.
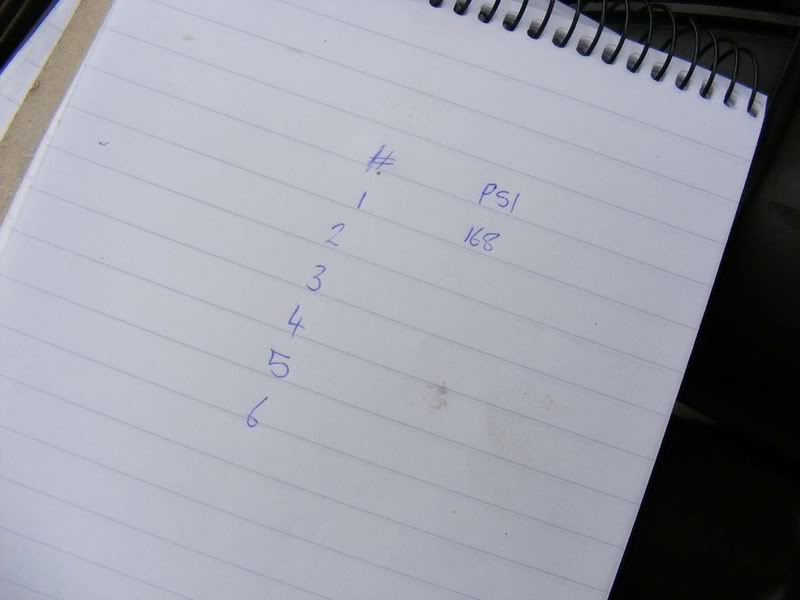
Just for info my results were:
Cylinder #1 168 psi
Cylinder #2 172 psi
Cylinder #3 172 psi
Cylinder #4 162 psi
Cylinder #5 171 psi
Cylinder #6 176 psi
I'm not too concerned at that although I do have a difference of exactly 14psi (176-162) between cylinders 4 and 6 which is right on the limit. I know I'm getting through a lot of oil so will be looking into this in more detail when I do the leakdown tester guide.
If you do find one or more cylinder is very low then the cause may seem of little importance as the head will come off anyway but I'd urge you to perform the leakdown test anyway, there may be multiple problems with the head and you could end up stripping it down, fixing part of the trouble then building it back up with the same issue. A leakdown test should help narrow down issues with valves, rings, head gasket etc.
The only thing you need to buy is the tester itself which should cost you around £15, in my opinion there's little benefit in getting a snap on one as opposed to a cheap and cheerful unit, you won't use it often and a basic unit will be accurate enough.
As your piston moves up and down in the cylinder, air is sucked in and compressed as part of the four stroke cycle. If we measure the peak cylinder pressure recorded we can get a rough insight into the condition of the engine. If the pressure fails to hold it could indicate worn/damaged piston rings, poor valve seals or other internal damage. The precise cause is not always revealed by this test but it does give a big clue as to whether one or more cylinders are not performing and is very simple to do so I recommend you invest in the tester and give it a try.
You will be using the starter motor to rotate the engine which puts quite a load on the battery so you need to make sure it is in good shape to do the test. You can't have the engine turning over slowly for the last cylinder for example or you will get a false reading.
Note this is performed on a warm engine or you will get lower readings.
Step 1 - Follow the guide for removing the coil pack.
Step 2 - Remove all six spark plugs
Step 3 - Always examine the plugs on removal and look for signs of engine problems, basically if one or two plugs look different to the rest then you may have an issue with that cylinder
Step 4 - You will want to use the narrow fitting for your compression tester on the Supra's engine, typically you have a screw on adaptor for larger bore plug holes as shown
Step 5 - Here you can see the tester in full, the metal part screws into the spark plug hole (I just spin it using the gauge and never had a problem with it leaking, just make sure it's pinched tight-no need to start attacking it with mole grips etc!), the gauge shows the pressure and there is a metal button just by my index finger, this is to release the pressure once the test is completed
Step 6 - Remove the fuse box cover next to the battery
Step 7 - Remove the 15 amp fuse at the bottom right hand corner, this is for the fuel pump. With no coil packs and no fuel pump you will have no issues with sparking or dumping unburnt fuel into the cylinder (or catalytic converter where fitted). You can also disconnect the CPS wiring at this point which is a simple plastic connector on the CPS itself
Step 8 - Hold your foot down on the throttle (right to the floor so air can get into the cylinders without restriction) and crank the engine over a number of times. Pick a number of revolutions and stick with it for all cylinders, at least 5 but no more than 10 is fine.
If you have an assistant then get them to floor the throttle and crank the engine so you can watch the gauge and see how the pressure builds - importantly, do all cylinders build pressure in the same manner. If you are using an assistant then you can tell them to stop cranking once the gauge stops rising, should still be no more than 10 revolutions though
Ideally all cylinders will be identical but this is often not the case. If the engine is in good condition then it will quickly build pressure (something around 60% on the first compression stroke i.e. the first jump of the needle and then the rest within about 3 cycles). Worn rings may be indicated by a slow build up in jumps of a few tens of psi each time.
Step 9 - After each cylinder has been cranked go and check the pressure on the gauge as accurately as you can before releasing the pressure with the metal button as shown. The cylinder pressures should be as follows:
1. Normally greater than or equal to 142 psi in each cylinder
2. At a minimum 128 psi in the cylinder or you have to investigate further
3. No more than 14 psi difference between each cylinder
If your gauge is only marked in bars as opposed to psi then multiply by 14.5 to convert e.g. 2 bar = 2x14.5 = 29 psi
Step 10 - Record readings for each cylinder as you progress through the test. If any single cylinder is low (more than 14 psi lesss than any other cylinder), try putting a few drops of oil down the spark plug hole and then repeat the test. If this improves the results then you are probably looking at worn piston rings, if not you need to investigate further with something like a leakdown test for valve problems.
If you put oil in the plug hole then do the test it is often referred to as a 'wet' compression test as opposed to the 'dry' test we do without oil.
Step 11 - Once finished, replace the fuel pump fuse and the fuse box cover. Removing this fuse for > 30 seconds will reset the ECU which means you will have wiped any stored error codes and also the ECU will need to go through it's self learning phase for a few miles so expect the car to run a little rough for up to 30 minutes or so. Just take it out for a nice long drive
Step 12 - Replace each spark plug and torque them up as shown (13 ft/lbs)
Step 13 - Refit the coil pack and then you can analyse the results in more detail. If you find two adjacent cylinders are low on pressure then it's possible the head gasket seal has failed between the two cylinders.
Just for info my results were:
Cylinder #1 168 psi
Cylinder #2 172 psi
Cylinder #3 172 psi
Cylinder #4 162 psi
Cylinder #5 171 psi
Cylinder #6 176 psi
I'm not too concerned at that although I do have a difference of exactly 14psi (176-162) between cylinders 4 and 6 which is right on the limit. I know I'm getting through a lot of oil so will be looking into this in more detail when I do the leakdown tester guide.
If you do find one or more cylinder is very low then the cause may seem of little importance as the head will come off anyway but I'd urge you to perform the leakdown test anyway, there may be multiple problems with the head and you could end up stripping it down, fixing part of the trouble then building it back up with the same issue. A leakdown test should help narrow down issues with valves, rings, head gasket etc.