
Checking and adjusting your valve shims is something you should do as routine maintenance. If the shims are wrong you can lose power and increase emissions, check them! It's a fiddly job and you need a friend but it might well make a big difference to your car. I found EVERY single shim was wrong - no clearance at all on any of them. That's not something you can ignore.
Make sure you do this when the engine is cold too because metal expands when hot so would give inaccurate readings
Step 1 - Follow the guide for removing the cam covers
Step 2 - Put a 19mm socket on the crank pulley so you can rotate the engine (use a breaker bar if you can, mine was broken!)

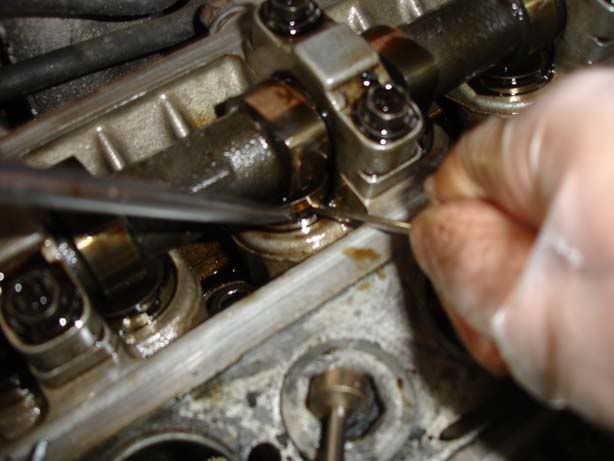
Step 3 - Rotate the crank until the nose of the cam lobe (the pointy bit on the cam) faces directly away from the top of the valve. This is the point where there is the greatest clearance. You then need to insert a feeler gauge to measure the clearance between the cam and the valve shim (the metal circle directly underneath the cam)

Step 4 - Note down all the clearances before you do anything else. You'll find that when you rotate the crank you'll do the cams in pairs where you have 2 cams on the inlet side facing away from the valve and 2 from the exhaust side will be as well. Once you have the clearances for all these you can work out your new shim sizes.
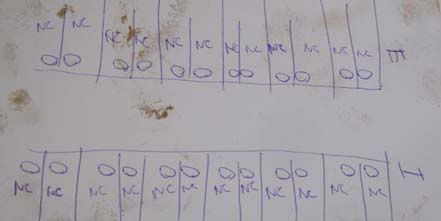
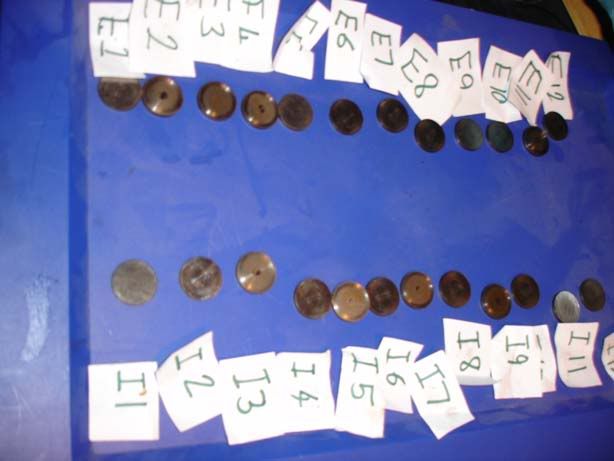
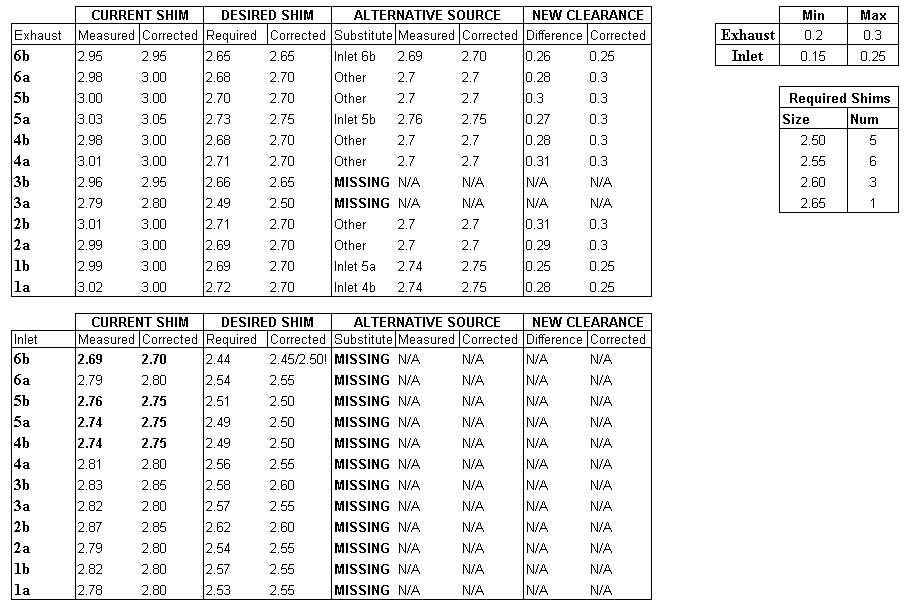
Here's a picture of what I recorded (NC = no clearance)
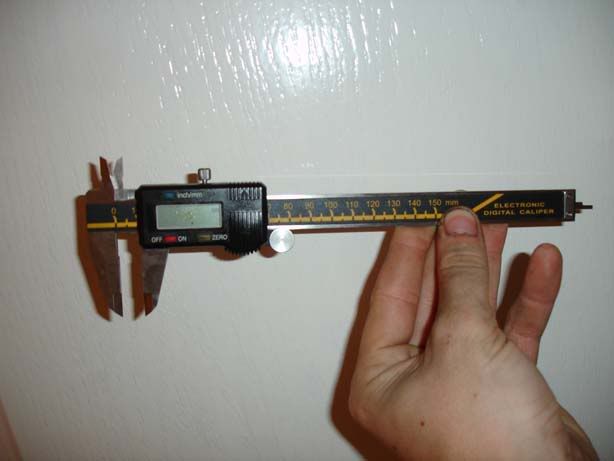
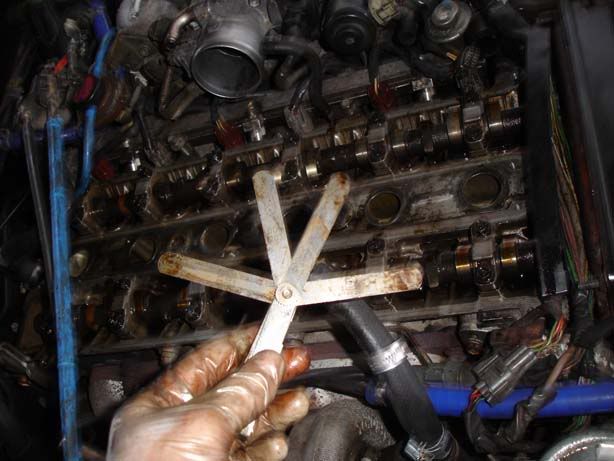
To measure the shims you need a micrometer or electronic calipers (See picture). The sizes of shims available are from 2.5 mm to 3.3 mm going up in steps of 0.05mm (17 different sizes). So when you measure them you should be able to correlate to a given size
Step 5 - The desired clearances are :
Exhaust : 0.20mm - 0.30mm
Inlet : 0.15mm - 0.25mm
To adjust your clearance you do the follwoing formulae:
Inlet: New shim size = Old shim size + (Clearance measured - 0.20mm)
Exhaust: New shim size = Old shim size + (Clearance measured - 0.25mm)
If you end up with no clearance at all then here's what I recommend:
1. You are unable to determine what size shim to use but you know it must be smaller than the current one
2. You have specs to show the minimum and maximum clearance for the valve lash (That's the distance between the cam and shim)
3. You know that by subtracting the maximum clearance from the current shim size you won't make a gap that exceeds the limits
4. By subtracting the maximum clearance allowed you have the best chance of getting a shim small enough to fit in
So based on that:
Inlet: New shim size = Old shim size - 0.30m
Exhaust: New shim size = Old shim size - 0.25mm
Step 6 - OK so you measured your gaps, worked out your new shim values and now you need to swap them. It's not easy and you DO need two people. Here's what you have to do:
(Ensure you have good lighting)
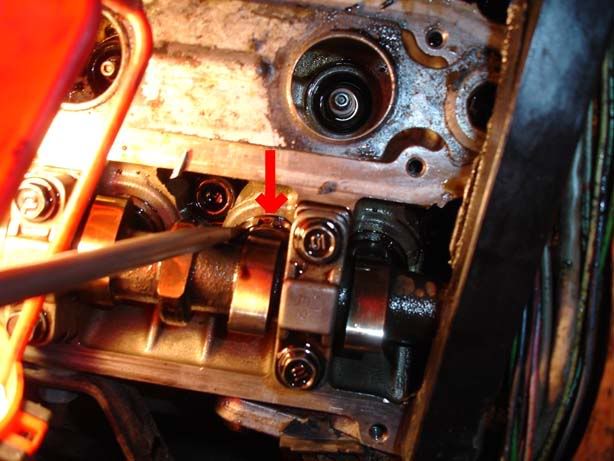
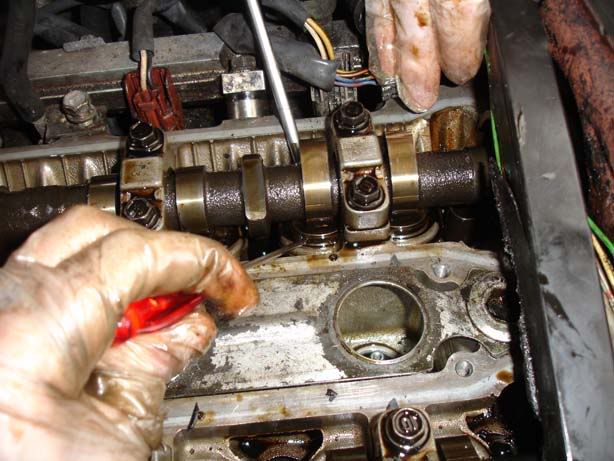
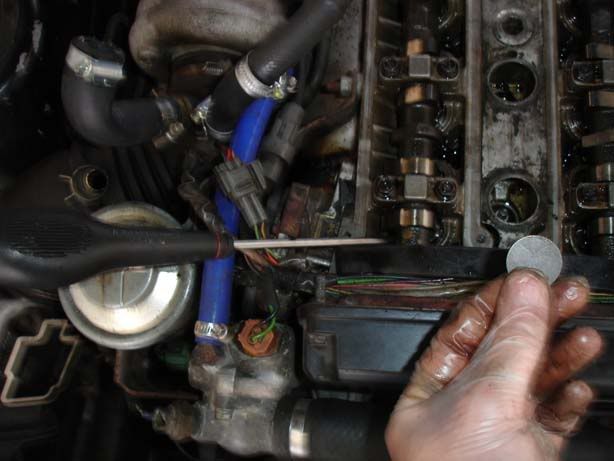
There is a small recess in the lifter/bucket as shown in this picture. The lifter should be rotated until you have good access to this
Once you can see the recess, get person 1 to insert a small flatblade screwdriver to hold it in place. Person 2 should take a big flatblade screwdriver and position it on the lip of the lifter itself (but not on the shim)
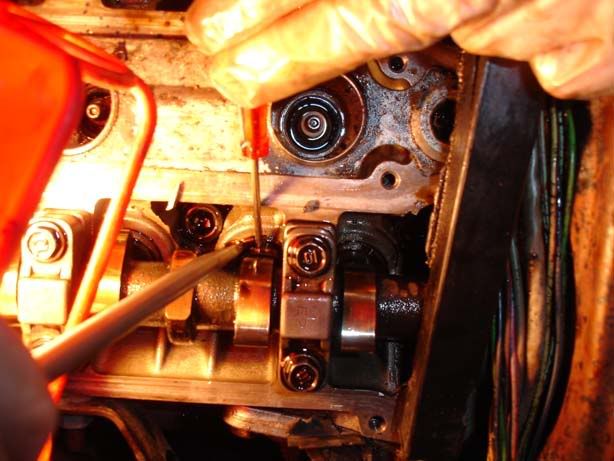
Person 2 needs to press down on the lifter with enough force to push the valve spring down (quite a lot and you have to try and stop the screwdriver from slipping off the small lip). When they do this, Person 1 can insert their small screwdriver past the recess and underneath the shim
On most of the valves, you can then push down with the big screwdriver on the back of the lifter and the shim will be able to slide straight out (Magnetic parts tool or pliers can handle these)
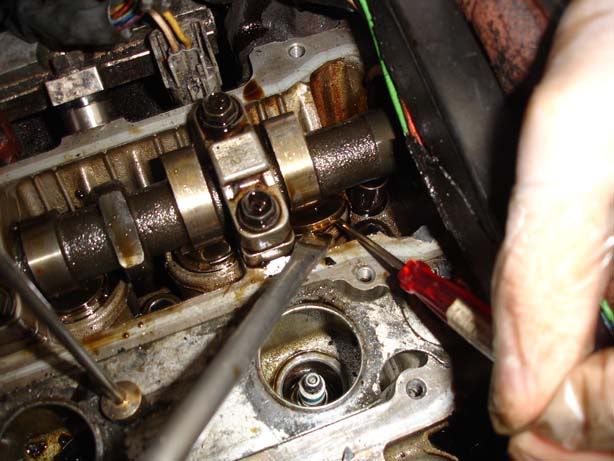
For the others you can try various techniques. We found a successful one was to insert the big screwdriver under the cam (over the shim) and rotate it away from the camshaft bearing cap (in the case of this picture it would be clockwise) to rotate the shim out
Pliers are invaluable - the shims are tough little cookies so you can pull them about with pliers and not damage them. If you can get some purchase with the pliers then you just need to compress the spring a little and you can pull it free.

For information, here's a chart I drew up for mine:

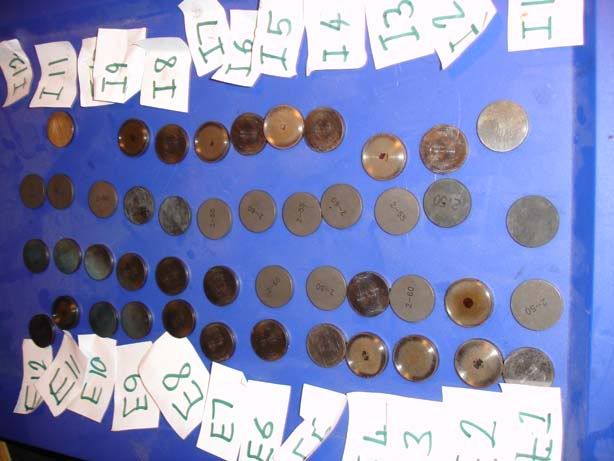
Step 7 - With all your shims removed be careful (VERY careful) not to mix them up. I put each one in a seperate polythene bag with a label. When it came to reinstalling them, I laid each one out as shown below
Step 8 - For info, I used shims from a Ford Zetec engine (thanks to signman for getting these) which are good because they have the values printed on them and are an exact swap - I also got them for £2 each instead of Toyota's £5.60 odd + VAT. This can get very expensive if you need as many shims as I did so be prepared!
Step 9 - Next, I laid out all my new valve shims inside the existing ones. There was some crossover where I could swap inlet/exhaust shims over but not much. You might be luckier than me
Step 10 - Reinstalling the shims can be done on your own (although may be easier with 2 people). All you need to do is :
a) Hold the shim in position next to the bucket it will sit in
b) Depress the bucket a small amount with the other hand
c) Push the shim in as far as you can with your fingers
d) Tap it into place with a screwdriver

e) Spin the bucket and ensure it sits properly
Couldn't get any decent pics because I was too busy trying to put the shims in on my own!
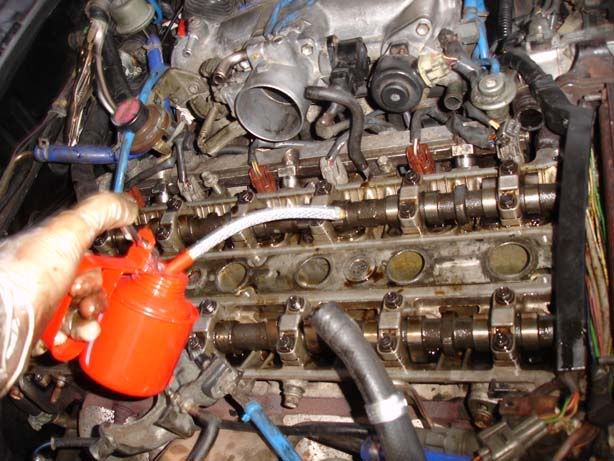
Step 11 - I think it is better to give a quick squirt of oil to the new shims but an optional step
Step 12 - Get your feeler gauge out again and go through the soul detroying process of re-shimming it! Hopefully you won't have to re-do many/any but if (like me) you are having to guess the sizes due to no clearance you'd have to be very lucky to get them right first time (I'm very lucky!)
Word of warning, rotate the crank slowly when you are checking the valve clearances after fitting the shims, if any pop off then the cam lobe will catch on the lip of the lifter and not be able to turn. If you get too much resistance stop and check all your shims!!
For what it's worth, this made an ENORMOUS different to my car's performance so was a worthy excercise
Make sure you do this when the engine is cold too because metal expands when hot so would give inaccurate readings
Step 1 - Follow the guide for removing the cam covers
Step 2 - Put a 19mm socket on the crank pulley so you can rotate the engine (use a breaker bar if you can, mine was broken!)
Step 3 - Rotate the crank until the nose of the cam lobe (the pointy bit on the cam) faces directly away from the top of the valve. This is the point where there is the greatest clearance. You then need to insert a feeler gauge to measure the clearance between the cam and the valve shim (the metal circle directly underneath the cam)
Step 4 - Note down all the clearances before you do anything else. You'll find that when you rotate the crank you'll do the cams in pairs where you have 2 cams on the inlet side facing away from the valve and 2 from the exhaust side will be as well. Once you have the clearances for all these you can work out your new shim sizes.
Here's a picture of what I recorded (NC = no clearance)
To measure the shims you need a micrometer or electronic calipers (See picture). The sizes of shims available are from 2.5 mm to 3.3 mm going up in steps of 0.05mm (17 different sizes). So when you measure them you should be able to correlate to a given size
Step 5 - The desired clearances are :
Exhaust : 0.20mm - 0.30mm
Inlet : 0.15mm - 0.25mm
To adjust your clearance you do the follwoing formulae:
Inlet: New shim size = Old shim size + (Clearance measured - 0.20mm)
Exhaust: New shim size = Old shim size + (Clearance measured - 0.25mm)
If you end up with no clearance at all then here's what I recommend:
1. You are unable to determine what size shim to use but you know it must be smaller than the current one
2. You have specs to show the minimum and maximum clearance for the valve lash (That's the distance between the cam and shim)
3. You know that by subtracting the maximum clearance from the current shim size you won't make a gap that exceeds the limits
4. By subtracting the maximum clearance allowed you have the best chance of getting a shim small enough to fit in
So based on that:
Inlet: New shim size = Old shim size - 0.30m
Exhaust: New shim size = Old shim size - 0.25mm
Step 6 - OK so you measured your gaps, worked out your new shim values and now you need to swap them. It's not easy and you DO need two people. Here's what you have to do:
(Ensure you have good lighting)
There is a small recess in the lifter/bucket as shown in this picture. The lifter should be rotated until you have good access to this
Once you can see the recess, get person 1 to insert a small flatblade screwdriver to hold it in place. Person 2 should take a big flatblade screwdriver and position it on the lip of the lifter itself (but not on the shim)
Person 2 needs to press down on the lifter with enough force to push the valve spring down (quite a lot and you have to try and stop the screwdriver from slipping off the small lip). When they do this, Person 1 can insert their small screwdriver past the recess and underneath the shim
On most of the valves, you can then push down with the big screwdriver on the back of the lifter and the shim will be able to slide straight out (Magnetic parts tool or pliers can handle these)
For the others you can try various techniques. We found a successful one was to insert the big screwdriver under the cam (over the shim) and rotate it away from the camshaft bearing cap (in the case of this picture it would be clockwise) to rotate the shim out
Pliers are invaluable - the shims are tough little cookies so you can pull them about with pliers and not damage them. If you can get some purchase with the pliers then you just need to compress the spring a little and you can pull it free.
For information, here's a chart I drew up for mine:
Step 7 - With all your shims removed be careful (VERY careful) not to mix them up. I put each one in a seperate polythene bag with a label. When it came to reinstalling them, I laid each one out as shown below
Step 8 - For info, I used shims from a Ford Zetec engine (thanks to signman for getting these) which are good because they have the values printed on them and are an exact swap - I also got them for £2 each instead of Toyota's £5.60 odd + VAT. This can get very expensive if you need as many shims as I did so be prepared!
Step 9 - Next, I laid out all my new valve shims inside the existing ones. There was some crossover where I could swap inlet/exhaust shims over but not much. You might be luckier than me
Step 10 - Reinstalling the shims can be done on your own (although may be easier with 2 people). All you need to do is :
a) Hold the shim in position next to the bucket it will sit in
b) Depress the bucket a small amount with the other hand
c) Push the shim in as far as you can with your fingers
d) Tap it into place with a screwdriver
e) Spin the bucket and ensure it sits properly
Couldn't get any decent pics because I was too busy trying to put the shims in on my own!
Step 11 - I think it is better to give a quick squirt of oil to the new shims but an optional step
Step 12 - Get your feeler gauge out again and go through the soul detroying process of re-shimming it! Hopefully you won't have to re-do many/any but if (like me) you are having to guess the sizes due to no clearance you'd have to be very lucky to get them right first time (I'm very lucky!)
Word of warning, rotate the crank slowly when you are checking the valve clearances after fitting the shims, if any pop off then the cam lobe will catch on the lip of the lifter and not be able to turn. If you get too much resistance stop and check all your shims!!
For what it's worth, this made an ENORMOUS different to my car's performance so was a worthy excercise
")