
BIG INTERCOOLER INSTALLATION
Parts Used:
$189 Megan Racing Intercooler - 935 Motorsports
$30 3 Rubber Elbows - 935 Motorsports
$10 straight section of 2.5" pipe - exhaust shop
$.25 steel weld tab - Metal store
$10 3" to 2.5" reducer - 935 Motorsports
$5 flat steel bar - Metal store
$10 bag of stainless clamps - Hardware store
$1 1/2" long 8mmx1.25" bolts/washers - Hardware store
This is a rough write up regarding getting the "ebay" intercooler in place for those on a budget. This assumes you have already taken off the stock intercooler setup and that you are keeping the stock fender pipe for ease of installation. You can always go back and change it later.
This is not the highest quality installation. However, for the prices shown, the bang for the buck value here is very high.
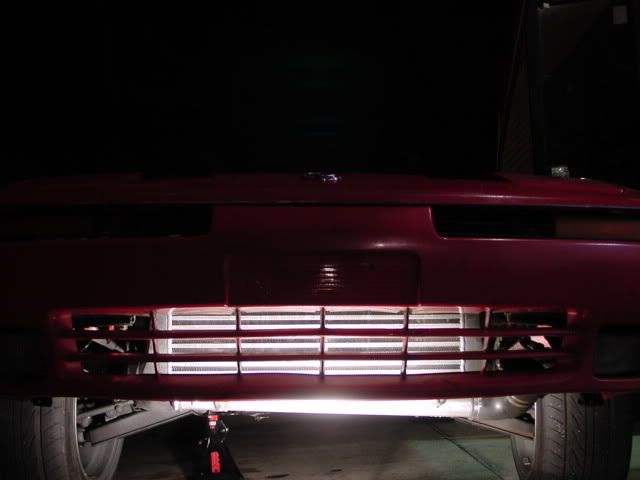
Test Fit
You will notice that the intercooler is much easier to fit if you have it on a jack, rather then trying to hold it up yourself. I've done this install many times, but this was the first time with the nice jack, so I could just hold up the intercooler where I wanted it and go from there.
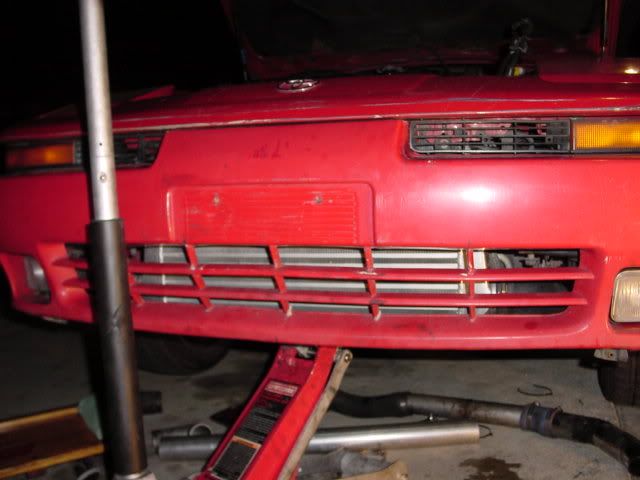
You will notice that there is a lip on the back of the bumper support. It is soft and easy to bend. If you bang on it, cut it off, or bend it up, you will find a little more breathing room to mount. You can also bend back the center support (under hood support) to get more clearance. Once you have this clearance the intercooler will go all the way up.
Note : 91-92 owners will find a massive power steering cooler up where the intercooler wants to go. This creates 2 problems. First, you can't get the intercooler as high as you want it. You want it as high as possible to prevent it from hitting things in the road, curbs, and overall looks. Some like to mount it a little lower to get more air to it. Second, the power steering cooler will cover the top bracket holes on the IC, preventing you from making top brackets.
The solution is to either remove the power steering coooler, re-locate with a smaller cooler, or unbolt the 10mm bolt holding it in place and jam it up higher so the IC can fit. I did not want to remove this one, so I moved it up. It is not bolted down, but it is stuck between the intercooler and bumper, so it is not going anywhere.
Once the intercooler is where it should be, we can continue.
Oil Cooler / Overflow / Driver Side
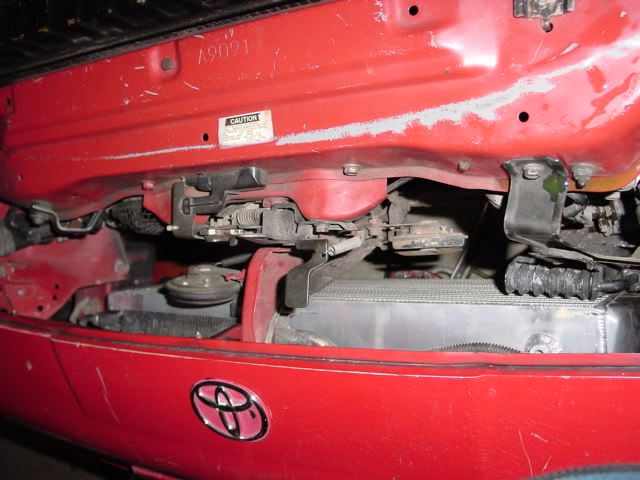
Here you can see the IC resting in place. The lip on my bumper support is gone, so I could easily slide it up and i did not have to modify my center support. The oil cooler is still connected to the stock lines and is resting behind the new IC. The 7M overflow is removed.
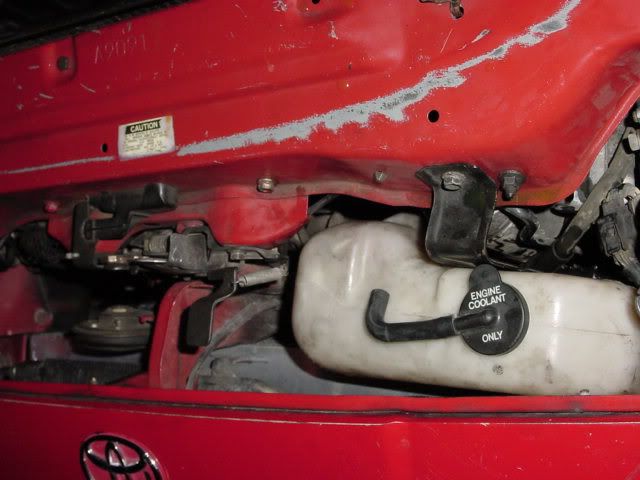
The stock bracket was bent upward some for clearance and 1JZ overflow installed. It has more room for an intercooler and was straight forward.
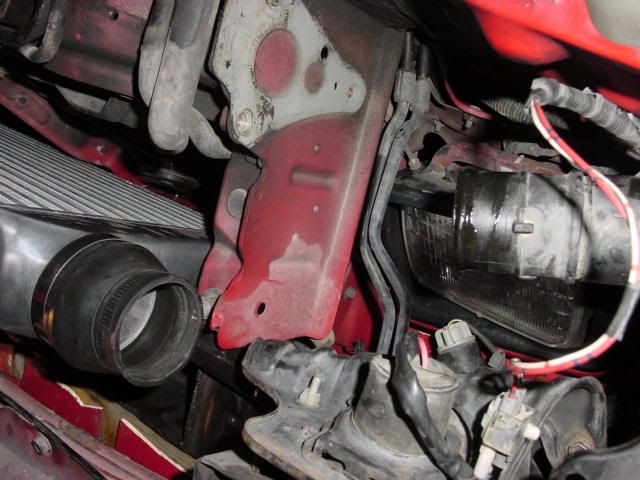
Here is the first look underneath. There are a few issues here. We want the driver side of the IC to make a U turn and go back to the turbo. However, we want the pipe to hug the body so that it is not obviously lower then the car and prevent it from hitting the ground. As you can see the AC line is in the way, and the oil cooler is in the way. On top of that, the oil cooler hard lines are in the way of putting the pipe to the body. Finally, the tow hook should be removed here. It makes things much easier and you have room to play with. If you are not comfortable with this, you can cut a piece off or bend it to the side if needed, when you get to that point. I can tell you now that removing it is going to save you lots of time. 3 17mm bolts and it's off.
For the A/C, you can remove the black bracket and bend the line up slightly. If you don't have A/C, then you are set. The oil cooler causes problems throughout this installation. I would suggest removing the entire system, pipes and all, and install it on the passenger side. This removes the metal pipes AND allows you to actually go behind the IC with the piping, completely hiding it from public view. This is what I desired to do, but time was at a minimum.
Here is the end result. Since I could not go behind the intercooler as planned, I had to go under the body. Originally a steel u-bend was to be used as a 180 degree, but they did not have short radius. You need a short radius bend. The steel U bend was $30, plus $10 for the 3" to 2.5" coupler. However, 2 90 rubber elbows were only $20 total. So I used rubber instead this time around. This also saved weight as the steel is very heavy. I had to weld a bracket on the steel long pipe for safety. In the event that the hose was to ever blow off, the pipe will not fall off. 1 on each side would be better.
You need a straight long pipe to go back to the turbo. I would suggest aluminum, if you can find it. It is much much lighter. I would still suggest making the bracket. I will update the top page with lengths later on.
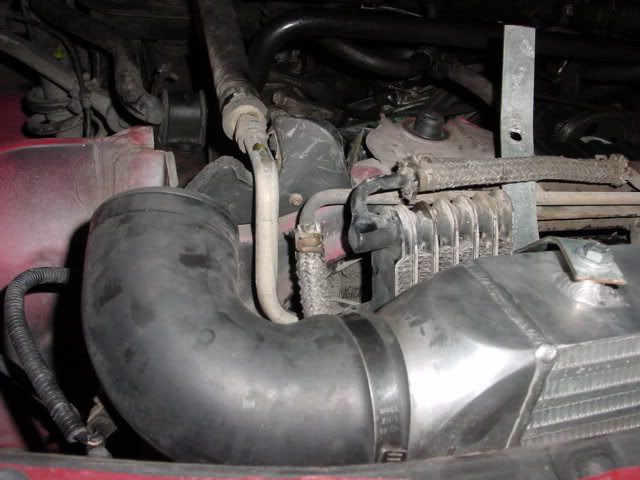
Passenger Side Fender Pipe
This is how it starts once the intercooler is in place. As you can see this is the easy part. All you need is a simple pipe to go from the outlet to the fender pipe. If you position the fender pipe right and the IC right, they are pointing right at each other. You just need 45 degrees and a small straight section. You can use a 45 degree coupler to the fender pipe with straight pipe, or weld a 45 degree end on your pipe. I also found something interesting, one of the 1JZ stock plastic pipes fit perfectly here, the one on the turbo side of the 1JZ. Something to consider if you have any friends with one laying around. Anyways, I found that with some wiggling and some creating positioning of the 3" coupler, a simple straight piece worked. In the picture the passenger side tow hook is removed, but i found that it did not obstruct anything and I put it back on. The passenger side tow hook must be removed in a 1JZ installation though.
Air box note: For those that like to go up through the airbox, it is pretty simple. You must come out of the IC about 3 inches straight. Actually having a 3" or 4" straigiht aluminum pipe welded directly to the intercooler would be ideal. From there its just a 90 degree shot straight up to the airbox hole and a 45 degree bend to go through it. For 2.5" piping there is plenty of room to avoid the headlight.

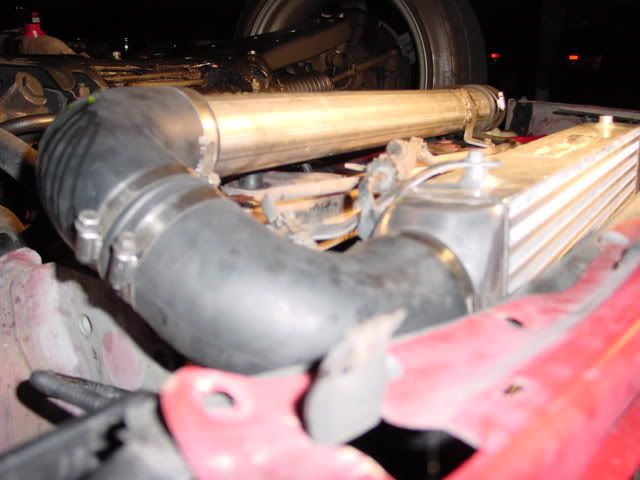
Turbo outlet to long ass straight pipe
The long straight pipe mentioned before should end right about where the IC inlet was positioned, just before the tow hook. A 90 degree rubber elbow here and I was now pointing straight back to the stock turbo piping. You could convert to 2.25" here and use the stock piping OR keep it 2.5" and make hard pipes all the way up to the turbo. After the 90, there is going to be 2 more 45 bends to get up to the turbo and it is a fairly straight shot.
Note:
If you are concerned about lag, I would suggest keeping the piping 2.25" all the way from the turbo to the IC. There will be less volume to fill when off boost and keep the velocity up. Big pipe size is not required. On another installation of this same IC, I used 2.25" pipe all on the turbo side to promote velocity and for better ground clearance. He just dynoed 367 to the wheels at 15 psi, on a very basic setup. So unless you are going for some HP records, 2.25" pipe is fine.
I only used 2.5" here, because the owner requested it. Unfortunately I have no pics of this section after it was completed, but it was very simple.
Brackets
If the intercooler is installed straight up and down like this. The brackets are easy. Some thick steel bar works well here. You have to make sure that it is thick. You will need a slight bend in it, but otherwise it's just a straight piece. Put a hole in each end and bolt one end to the IC bung and another end to the frame in the holes that were originally for the oil cooler. This will be a bit more tough if you left the oil cooler in the stock spot as the metal lines get in the way. 2 brackets on the bottom at least, and at least 1 at the top, if not 2. The top brackets don't have to be as thick.
Once everything is bolted up, you should not be able to move the intercooler by hand. If you can, then it is not braced well and will sag over time.
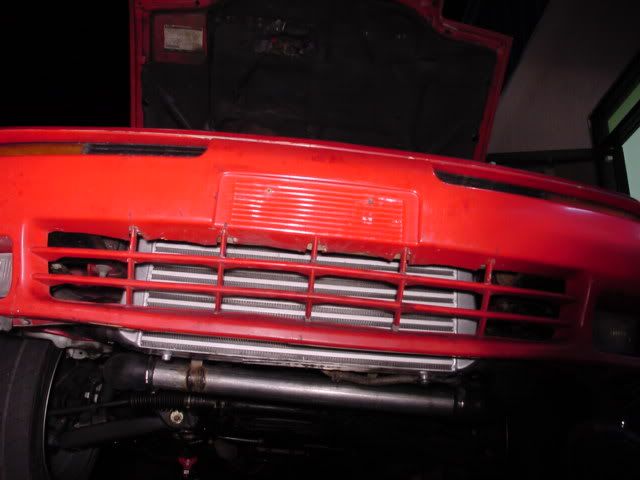
Here is the final product:
Final Thought
This is the best mod ever. Without raising the boost, you get more boost by freeing up the choked up intercooler. Boost comes in fast and hard. On this car, boost starts at 2000 RPM on a 54 Trim and stock downpipe. It is very difficult to keep it out of boost. It is an automatic, which tends to be less laggy. Keep in mind that this same car has a 2.5" to 2.75" upper IC pipe which also helps it spool up faster.
Even with no power gain, you are giving your engine colder air temperature at all times. This can only serve to improve the life of your engine, especially if you live in hot areas.
I would suggest using aluminum, again, as the intercooler is already hefty and adds significant weight to the front of the car. This large IC may not be as ideal for road racers who like things light. The steel piping added even more so it is pretty heavy. If I was to do it over again, I would use 2.25" piping and put it behind the intercooler with a sharp 2.5" u bend at the end. The reason for the 2.5" at the end is that the sharp bend will need a bigger size to keep the same amount of flow up. But the air will be able to travel fast through the long 2.25" piping.
Once it is all done and tested, you should pressure check everything. Also, use T bolt clamps if you are boosting high, to prevent blow offs. Finally, send out your pipes to get powder coated.
Good luck!
Parts Used:
$189 Megan Racing Intercooler - 935 Motorsports
$30 3 Rubber Elbows - 935 Motorsports
$10 straight section of 2.5" pipe - exhaust shop
$.25 steel weld tab - Metal store
$10 3" to 2.5" reducer - 935 Motorsports
$5 flat steel bar - Metal store
$10 bag of stainless clamps - Hardware store
$1 1/2" long 8mmx1.25" bolts/washers - Hardware store
This is a rough write up regarding getting the "ebay" intercooler in place for those on a budget. This assumes you have already taken off the stock intercooler setup and that you are keeping the stock fender pipe for ease of installation. You can always go back and change it later.
This is not the highest quality installation. However, for the prices shown, the bang for the buck value here is very high.
Test Fit
You will notice that the intercooler is much easier to fit if you have it on a jack, rather then trying to hold it up yourself. I've done this install many times, but this was the first time with the nice jack, so I could just hold up the intercooler where I wanted it and go from there.
You will notice that there is a lip on the back of the bumper support. It is soft and easy to bend. If you bang on it, cut it off, or bend it up, you will find a little more breathing room to mount. You can also bend back the center support (under hood support) to get more clearance. Once you have this clearance the intercooler will go all the way up.
Note : 91-92 owners will find a massive power steering cooler up where the intercooler wants to go. This creates 2 problems. First, you can't get the intercooler as high as you want it. You want it as high as possible to prevent it from hitting things in the road, curbs, and overall looks. Some like to mount it a little lower to get more air to it. Second, the power steering cooler will cover the top bracket holes on the IC, preventing you from making top brackets.
The solution is to either remove the power steering coooler, re-locate with a smaller cooler, or unbolt the 10mm bolt holding it in place and jam it up higher so the IC can fit. I did not want to remove this one, so I moved it up. It is not bolted down, but it is stuck between the intercooler and bumper, so it is not going anywhere.
Once the intercooler is where it should be, we can continue.
Oil Cooler / Overflow / Driver Side
Here you can see the IC resting in place. The lip on my bumper support is gone, so I could easily slide it up and i did not have to modify my center support. The oil cooler is still connected to the stock lines and is resting behind the new IC. The 7M overflow is removed.
The stock bracket was bent upward some for clearance and 1JZ overflow installed. It has more room for an intercooler and was straight forward.
Here is the first look underneath. There are a few issues here. We want the driver side of the IC to make a U turn and go back to the turbo. However, we want the pipe to hug the body so that it is not obviously lower then the car and prevent it from hitting the ground. As you can see the AC line is in the way, and the oil cooler is in the way. On top of that, the oil cooler hard lines are in the way of putting the pipe to the body. Finally, the tow hook should be removed here. It makes things much easier and you have room to play with. If you are not comfortable with this, you can cut a piece off or bend it to the side if needed, when you get to that point. I can tell you now that removing it is going to save you lots of time. 3 17mm bolts and it's off.
For the A/C, you can remove the black bracket and bend the line up slightly. If you don't have A/C, then you are set. The oil cooler causes problems throughout this installation. I would suggest removing the entire system, pipes and all, and install it on the passenger side. This removes the metal pipes AND allows you to actually go behind the IC with the piping, completely hiding it from public view. This is what I desired to do, but time was at a minimum.
Here is the end result. Since I could not go behind the intercooler as planned, I had to go under the body. Originally a steel u-bend was to be used as a 180 degree, but they did not have short radius. You need a short radius bend. The steel U bend was $30, plus $10 for the 3" to 2.5" coupler. However, 2 90 rubber elbows were only $20 total. So I used rubber instead this time around. This also saved weight as the steel is very heavy. I had to weld a bracket on the steel long pipe for safety. In the event that the hose was to ever blow off, the pipe will not fall off. 1 on each side would be better.
You need a straight long pipe to go back to the turbo. I would suggest aluminum, if you can find it. It is much much lighter. I would still suggest making the bracket. I will update the top page with lengths later on.
Passenger Side Fender Pipe
This is how it starts once the intercooler is in place. As you can see this is the easy part. All you need is a simple pipe to go from the outlet to the fender pipe. If you position the fender pipe right and the IC right, they are pointing right at each other. You just need 45 degrees and a small straight section. You can use a 45 degree coupler to the fender pipe with straight pipe, or weld a 45 degree end on your pipe. I also found something interesting, one of the 1JZ stock plastic pipes fit perfectly here, the one on the turbo side of the 1JZ. Something to consider if you have any friends with one laying around. Anyways, I found that with some wiggling and some creating positioning of the 3" coupler, a simple straight piece worked. In the picture the passenger side tow hook is removed, but i found that it did not obstruct anything and I put it back on. The passenger side tow hook must be removed in a 1JZ installation though.
Air box note: For those that like to go up through the airbox, it is pretty simple. You must come out of the IC about 3 inches straight. Actually having a 3" or 4" straigiht aluminum pipe welded directly to the intercooler would be ideal. From there its just a 90 degree shot straight up to the airbox hole and a 45 degree bend to go through it. For 2.5" piping there is plenty of room to avoid the headlight.
Turbo outlet to long ass straight pipe
The long straight pipe mentioned before should end right about where the IC inlet was positioned, just before the tow hook. A 90 degree rubber elbow here and I was now pointing straight back to the stock turbo piping. You could convert to 2.25" here and use the stock piping OR keep it 2.5" and make hard pipes all the way up to the turbo. After the 90, there is going to be 2 more 45 bends to get up to the turbo and it is a fairly straight shot.
Note:
If you are concerned about lag, I would suggest keeping the piping 2.25" all the way from the turbo to the IC. There will be less volume to fill when off boost and keep the velocity up. Big pipe size is not required. On another installation of this same IC, I used 2.25" pipe all on the turbo side to promote velocity and for better ground clearance. He just dynoed 367 to the wheels at 15 psi, on a very basic setup. So unless you are going for some HP records, 2.25" pipe is fine.
I only used 2.5" here, because the owner requested it. Unfortunately I have no pics of this section after it was completed, but it was very simple.
Brackets
If the intercooler is installed straight up and down like this. The brackets are easy. Some thick steel bar works well here. You have to make sure that it is thick. You will need a slight bend in it, but otherwise it's just a straight piece. Put a hole in each end and bolt one end to the IC bung and another end to the frame in the holes that were originally for the oil cooler. This will be a bit more tough if you left the oil cooler in the stock spot as the metal lines get in the way. 2 brackets on the bottom at least, and at least 1 at the top, if not 2. The top brackets don't have to be as thick.
Once everything is bolted up, you should not be able to move the intercooler by hand. If you can, then it is not braced well and will sag over time.
Here is the final product:
Final Thought
This is the best mod ever. Without raising the boost, you get more boost by freeing up the choked up intercooler. Boost comes in fast and hard. On this car, boost starts at 2000 RPM on a 54 Trim and stock downpipe. It is very difficult to keep it out of boost. It is an automatic, which tends to be less laggy. Keep in mind that this same car has a 2.5" to 2.75" upper IC pipe which also helps it spool up faster.
Even with no power gain, you are giving your engine colder air temperature at all times. This can only serve to improve the life of your engine, especially if you live in hot areas.
I would suggest using aluminum, again, as the intercooler is already hefty and adds significant weight to the front of the car. This large IC may not be as ideal for road racers who like things light. The steel piping added even more so it is pretty heavy. If I was to do it over again, I would use 2.25" piping and put it behind the intercooler with a sharp 2.5" u bend at the end. The reason for the 2.5" at the end is that the sharp bend will need a bigger size to keep the same amount of flow up. But the air will be able to travel fast through the long 2.25" piping.
Once it is all done and tested, you should pressure check everything. Also, use T bolt clamps if you are boosting high, to prevent blow offs. Finally, send out your pipes to get powder coated.
Good luck!