Well I got tired after owning 2 Supras the same green color in the dash and shift indicator (Both were autos). So I did a lot of research and decided to do a write up on this project.
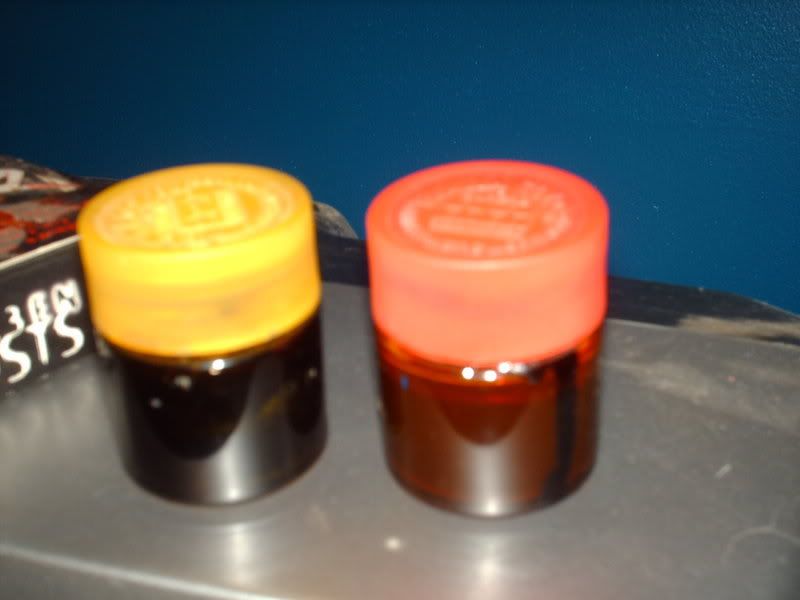
I used a nice looking red color, which I got from a local HobbyTown. I also snagged a yellow for the future.
Changing the gauge cluster color
For this I used..
Now, before we start, make sure you have all the items. I went to my local hobbytown, and bought the translucent Taymia (Sp) paint used for taillights on small R/C cars, or models. I'm not sure how any other paints will turn out, so ask others for advice on that.
Also, for those of you who have the indiglo faced gauges, I assume this will change the needle color if you have been wondering.
Also note there are many ways to do this, using colored wide-angle LED's for another example.
1. Start off by removing the climate control/ashtray/stereo surround. This is simply screws and pop-rivets, nothing huge. Make sure to remove the ashtray, followed by the 2 screws that are on top (You will see them) or it will not come out easily. Remove the female plugs from the male plugs on both the headlight washer button and the hazard light switch. Set this piece aside
NOTE: If your Supra equipped with an automatic transmission, this may require you to put the shifter in Low to remove completely.
2. Next, you will remove the 4 (or 3) switches on the left side under the dash (The foglight switch, coin holder, ect.) Remove a screw under the switch cluster (You will find it) and simply apply small pressure outwards to release all pressure on the pop-rivets. Remove the female plugs from the male plugs and once again set aside.
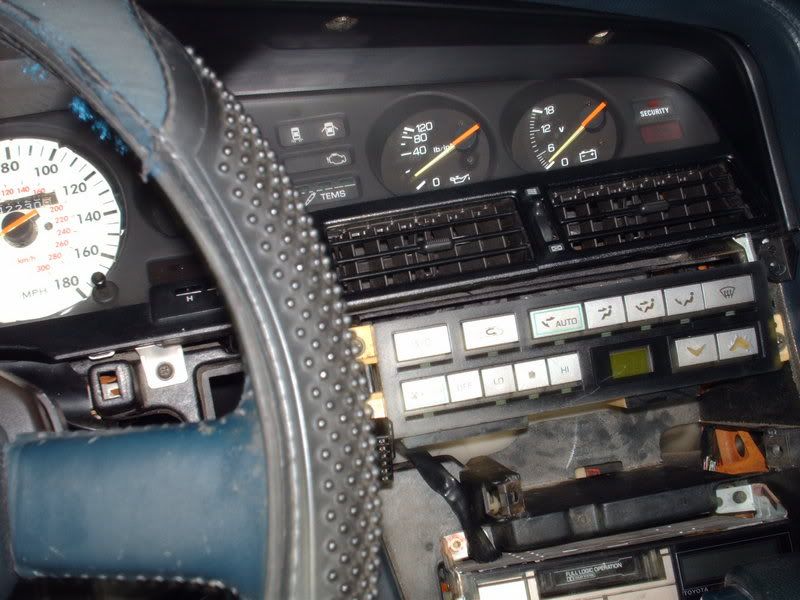
3. Now remove the Black piece above the gauge cluster. This is around 7 screws (4 or 5 on top, and 1 on each side at the bottom). Set aside.
4. Remove the gauge cluster. This is 4 screws on top of the cluster (You will see white things where the screws go into) and a couple screws on the bottom. Slowly and gently apply a decent amount of pressure needed to get the cluster to the back of the steering wheel. Separate the plugs and set aside.
5. Turn the cluster over to reveal the back of the cluster. It may look confusing but is very simple to do.
6. Remove all the (GREEN) bulb holders by turning counter clockwise and removing (There are 4 bigger ones and 1 smaller one) You know you will have the correct bulbs when you see a green condom on the bulbs.
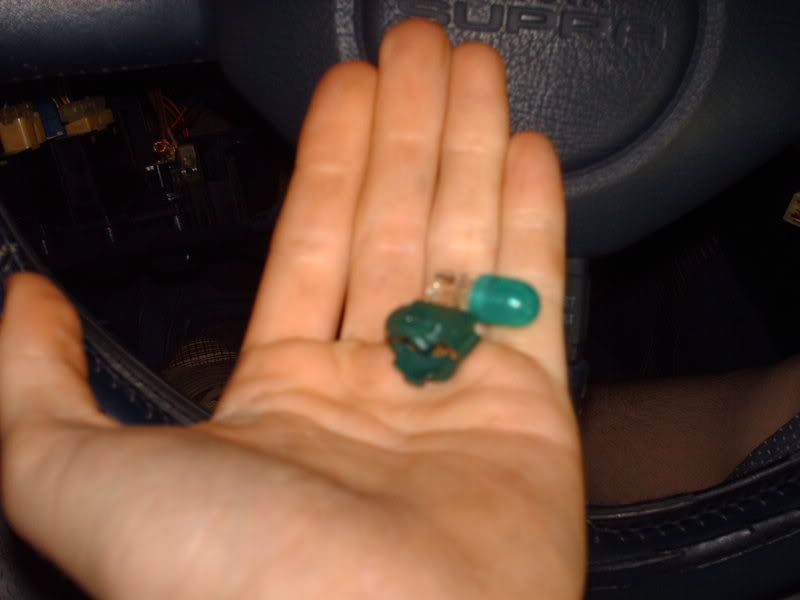
7. Remove the condoms (One of mine was stuck on, and I scraped it off lightly with a screwdriver), but don't throw them away (You will see why at the end)
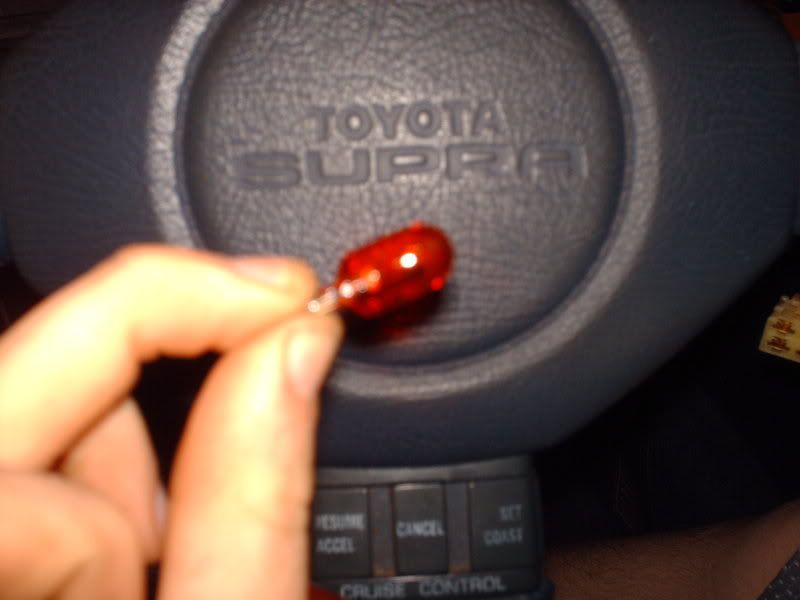
8. Now simply paint the bulbs with one thin coat of the translucent hobby paint, and once dried (Aprox 10 minutes) Add another coat. It should look like this. Be careful with this paint, IT ISN'T VERY FORGIVING ON CLOTHES!!
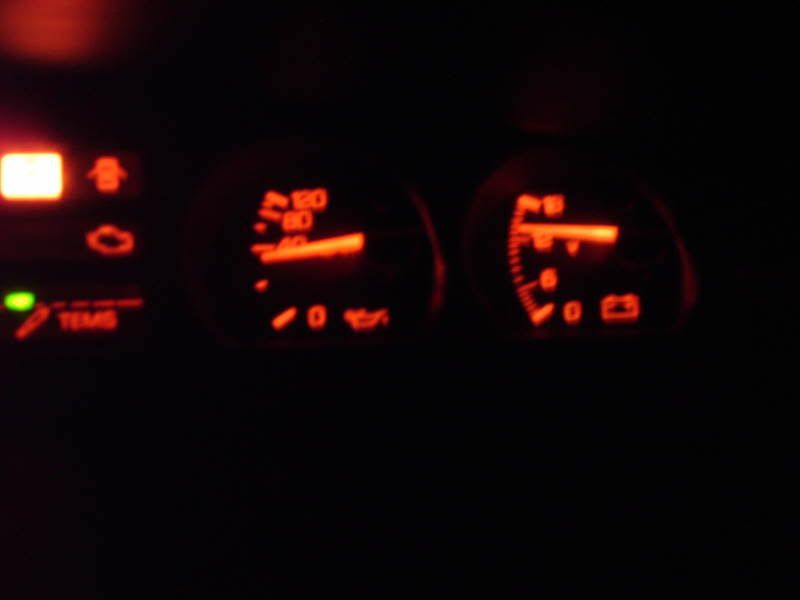
9. Put everything back together (Opposite way of removal) and watch them GLOW!!!
10. Take the green light condoms, find one of your guy friends (Or brother) and if they have a sense of humor tell them you found them some condoms that will fit them . I got a good laugh out of my brother, follow by a flying remote to the TV.
NOTE: When re-installing the gauge cluster, make sure the wiring harness doesn't get trapped within the male and female parts of the speedometer plug. This made my day long, until I figured it out!
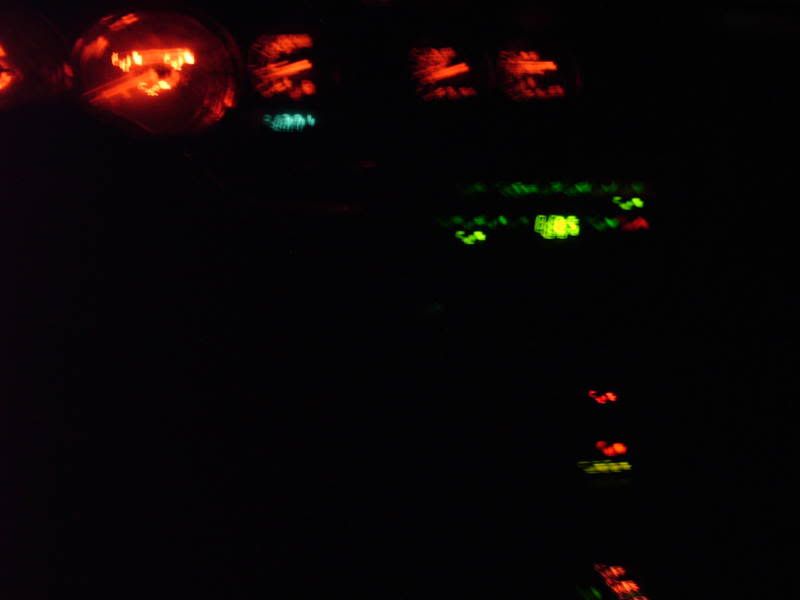
Final product should look like this
Factory 87 Stereo FTW

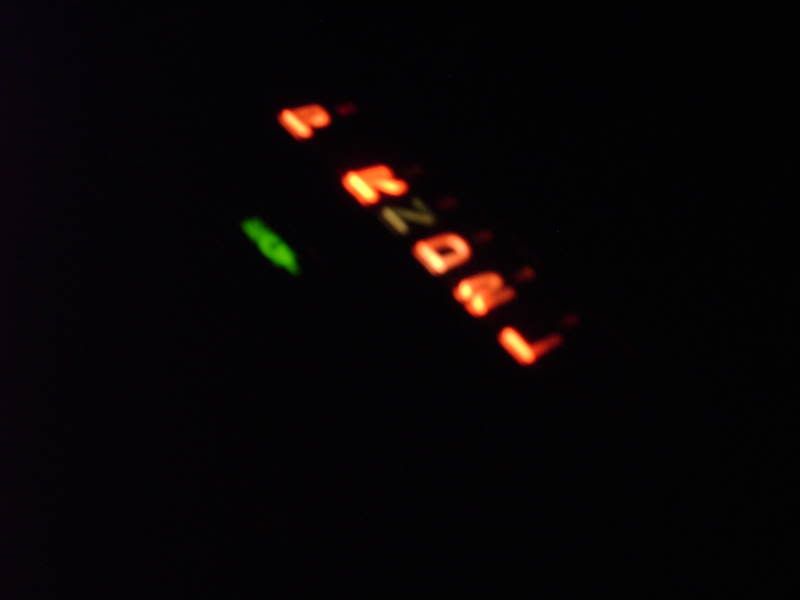
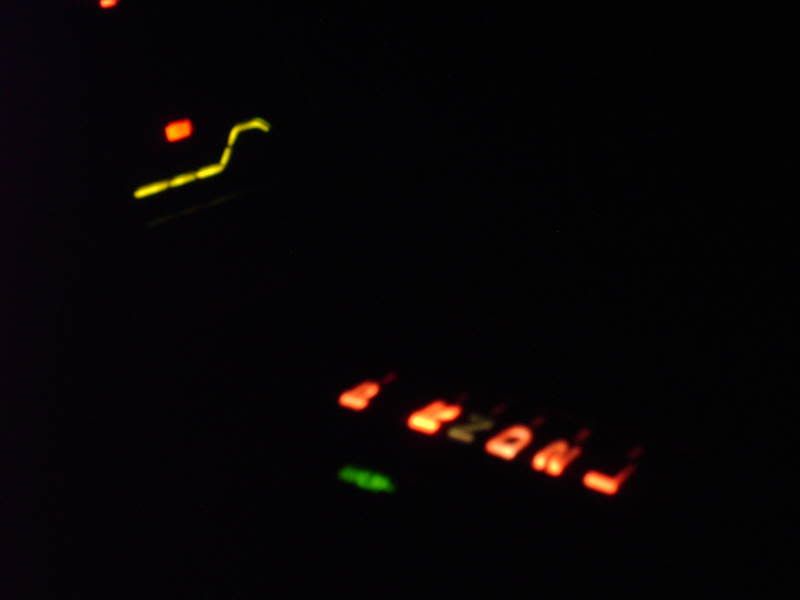
Changing the Auto shift Indicator color
1. With the stereo surround removed pop off the black indicator surround. No screws.
2. Now remove the 4 screws necessary to grab a hold of the indicator.
3. Remove the bulb the same way you would the others, turning counter-clockwise and pulling gently.
4. Remove the condom, and paint with 2 coats like the others were done
It should look like this when complete
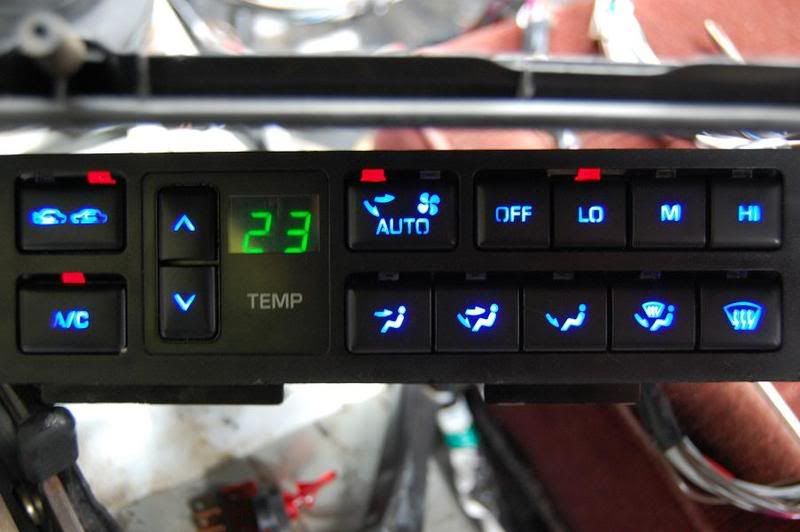
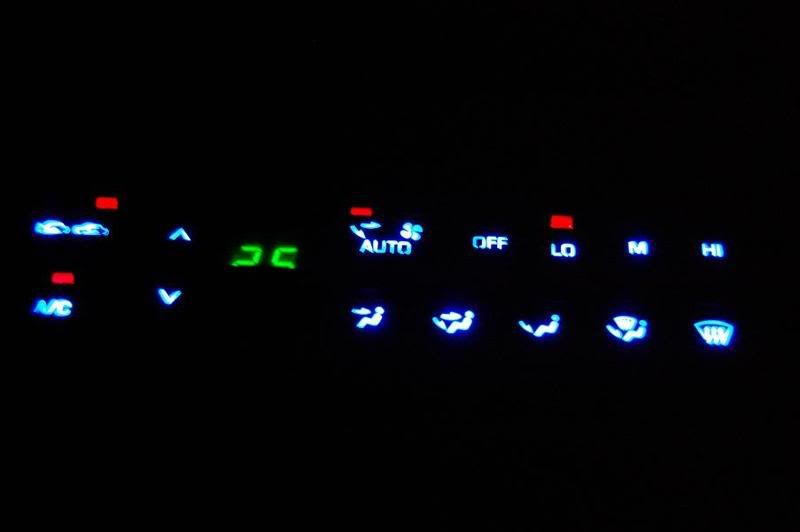
Changing the Climate control color
I'm not exactly sure how this is because I haven't changed the color to this yet. From what I've heard it requires more time, patience, LED's and soldering to the board.
-----------------------------------
I hope you all like the write-up. This is my first and hopefully this helps all the wondering people!!
-Matt E
I used a nice looking red color, which I got from a local HobbyTown. I also snagged a yellow for the future.
Changing the gauge cluster color
For this I used..
- Phillips head screwdriver
- Hobby Translucent paint (Red)
- Smoked beef jerky (Optional)
- Small detail paint brush
- A bowl and lid for all the screws
Now, before we start, make sure you have all the items. I went to my local hobbytown, and bought the translucent Taymia (Sp) paint used for taillights on small R/C cars, or models. I'm not sure how any other paints will turn out, so ask others for advice on that.
Also, for those of you who have the indiglo faced gauges, I assume this will change the needle color if you have been wondering.
Also note there are many ways to do this, using colored wide-angle LED's for another example.
1. Start off by removing the climate control/ashtray/stereo surround. This is simply screws and pop-rivets, nothing huge. Make sure to remove the ashtray, followed by the 2 screws that are on top (You will see them) or it will not come out easily. Remove the female plugs from the male plugs on both the headlight washer button and the hazard light switch. Set this piece aside
NOTE: If your Supra equipped with an automatic transmission, this may require you to put the shifter in Low to remove completely.
2. Next, you will remove the 4 (or 3) switches on the left side under the dash (The foglight switch, coin holder, ect.) Remove a screw under the switch cluster (You will find it) and simply apply small pressure outwards to release all pressure on the pop-rivets. Remove the female plugs from the male plugs and once again set aside.
3. Now remove the Black piece above the gauge cluster. This is around 7 screws (4 or 5 on top, and 1 on each side at the bottom). Set aside.
4. Remove the gauge cluster. This is 4 screws on top of the cluster (You will see white things where the screws go into) and a couple screws on the bottom. Slowly and gently apply a decent amount of pressure needed to get the cluster to the back of the steering wheel. Separate the plugs and set aside.
5. Turn the cluster over to reveal the back of the cluster. It may look confusing but is very simple to do.
6. Remove all the (GREEN) bulb holders by turning counter clockwise and removing (There are 4 bigger ones and 1 smaller one) You know you will have the correct bulbs when you see a green condom on the bulbs.
7. Remove the condoms (One of mine was stuck on, and I scraped it off lightly with a screwdriver), but don't throw them away (You will see why at the end)
8. Now simply paint the bulbs with one thin coat of the translucent hobby paint, and once dried (Aprox 10 minutes) Add another coat. It should look like this. Be careful with this paint, IT ISN'T VERY FORGIVING ON CLOTHES!!
9. Put everything back together (Opposite way of removal) and watch them GLOW!!!
10. Take the green light condoms, find one of your guy friends (Or brother) and if they have a sense of humor tell them you found them some condoms that will fit them
. I got a good laugh out of my brother, follow by a flying remote to the TV. NOTE: When re-installing the gauge cluster, make sure the wiring harness doesn't get trapped within the male and female parts of the speedometer plug. This made my day long, until I figured it out!
Final product should look like this
Factory 87 Stereo FTW
Changing the Auto shift Indicator color
1. With the stereo surround removed pop off the black indicator surround. No screws.
2. Now remove the 4 screws necessary to grab a hold of the indicator.
3. Remove the bulb the same way you would the others, turning counter-clockwise and pulling gently.
4. Remove the condom, and paint with 2 coats like the others were done
It should look like this when complete
Changing the Climate control color
I'm not exactly sure how this is because I haven't changed the color to this yet. From what I've heard it requires more time, patience, LED's and soldering to the board.
-----------------------------------
I hope you all like the write-up. This is my first and hopefully this helps all the wondering people!!
-Matt E