
Supradupra.com 2.5TT Aero Limited JDM refurb (yUK)
- Thread starter Supradupra.com
- Start date
You are using an out of date browser. It may not display this or other websites correctly.
You should upgrade or use an alternative browser.
You should upgrade or use an alternative browser.
awsome build. what type (brand) of paint products are u using on the engine bay and bits? looks great.
Please excuse me while I go clean the jizz off my shorts. Could you explain better how you did the buttons? Id love to intigrate that same style into a couple projects.
I read your whole thread on mkiisupra.net and i really like your project except for not removing the old underseal before applying new ")
Did you only use hammerite paints on your suspension parts?
Did you only use hammerite paints on your suspension parts?
Code:
Am very pleased to see you migrate this build thread over here at long lastI thought I'd do my bit for international relations :biglaugh:
I read your whole thread on mkiisupra.net and i really like your project except for not removing the old underseal before applying new
Lol, I totally understand what you mean & if this was a yUK car that had lived in our climate for a number of years I'd have had too but, this car lived 87% of it's life in Japan & was garaged here by the previous owners. As a result the car has absolutely 100% - 0 rust & the underseal there was, is absolutely perfect & I mean perfect.
Being a JDM the other parts were not coated at all so, the underseal was a fresh coat anyway.
I would have actually done damage to the underside by removing the thick rubber coating in this particular case, it's just such a solid car, I've not come across a better one, even in comparison to the first aero I had before it's sad demise & that was a super clean one. Just real lucky for a change! I can highly recommend a JDM import to people if they don't want rust:boink:
With the installation of the rear arch liners as tested on my yUK car for a few years the rear arches are now super protected - which they need to be here!
what type (brand) of paint products are u using on the engine bay and bits?
Did you only use hammerite paints on your suspension parts?
I have been using a large number of Simoniz paints on parts. I've found this paint good in the past, it's well priced & consistent.
Depending on the parts the paint finish has varied from standard gloss /satin paints. Anti rust aluminium paints (great for bolts) Mid temperature enamel paints & the extreme high temperature enamel paints for some of the engine parts depending on what & where they are. Coolers are treated with enamel for instance.
Most of the suspension uses the hammerite range of paints yes. This stuff gives superb protection, can be layered up & is easy to repair should it become damaged. It is like painting with treacle & does take a while to fully harden when the average temperature barely gets over 12'c!
Other parts have been treated with aluminium anti rust paint & everything gets coated finally with Waxoil anti corrosion products suitable for the particular area being protected (clear/black/underseal etc)
Hammerite also works well in some warmer areas too such as retract motors etc. It's always lasted well in the past & refinishes well if damaged. It's also 100% compatible with the same brand of wax & underseal protection.
Although the car body will be resprayed in probably Aston Martin Meteorite Silver (still fully making mind up) I decided to keep the engine bay black. The reason for this is purely a practical choice - it's really easy to keep perfect when the inevitable scratches & bumps occur in the future & even during work on the build.. I can handle this myself where as I'd never dream of trying to do bodywork painting!!
Parts I consider to need a really durable finish or a fancy finish are powder coated. I have a home system & a chuffing great oven to bake this in. The systems great & is absolutely outstanding, particularly for all those brackets, large & small as the coating is flexible unlike paint. You can bend it all day long & the stuff just does not fall off.
Much of the ally parts on the engine I'm leaving natural but cleaned up. not only can you not see them I also like the looks & honesty of many mechanics in a raw finish. Yeah, some stuff looks great painted & prettyfied, it also protects it, look at an old beam engine or steam train etc - beautiful stuff. Other items need leaving well alone & just keeping clean. They require regular service etc so, any sort of applied finish would be detrimental to purpose. (can you tell I'm an engineer
)Adi started the polished parts legacy & this stuff really sets off this power unit. I will be spending time on restoring this stuff & maintaining this legacy.
Assuming your male If you can bear a child I'd be impressed, the cash we could make from such a miracle would buy a nice big villa somewhere hot & I could retire - you can keep the kid tho :icon_razz:can I bear your children..!?!!?
Still fighting my insurance company here.
Good luck with that, it truly is an evil money making business that has little to no time for enthusiasts.
Please excuse me while I go clean the jizz off my shorts. Could you explain better how you did the buttons?
Allegedly cold water & a towel works well, alternatively there are people will buy them on Ebay :biglaugh:
As for the buttons, there's a bit more info on my site & MKiii.net. I already give far too much away lol.
I'm going to be redeveloping the screens in the near future, particularly as the Solaris GP6 ECU does such an incredible amount of stuff & I have traction control operations to sort out. I want to get the final versions actually screen printed onto the proper membrane stuff & hopefully even offer kits for say the TEMS unit which is shoddy from the factory.
Last edited:
Update 24/02/2010
It’s that time again, the continuing voyage of a guy in a workshop with a Supra driven only by the compelling fumes of standard thinners…
So, since the last update I have been working away on getting the engine finished & reloading stuff back into the engine bay.
An assortment of parts have come through keeping royal fail & various other delivery companies in business, these mainly being:
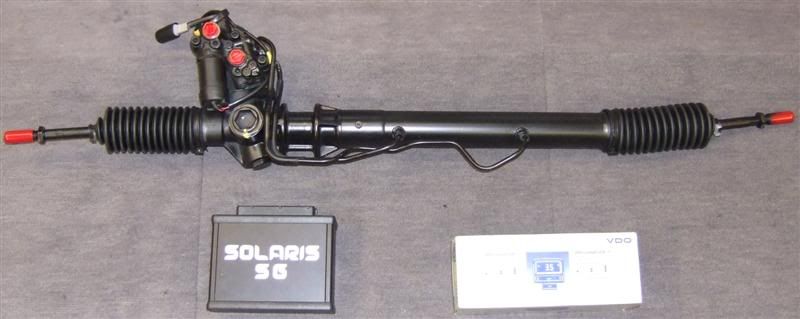
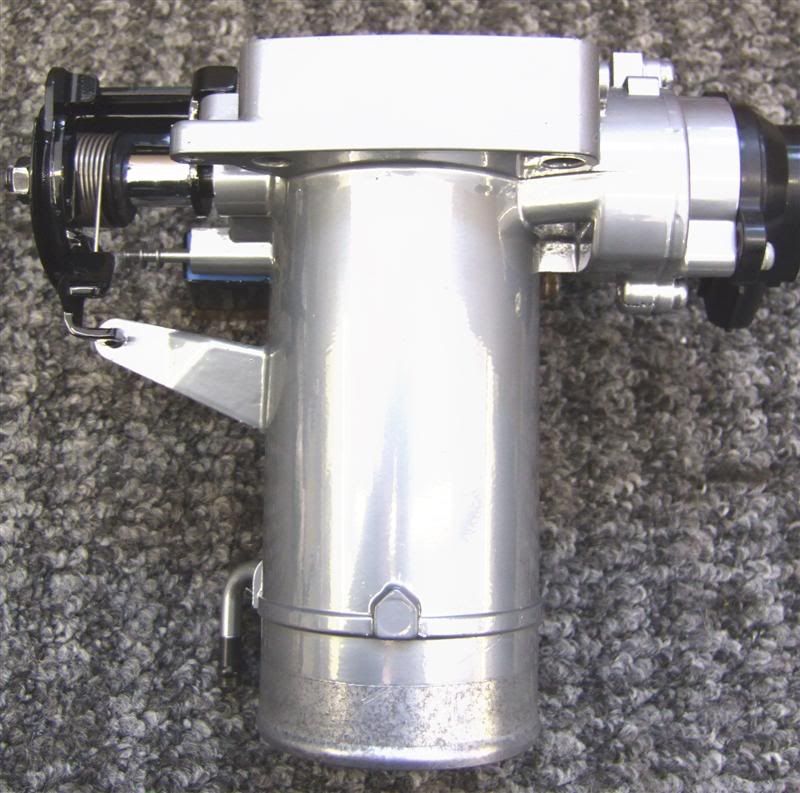
A completely rebuilt PS rack courtesy of Eurorack via CAF, an auto factors down here.
From what I understand this rack has been completely rebuilt with all new seals & hydraulic parts, as well as the actual inner rack being re-chromed. Fingers crossed it will not dribble like it’s owner does. It comes with a 24,000/2 year warranty if not.
Also I took delivery of the Solaris 6GP (now Syvecs) This is a very expensive black box! I also got the 3 bar map (GM style) Wide band O2 sensor & the field harness - which sadly is for a Soarer 1J which would appear to have different plugs to the Supra 1J so, Ryan is sorting out another plug to make up a compatible one.
A few instruments have come through too, new rack bushes, few more gaskets I’d missed from my original shopping list etc etc.
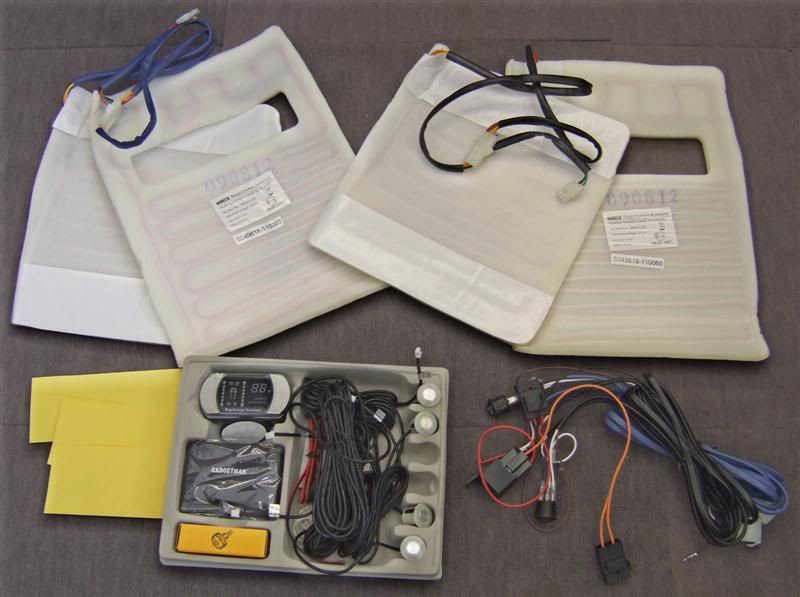
Because I’m a tart & the average temperature in the yUK is below 10’C I have invested in a retro fit kit of full front heated seat elements. These I have on my ST24 & they are great! They have 3 settings & I’ll fab some controls up when I do the control gear for all this stuff. They should make roof off driving more comfortable in the long hot summers we never get here….
Also got a set of rear parking sensors just for the hell of it although, I never use them on the other cars that have them, they can be handy on occasions.
I’ve been powder coating like a freak with all this engine stuff. I know I said I wouldn’t go too mad with the engine but, the aim is as if the car had driven out the showroom so, the project just kind of continued that way.
Just out of interest I thought I’d just brush over how the system works for those who may be interested.
Firstly you clean your part, I also pre bake it to clear off any contaminants, I know some people don’t do this, others do. Then, just like paint, you mask off the areas you don’t want covered with masking tape.
Next, it’s out to the tent with the powder coating gun loaded with your desired colour. The system I have here works off dry, clean compressed air. The powder is very fine & gets agitated & propelled out through a nozzle. In tis nozzle is a metal section charged up to around 50+KV judging by the spark which statically charges the fine dust.
You earth the piece your about to coat & just spray an even coating of the stuff.
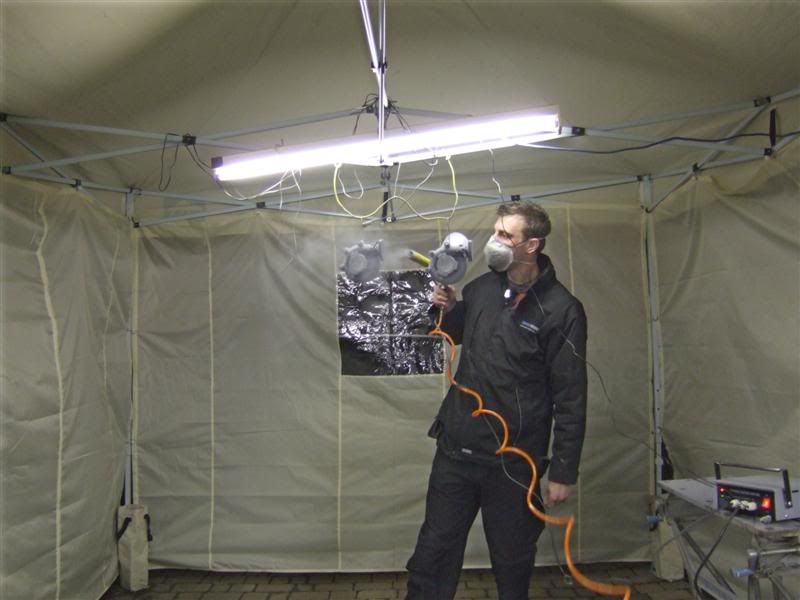
Then, it’s carefully off to a pre heated oven at 180’c to bake off. The average time is 10 mins but, this entirely depends on the part – the actual part must be at this temperature for that period for the stuff to cure properly so, you have to be sure the part is up to this.
A sprig of thyme & some red wine, few onions these taste great..

Once done, pull the item out to cool off & remove the masking tape while it’s still warm otherwise the stuff is a PITA to remove! Job done, bare part to finished part in an average of 30 mins.
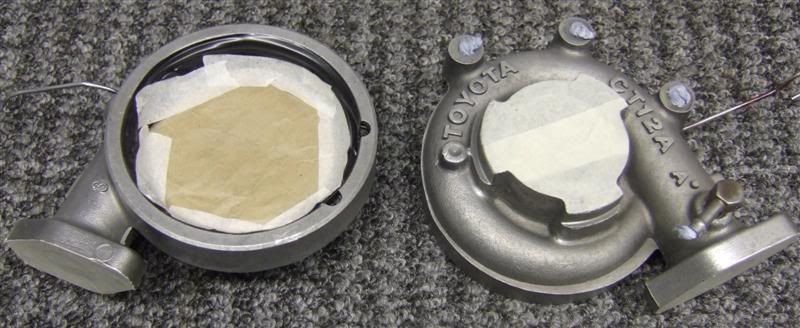
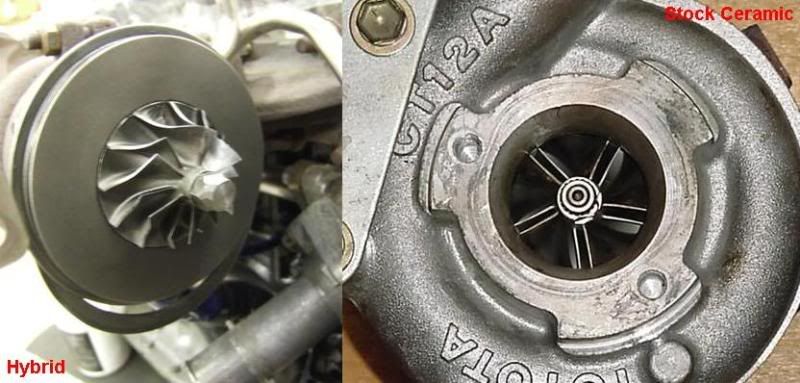
Out of interest, while I have turbos in bits, here is a comparison of a Hybrid Vs Stock ceramic CT12-A.
So with powder coating in mind, you can see from this lot I have had some really really fascinating weekends…
I revised the throttle body linkage & got shot of all the auto & TRC connections that are superfluous to this engine to tidy the thing up a bit.
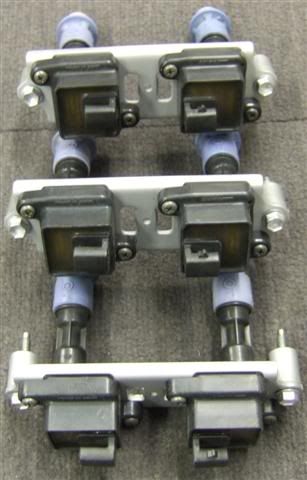
The coil on plug spark packs got treated to a high temperature paint as things get a tad toasty in the middle of the engine where they live. Nobody sees these but, I know they are there!
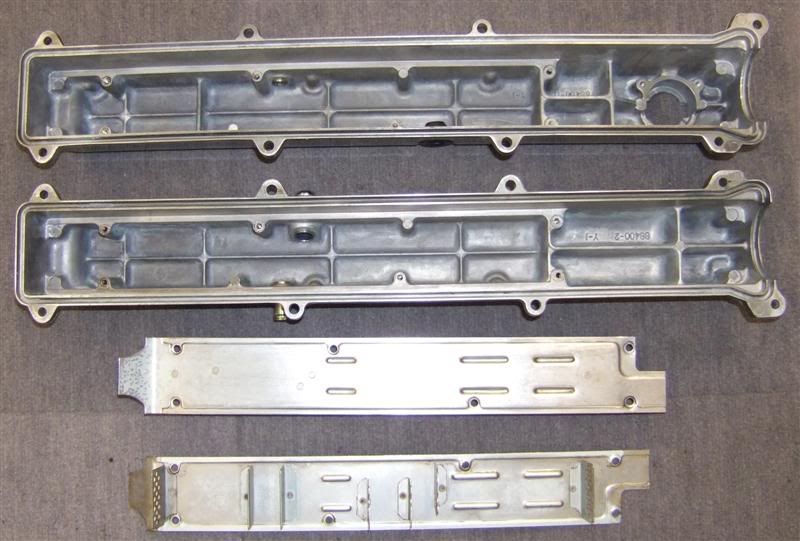
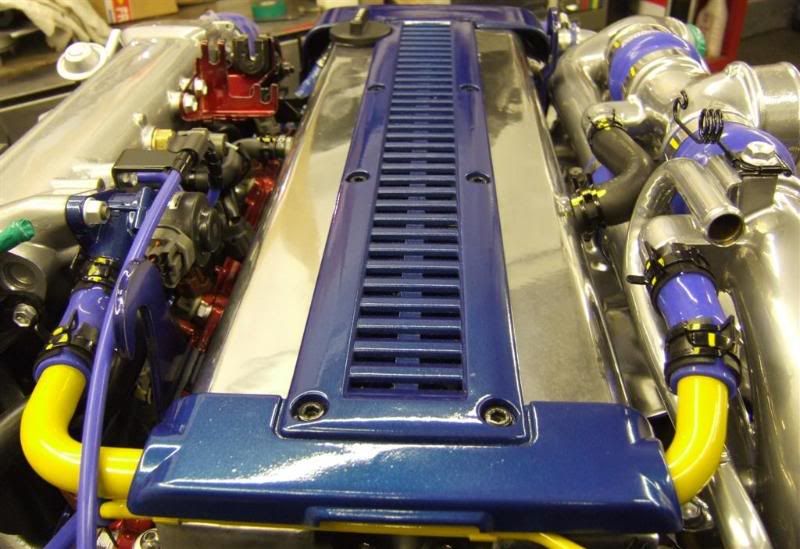
After a few hours of oven cleaner – these cam covers came up like new, the oil from the PCV system really cruds up in here & bakes on behind the baffles. Hard work to shift but, all sorted now. I suspect Adi will only know what these were like before!
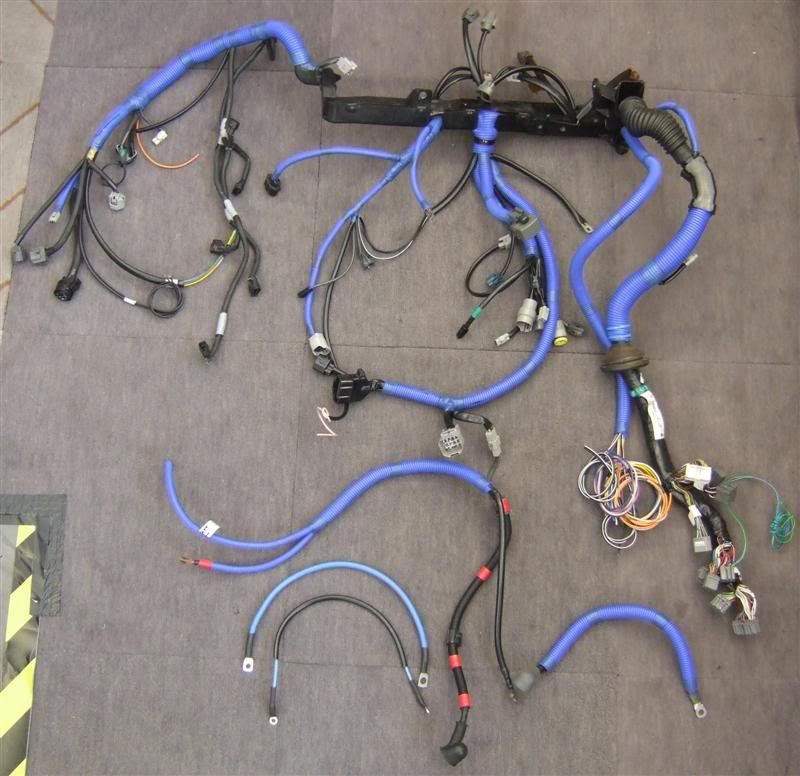
And finally the engine loom got reconditioned completely. Broken insulation repaired, busted plugs replaced – Toyota sell the housings still when armed with the parts catalogue, thanks Kai for sending that to me.
A large amount of additional wiring went in here too for additional sensors, individual injector control etc. This I ended up making a small sub loom for due to size. I ended up aluminium foil wrapping the part where it runs over the front cam bearings to protect it from heat & space limitations.
It’s that time again, the continuing voyage of a guy in a workshop with a Supra driven only by the compelling fumes of standard thinners…
So, since the last update I have been working away on getting the engine finished & reloading stuff back into the engine bay.
An assortment of parts have come through keeping royal fail & various other delivery companies in business, these mainly being:
A completely rebuilt PS rack courtesy of Eurorack via CAF, an auto factors down here.
From what I understand this rack has been completely rebuilt with all new seals & hydraulic parts, as well as the actual inner rack being re-chromed. Fingers crossed it will not dribble like it’s owner does. It comes with a 24,000/2 year warranty if not.
Also I took delivery of the Solaris 6GP (now Syvecs) This is a very expensive black box! I also got the 3 bar map (GM style) Wide band O2 sensor & the field harness - which sadly is for a Soarer 1J which would appear to have different plugs to the Supra 1J so, Ryan is sorting out another plug to make up a compatible one.
A few instruments have come through too, new rack bushes, few more gaskets I’d missed from my original shopping list etc etc.
Because I’m a tart & the average temperature in the yUK is below 10’C I have invested in a retro fit kit of full front heated seat elements. These I have on my ST24 & they are great! They have 3 settings & I’ll fab some controls up when I do the control gear for all this stuff. They should make roof off driving more comfortable in the long hot summers we never get here….
Also got a set of rear parking sensors just for the hell of it although, I never use them on the other cars that have them, they can be handy on occasions.
I’ve been powder coating like a freak with all this engine stuff. I know I said I wouldn’t go too mad with the engine but, the aim is as if the car had driven out the showroom so, the project just kind of continued that way.
Just out of interest I thought I’d just brush over how the system works for those who may be interested.
Firstly you clean your part, I also pre bake it to clear off any contaminants, I know some people don’t do this, others do. Then, just like paint, you mask off the areas you don’t want covered with masking tape.
Next, it’s out to the tent with the powder coating gun loaded with your desired colour. The system I have here works off dry, clean compressed air. The powder is very fine & gets agitated & propelled out through a nozzle. In tis nozzle is a metal section charged up to around 50+KV judging by the spark which statically charges the fine dust.
You earth the piece your about to coat & just spray an even coating of the stuff.
Then, it’s carefully off to a pre heated oven at 180’c to bake off. The average time is 10 mins but, this entirely depends on the part – the actual part must be at this temperature for that period for the stuff to cure properly so, you have to be sure the part is up to this.
A sprig of thyme & some red wine, few onions these taste great..
Once done, pull the item out to cool off & remove the masking tape while it’s still warm otherwise the stuff is a PITA to remove! Job done, bare part to finished part in an average of 30 mins.
Out of interest, while I have turbos in bits, here is a comparison of a Hybrid Vs Stock ceramic CT12-A.
So with powder coating in mind, you can see from this lot I have had some really really fascinating weekends…
I revised the throttle body linkage & got shot of all the auto & TRC connections that are superfluous to this engine to tidy the thing up a bit.
The coil on plug spark packs got treated to a high temperature paint as things get a tad toasty in the middle of the engine where they live. Nobody sees these but, I know they are there!
After a few hours of oven cleaner – these cam covers came up like new, the oil from the PCV system really cruds up in here & bakes on behind the baffles. Hard work to shift but, all sorted now. I suspect Adi will only know what these were like before!
And finally the engine loom got reconditioned completely. Broken insulation repaired, busted plugs replaced – Toyota sell the housings still when armed with the parts catalogue, thanks Kai for sending that to me.
A large amount of additional wiring went in here too for additional sensors, individual injector control etc. This I ended up making a small sub loom for due to size. I ended up aluminium foil wrapping the part where it runs over the front cam bearings to protect it from heat & space limitations.
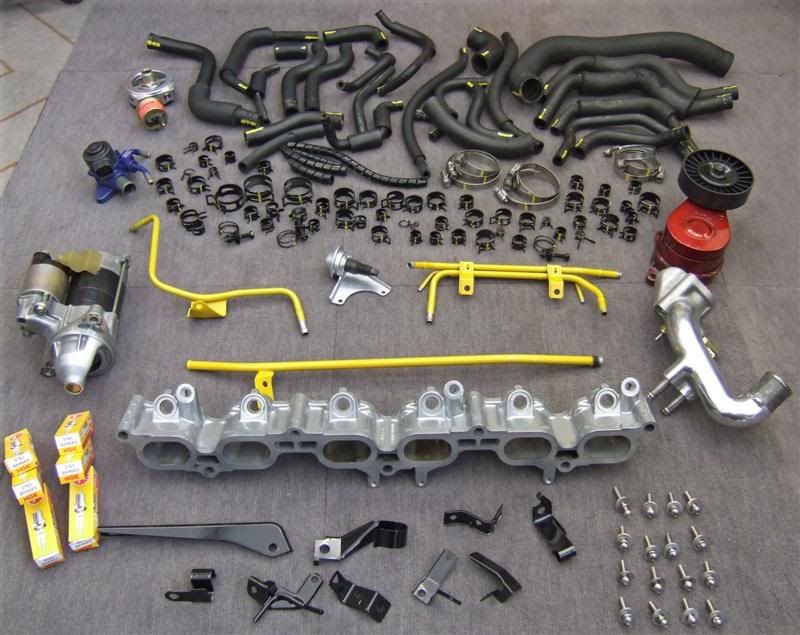
After all that I felt it time to start putting stuff back on the engine.
This is self explanatory really,all went back with new parts where needed & new gaskets.
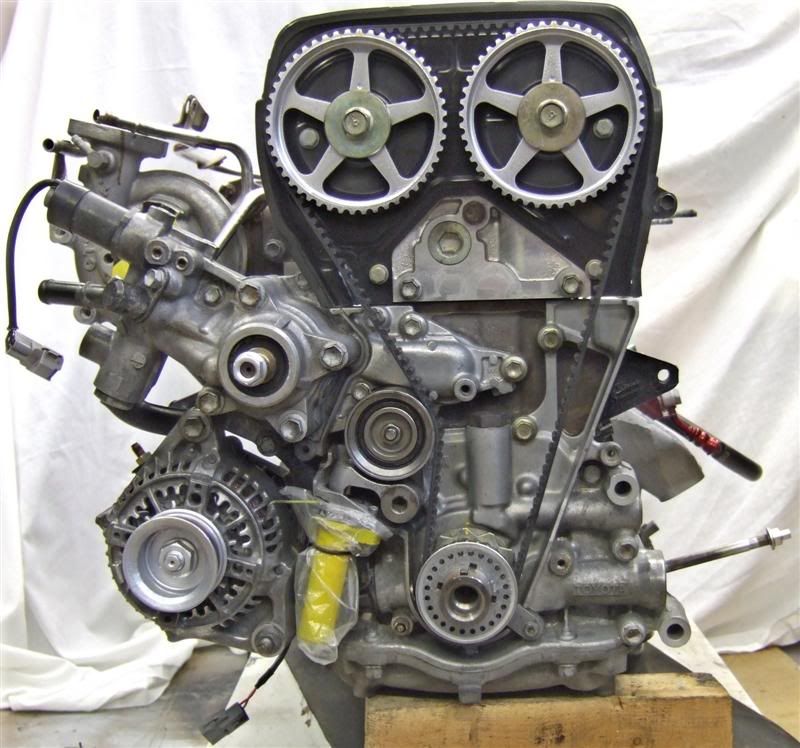
For interest this is how the 1Jz timing gear is set out. Thanks Mark for tightening my crank with your big tool
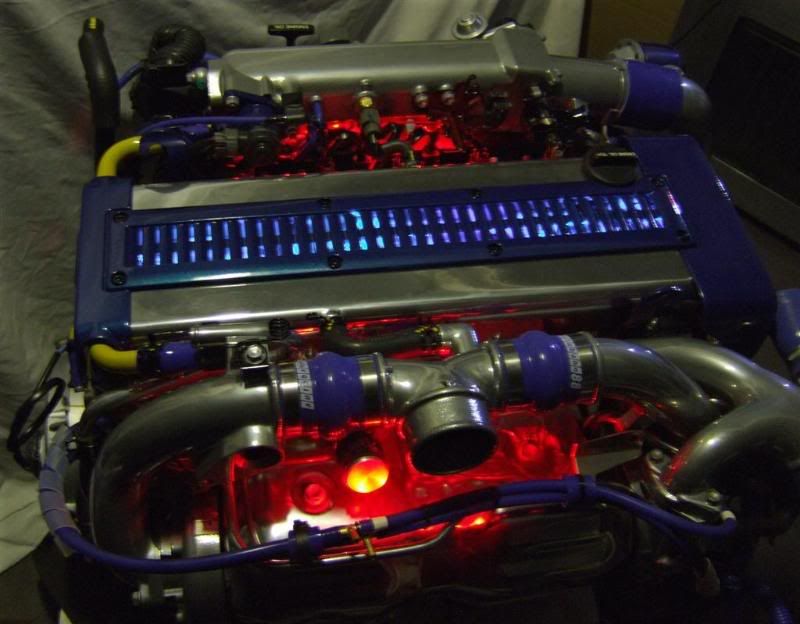
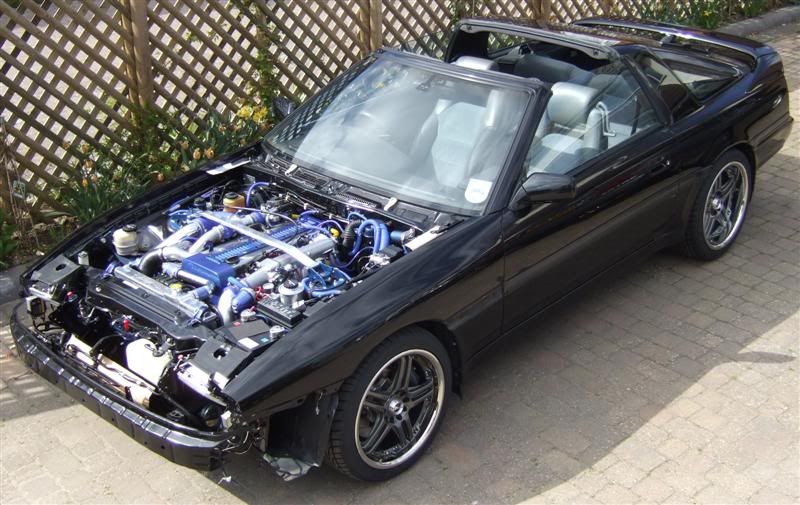
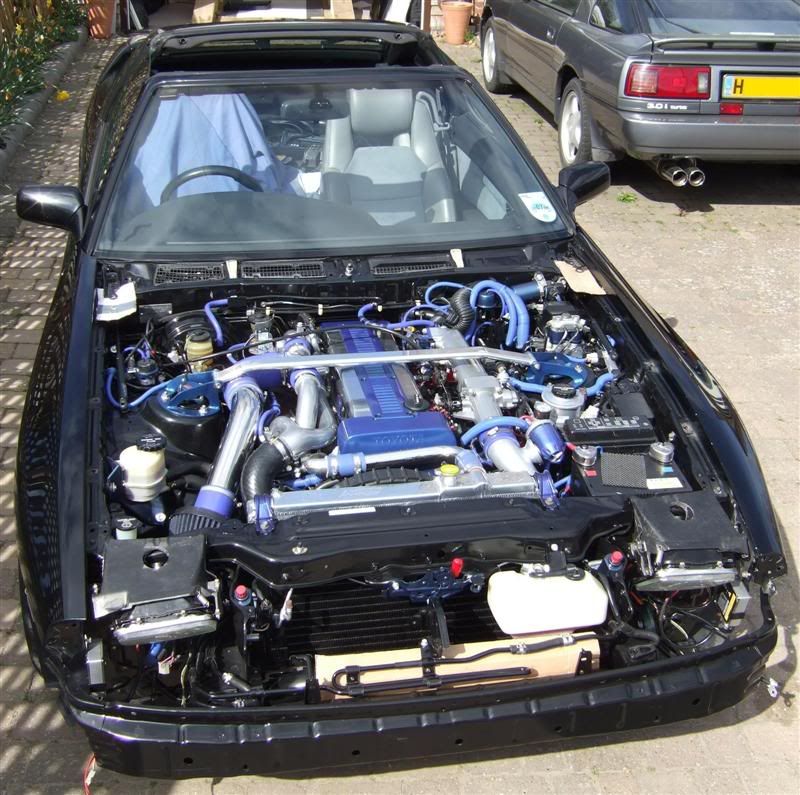
And now just a bit of engine porn…
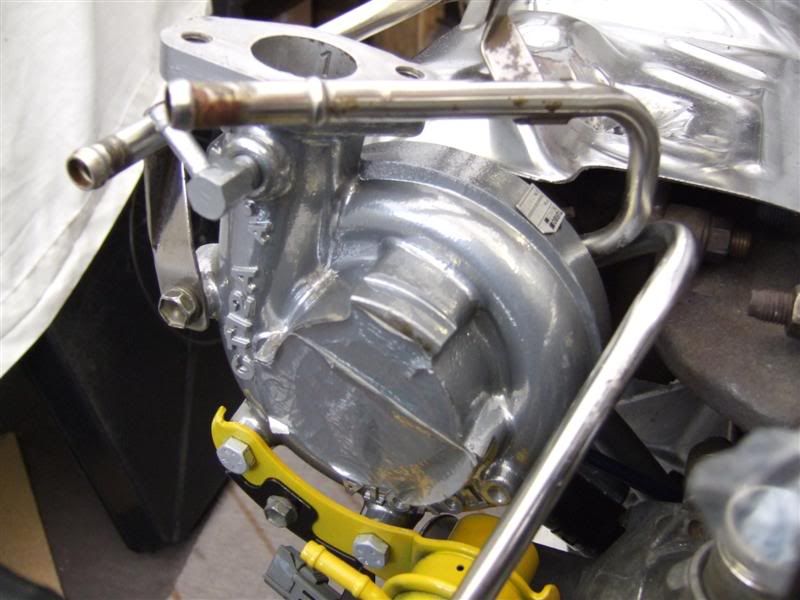
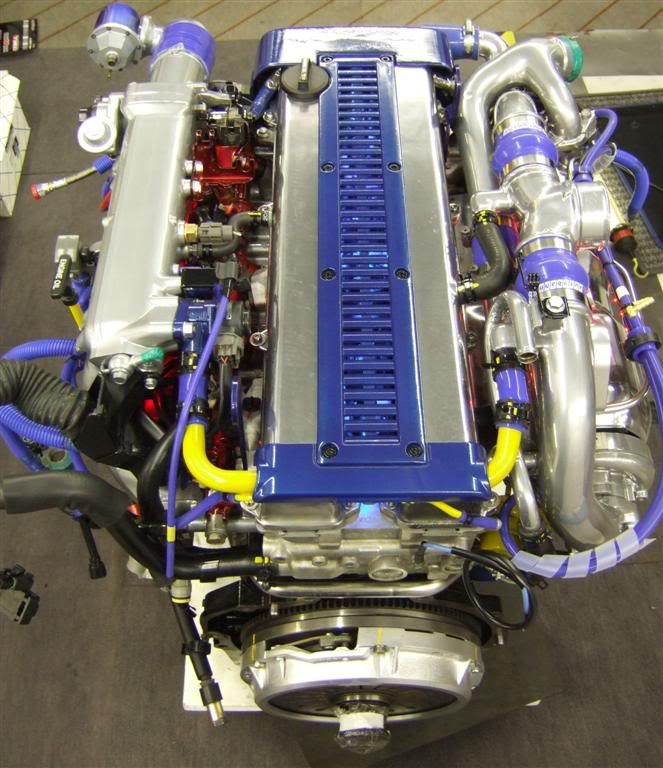
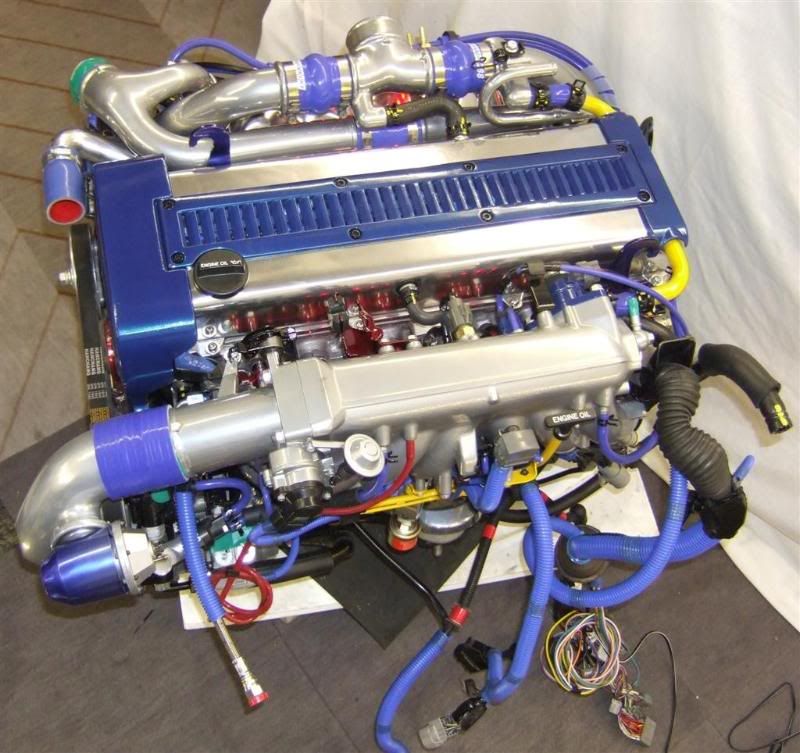
Exhaust side with the twin hybrids.
Clutch on ready for box.
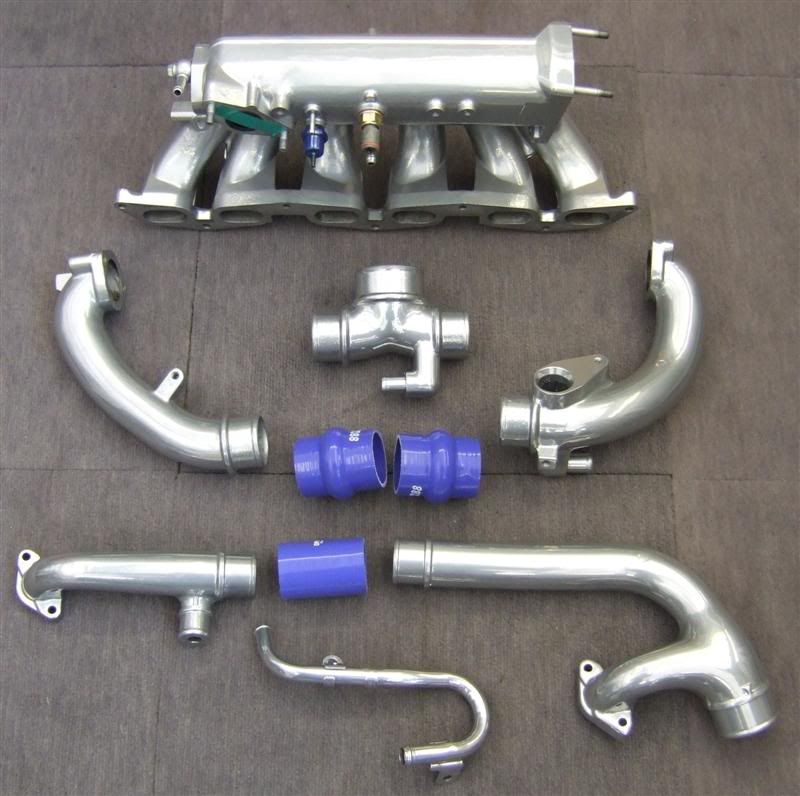
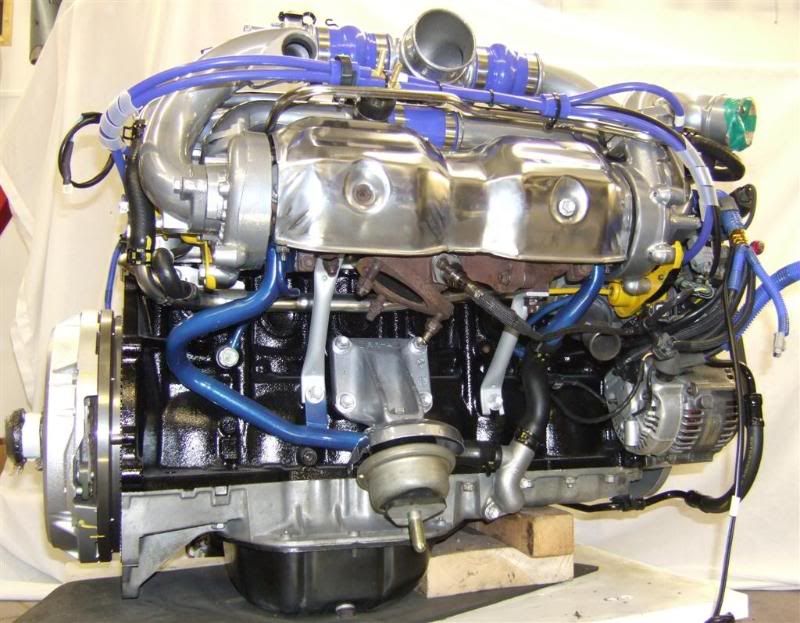
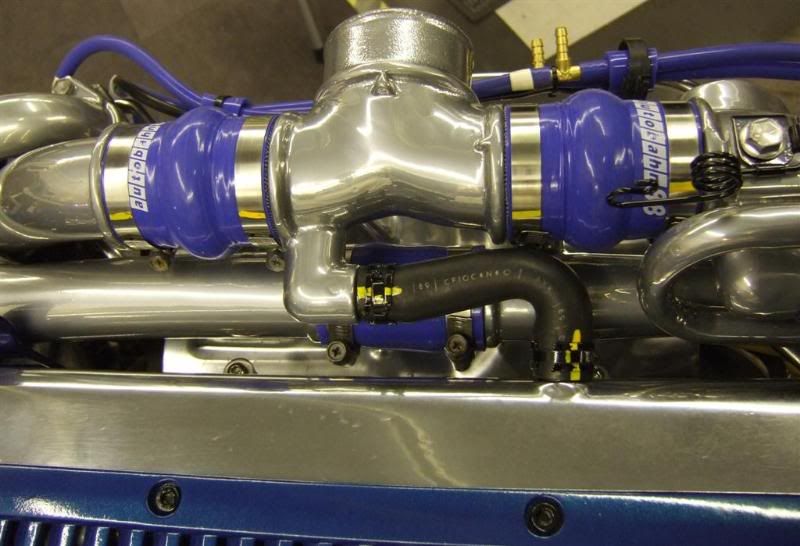
Inlet side & plenum – where most of the wizardry happens!
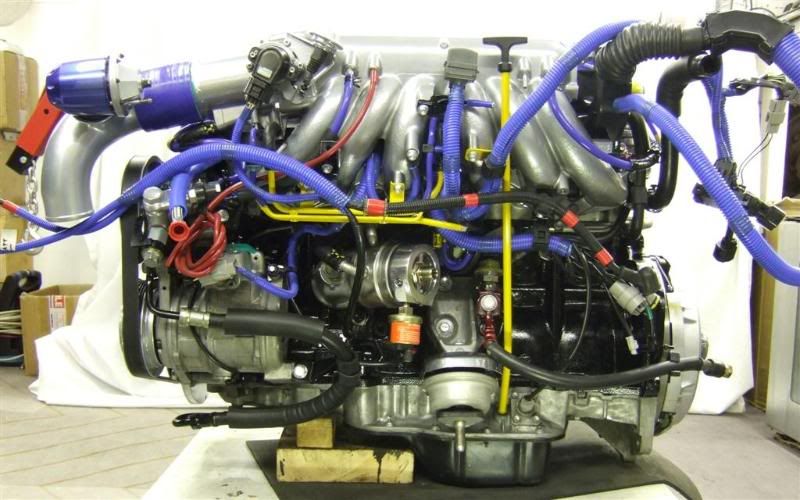
Front ancillary end.
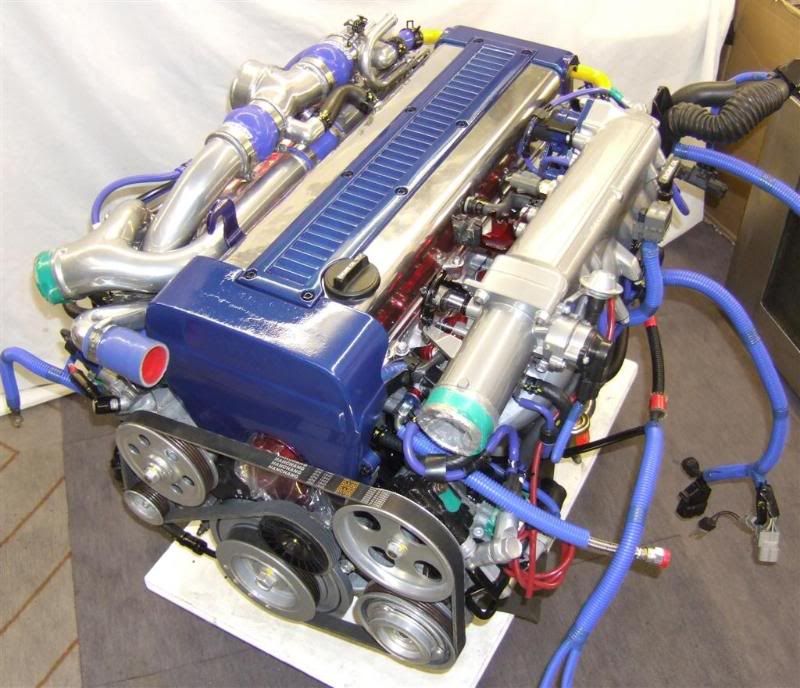
And some general shots while it still looks like new!


Obviously belonging to me this power plant must also have a party trick:

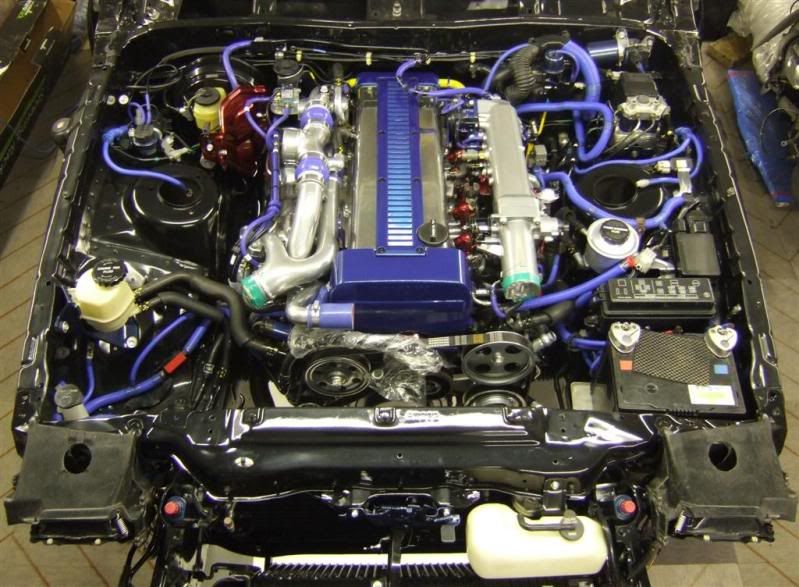
Joy, so now that’s in one bit I have started refitting all the engine bay hydraulic & HVAC pipework. The AC got all new seals & polished ally bits seeming as that’s kind of a theme. Hopefully the engine will drop in soon & I can start on the front sub frame assembly & brakes.
Clearly a few more car house disco evenings to go yet!
*
*
This is self explanatory really,all went back with new parts where needed & new gaskets.
For interest this is how the 1Jz timing gear is set out. Thanks Mark for tightening my crank with your big tool
And now just a bit of engine porn…
Exhaust side with the twin hybrids.
Clutch on ready for box.
Inlet side & plenum – where most of the wizardry happens!
Front ancillary end.
And some general shots while it still looks like new!
Obviously belonging to me this power plant must also have a party trick:
Joy, so now that’s in one bit I have started refitting all the engine bay hydraulic & HVAC pipework. The AC got all new seals & polished ally bits seeming as that’s kind of a theme. Hopefully the engine will drop in soon & I can start on the front sub frame assembly & brakes.
Clearly a few more car house disco evenings to go yet!
*
*
Update: 08/03/2010
Only been a couple of weeks since my last load of waffle but, this is a biggy. 6 months after undergoing open heart surgery my supra is making good recovery.
For a start it's front legs are starting to grow back:
The boost valve came in so, I conjured up a mounting bracket/hat shield for it & also got my metalwork tools out to make a stock dump valve blanking plate.

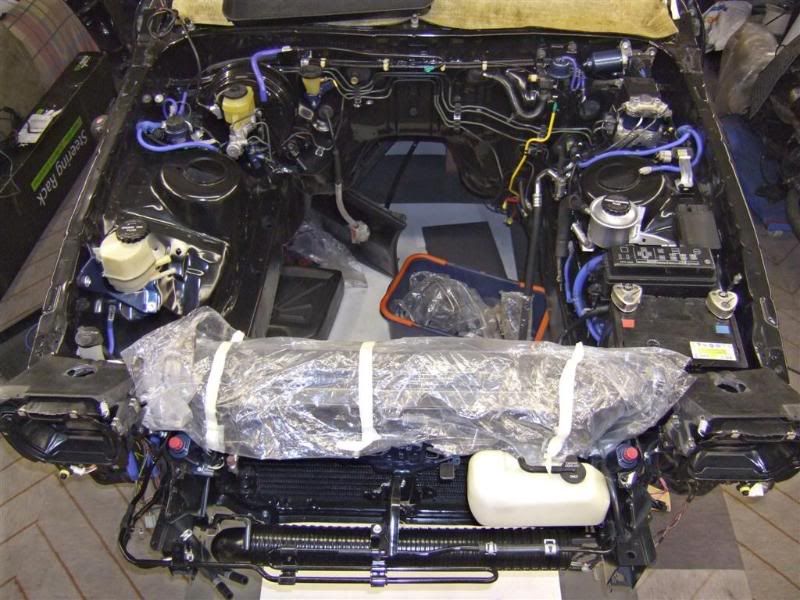
Most importantly of all, with a little physical guidance from my folks, the Supra saw the return of it's heart.

All sat in there looking pretty.
Obviously it does not work yet - it needs a brain first! No use in using mine as it's clearly shot!
Ryan has contacted me to say the correct (fingers crossed) ECU plug is on it's way from the US so, a new field harness can be put together.
As I type this, most of the engine HVAC & hydraulics are connected up ready.
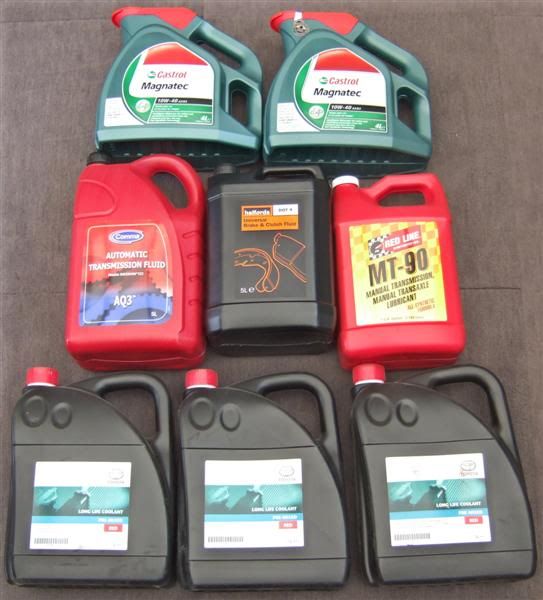
Transmission is on awaiting delivery of Redline MT-90. After ordering it last Monday I can now see why it cost £7 P&P - clearly, still not having arrived a couple of hundred miles from Yorkshire, the package must go via Sydney.... I do find it consistently disappointing how a proper "company" takes 7 times longer to deliver stuff compared to a guy in a bedroom on Ebay. Hmmm.
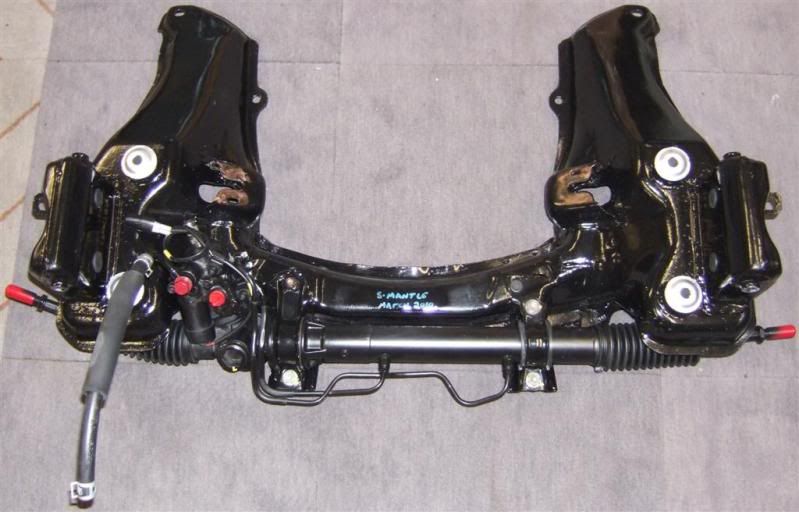
I can now get down to reinstalling it's front legs & feet & tackling the fitting of the Willwood brakes.
Plenty still to do but, getting the engine in has gained me a whole cubed metre of space in the workshop!
Only been a couple of weeks since my last load of waffle but, this is a biggy. 6 months after undergoing open heart surgery my supra is making good recovery.
For a start it's front legs are starting to grow back:
The boost valve came in so, I conjured up a mounting bracket/hat shield for it & also got my metalwork tools out to make a stock dump valve blanking plate.
Most importantly of all, with a little physical guidance from my folks, the Supra saw the return of it's heart.
All sat in there looking pretty.
Obviously it does not work yet - it needs a brain first! No use in using mine as it's clearly shot!
Ryan has contacted me to say the correct (fingers crossed) ECU plug is on it's way from the US so, a new field harness can be put together.
As I type this, most of the engine HVAC & hydraulics are connected up ready.
Transmission is on awaiting delivery of Redline MT-90. After ordering it last Monday I can now see why it cost £7 P&P - clearly, still not having arrived a couple of hundred miles from Yorkshire, the package must go via Sydney.... I do find it consistently disappointing how a proper "company" takes 7 times longer to deliver stuff compared to a guy in a bedroom on Ebay. Hmmm.
I can now get down to reinstalling it's front legs & feet & tackling the fitting of the Willwood brakes.
Plenty still to do but, getting the engine in has gained me a whole cubed metre of space in the workshop!
Update: 21/04/2010
Time to update the progress on this build again. Various things moving forward, if it were not for a water pump deciding to spontaneously leak on the shaft seal through lack of use I'd be getting an MOT today instead of stripping out the hydro fan system & timing gear!!!!
This annoys me somewhat as, all this stuff was thoroughly tried & tested before the build to make sure this exact hold up never occurred. Typical Supra & typical personal "luck" - Just shows, even if you take the time to test stuff properly it still screws you over!
Anyway. Expensive day at the local auto factors to say the least! Lots of fluid gone in this, & out, in again, out again.....
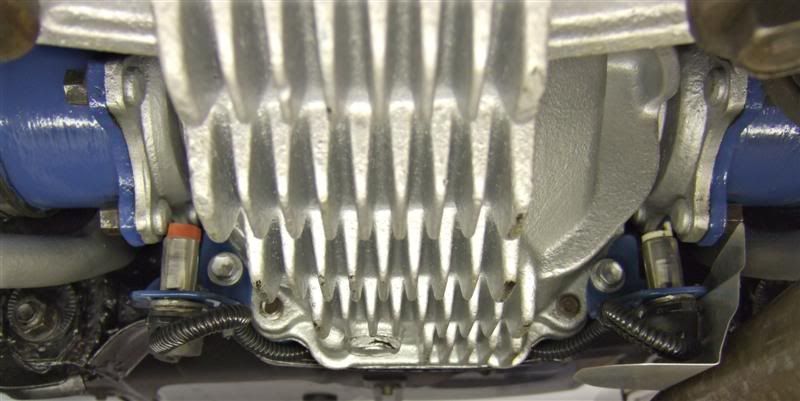
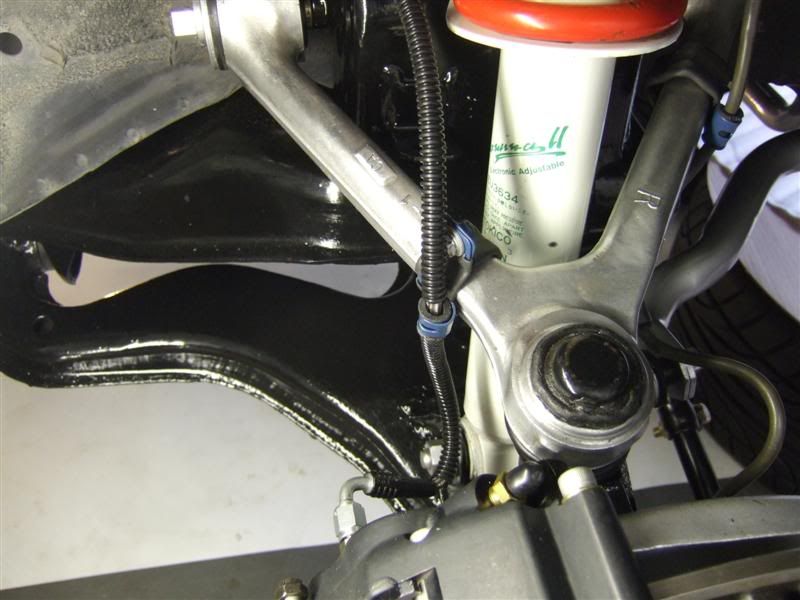
Bracketry reconditioned for the front suspension system & additional brackets fabricated for the rear TCS sensors.
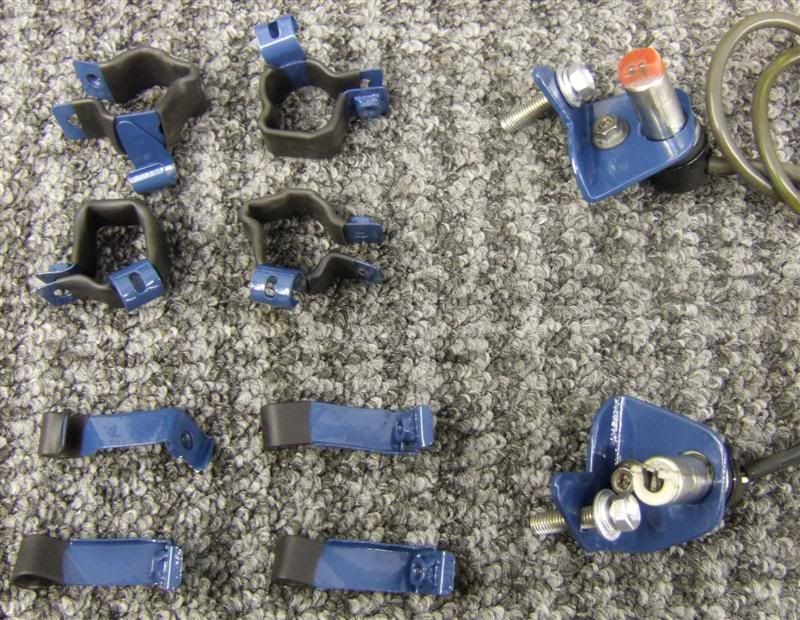
managed to get a pair of front ABS sensors mounted to the rear diff utilising stock spare holes in the casing for the traction control rear wheel speed sensing.
The brackets are good and strong, should take the strain of being on the back of a car. They pick up on the blind had bolts on the CV flanges. 6 pulses per rotation. I chose this spot because the sensors have to run within 1mm of the moving parts. This area has no movement suspension wise, has the room required & the tabs act as the trigger wheels.
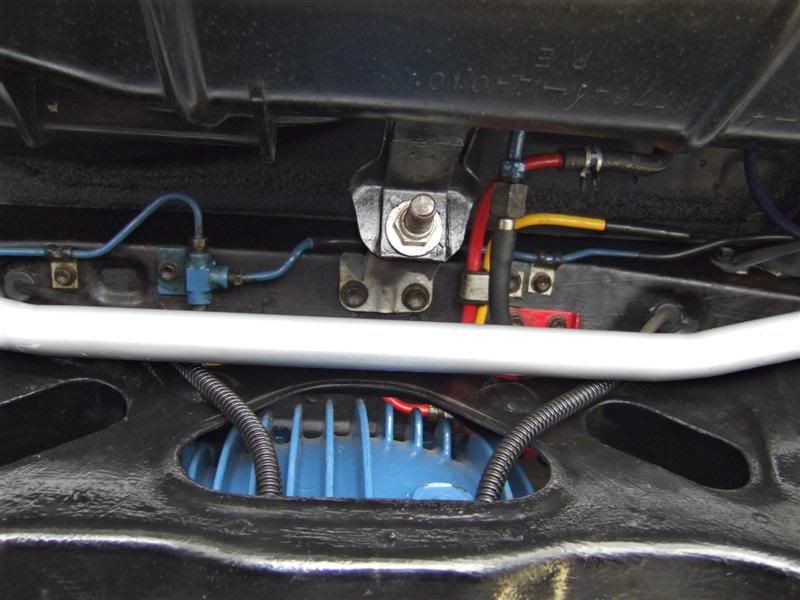
Cables route up through stock grommets into the trunk - no need to drill holes what so ever for this retrofit.
Dull ass video of the sensors in action here:

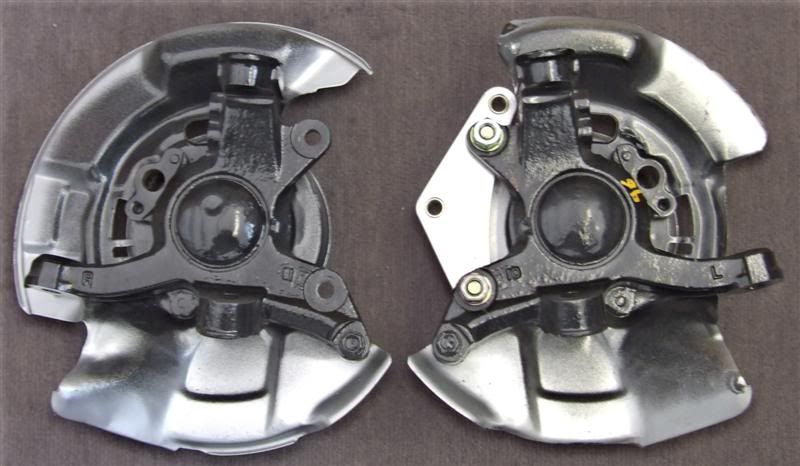
Modified the front hub dust guards to accept the wilwood brake kit. I did not want to simply cut the whole thing off, it aids cooling, prevents crud being thrown onto disks & is generally supposed to be there!
Stock left, Modded right.
This kit fitted great, no messing. The only thing I could fault was the fitment of the braided hose - it could do with being a few inches longer for proper routing & I would personally say the stock type banjo connection is less susceptible to coming loose over time compared to the hose connections on these which I can see being quite easy to loosen, have others had any experience?
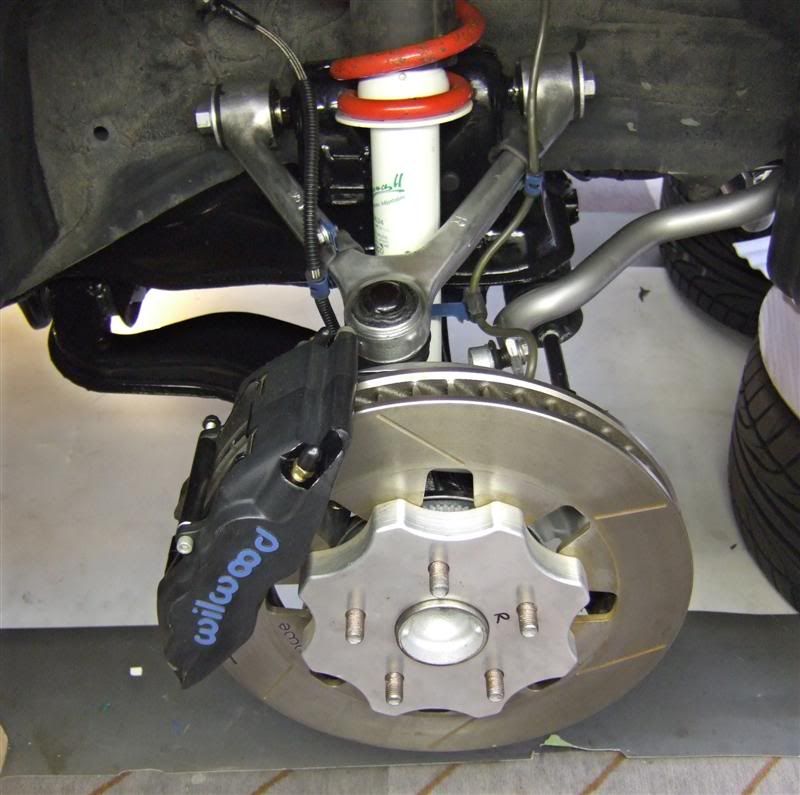
Hose routing using spare ABS sensor cable brackets.
As expected the wheels I had already didn't clear the huge new callipers - not even slightly! These are now on Mark3's car.
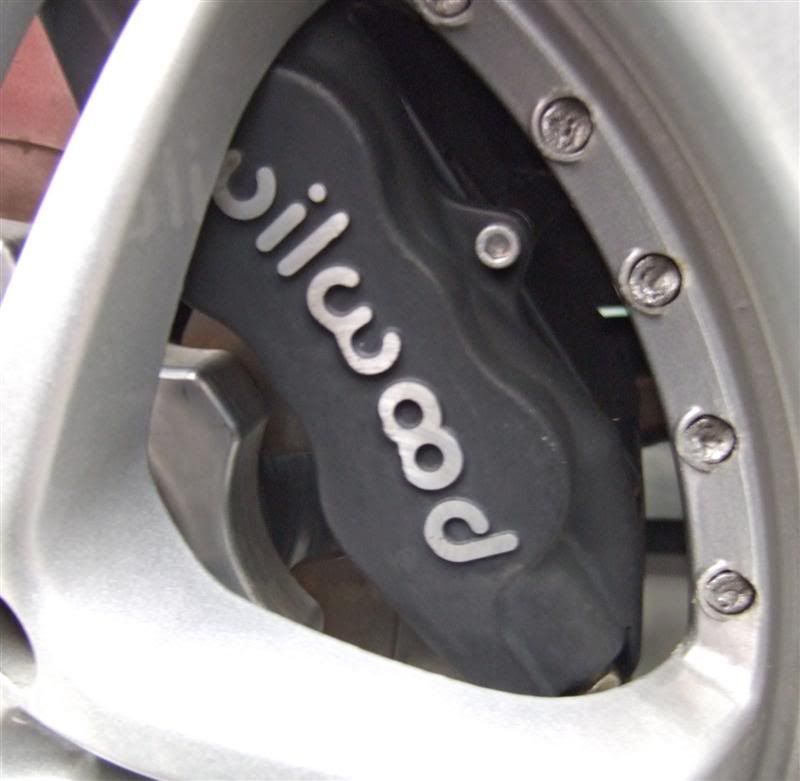
This meant I had to stump up for a new set of wheels sooner than wanted but, I had a contingency in place for this as, until all was fitted it was impossible to tell.
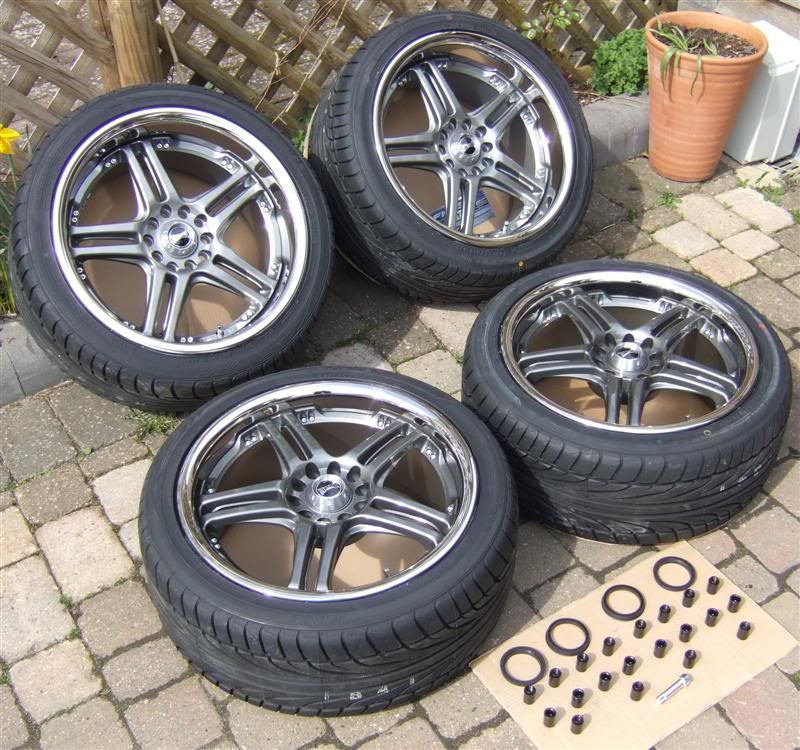
I opted for a set of Ultralite GT-2's in 18 x 8.5 & 18 x 9.5 (offset 35, stud pattern 5 x 114.3)
I went for the gunmetal finish as, this will be close to the colour of the respray so, should all match nicely through. Silver seemed to stick out loads against the meteorite grey.
Just to prove it moves under it's own steam, the car stretched it's legs onto the drive, I suspect it was at this point the car saw the state of our roads & decided to pop the water pump shaft seal so it could return to a carpeted workshop! Pussy!
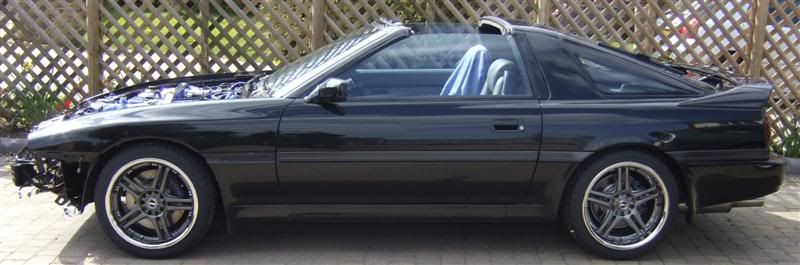
It's funny, I have been so used to the car high up ff the ground I was actually shocked into grinning when I stood at the front of it to find it actually only comes up to just above my knees these are so low!
So that's it for now, I am in the process of stripping the front of the engine off to get the water pump out. It's a bit of a PITA.
I will decide upon inspection what to do, there is a seal kit listed for the pump but, it's suitably vague as to weather or not it comes with a shaft seal.
The other option is to bin the complexities & oil filled nastyness of the hydrofan dog/child vaccuuming unit, save the space & fit a 2jz water pump & a pair of electric fans.
In honesty, I a being swayed this way just because it will offer so many service benefits in the future over having to strip out the hydrofan system - which only just fits with a Koyo anyway.
The only other thing that will give some of you a laugh is the way I stitched myself up with the PS system. I could not get this bl00dy thing to bleed, I knew it should self bleed but, nothing, not a dribble.
I bit the bullet & removed the pump only to find I had stitched up myself. On reconditioning I'd inserted a blank plug into the fluid inlet of a precise fit to stop oil pi5sing out. The fit was so good & the time scales between refitting & reconditioning long enough for me to completely miss this bung when refitting! It was this that caused me a days worth of head scratching, being covered in PS fluid & filling the swear box!
More soon.
Time to update the progress on this build again. Various things moving forward, if it were not for a water pump deciding to spontaneously leak on the shaft seal through lack of use I'd be getting an MOT today instead of stripping out the hydro fan system & timing gear!!!!
This annoys me somewhat as, all this stuff was thoroughly tried & tested before the build to make sure this exact hold up never occurred. Typical Supra & typical personal "luck" - Just shows, even if you take the time to test stuff properly it still screws you over!
Anyway. Expensive day at the local auto factors to say the least! Lots of fluid gone in this, & out, in again, out again.....
Bracketry reconditioned for the front suspension system & additional brackets fabricated for the rear TCS sensors.
managed to get a pair of front ABS sensors mounted to the rear diff utilising stock spare holes in the casing for the traction control rear wheel speed sensing.
The brackets are good and strong, should take the strain of being on the back of a car. They pick up on the blind had bolts on the CV flanges. 6 pulses per rotation. I chose this spot because the sensors have to run within 1mm of the moving parts. This area has no movement suspension wise, has the room required & the tabs act as the trigger wheels.
Cables route up through stock grommets into the trunk - no need to drill holes what so ever for this retrofit.
Dull ass video of the sensors in action here:
Modified the front hub dust guards to accept the wilwood brake kit. I did not want to simply cut the whole thing off, it aids cooling, prevents crud being thrown onto disks & is generally supposed to be there!
Stock left, Modded right.
This kit fitted great, no messing. The only thing I could fault was the fitment of the braided hose - it could do with being a few inches longer for proper routing & I would personally say the stock type banjo connection is less susceptible to coming loose over time compared to the hose connections on these which I can see being quite easy to loosen, have others had any experience?
Hose routing using spare ABS sensor cable brackets.
As expected the wheels I had already didn't clear the huge new callipers - not even slightly! These are now on Mark3's car.
This meant I had to stump up for a new set of wheels sooner than wanted but, I had a contingency in place for this as, until all was fitted it was impossible to tell.
I opted for a set of Ultralite GT-2's in 18 x 8.5 & 18 x 9.5 (offset 35, stud pattern 5 x 114.3)
I went for the gunmetal finish as, this will be close to the colour of the respray so, should all match nicely through. Silver seemed to stick out loads against the meteorite grey.
Just to prove it moves under it's own steam, the car stretched it's legs onto the drive, I suspect it was at this point the car saw the state of our roads & decided to pop the water pump shaft seal so it could return to a carpeted workshop! Pussy!
It's funny, I have been so used to the car high up ff the ground I was actually shocked into grinning when I stood at the front of it to find it actually only comes up to just above my knees
these are so low!
So that's it for now, I am in the process of stripping the front of the engine off to get the water pump out. It's a bit of a PITA.
I will decide upon inspection what to do, there is a seal kit listed for the pump but, it's suitably vague as to weather or not it comes with a shaft seal.
The other option is to bin the complexities & oil filled nastyness of the hydrofan dog/child vaccuuming unit, save the space & fit a 2jz water pump & a pair of electric fans.
In honesty, I a being swayed this way just because it will offer so many service benefits in the future over having to strip out the hydrofan system - which only just fits with a Koyo anyway.
The only other thing that will give some of you a laugh is the way I stitched myself up with the PS system. I could not get this bl00dy thing to bleed, I knew it should self bleed but, nothing, not a dribble.
I bit the bullet & removed the pump only to find I had stitched up myself. On reconditioning I'd inserted a blank plug into the fluid inlet of a precise fit to stop oil pi5sing out. The fit was so good & the time scales between refitting & reconditioning long enough for me to completely miss this bung when refitting! It was this that caused me a days worth of head scratching, being covered in PS fluid & filling the swear box!
More soon.