
So most of you don’t know me and the ones that did know me, probably don’t remember me.. yes it’s been that long.
If you’re wanting an update on my build thread I can revive the dead and do that.
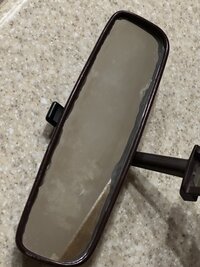
But this past summer I’ve been redoing my interior and one of the final pieces that needed addressing was the rear view mirror.
Like most, mine was faded, chalky plastic with a mirror that was hazy and losing its silver. So after researching for most of the summer I found a solution that works, it’s new, and it’s cheap. Not so much worried about the cheap side but it’s a plus.
Our mirror is mounted differently than most, so finding a replacement is next to impossible.
So what I found is sold by two different brands on Amazon. One is CARBBIA, part number 76430-S01-A01ZA. The second is by MOTOKU no part number, but both are for a 1996-2000 civic. Both are the same, and at the time of writing this, they are listed for $25

Some disassembly and reassembly is necessary, but not too terribly difficult.
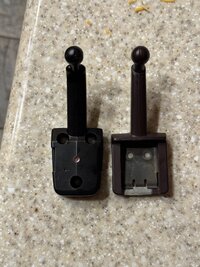
This mirror is mounted in the same way as ours, so basically you just need to remove the new ball mount and swap it with your old one. The new one is very close and the dimensions are almost spot on but the bolt holes don’t line up.
First you need to remove your old one from the car. There is plenty of info on that so I won’t rehash it.
But once you have it removed you’ll want to remove the ball mount. To do this just remove the two screws that are located on top of the mirror and pull the mount off. Then remove the clamp by squeezing out the plastic ball cup, then the metal retainer will slide over the ball.


Next, with the new mirror you need to remove the glass from the frame. This is the trickiest part but if you work slowly and carefully it will just pop out.
I found that using a very small flat screwdriver and working from the bottom and then to the sides it came out easily enough. Just be careful because you can easily break the glass or gouge the plastic frame.
Once the glass is off, you’ll see the retaining clamp. The screw is accessed from the rear of the frame. Remove the screw and the “civic” ball mount will come off. Then just replace it with the Supra’s ball mount and reinstall the clamp. Then reinstall the glass by pushing it back into the frame.
View attachment IMG_0516.jpeg
And that’s it. Hopefully this helps a few of you! I’ll try to add some more photos in a reply to this.
If you’re wanting an update on my build thread I can revive the dead and do that.
But this past summer I’ve been redoing my interior and one of the final pieces that needed addressing was the rear view mirror.
Like most, mine was faded, chalky plastic with a mirror that was hazy and losing its silver. So after researching for most of the summer I found a solution that works, it’s new, and it’s cheap. Not so much worried about the cheap side but it’s a plus.
Our mirror is mounted differently than most, so finding a replacement is next to impossible.
So what I found is sold by two different brands on Amazon. One is CARBBIA, part number 76430-S01-A01ZA. The second is by MOTOKU no part number, but both are for a 1996-2000 civic. Both are the same, and at the time of writing this, they are listed for $25
Some disassembly and reassembly is necessary, but not too terribly difficult.
This mirror is mounted in the same way as ours, so basically you just need to remove the new ball mount and swap it with your old one. The new one is very close and the dimensions are almost spot on but the bolt holes don’t line up.
First you need to remove your old one from the car. There is plenty of info on that so I won’t rehash it.
But once you have it removed you’ll want to remove the ball mount. To do this just remove the two screws that are located on top of the mirror and pull the mount off. Then remove the clamp by squeezing out the plastic ball cup, then the metal retainer will slide over the ball.
Next, with the new mirror you need to remove the glass from the frame. This is the trickiest part but if you work slowly and carefully it will just pop out.
I found that using a very small flat screwdriver and working from the bottom and then to the sides it came out easily enough. Just be careful because you can easily break the glass or gouge the plastic frame.
Once the glass is off, you’ll see the retaining clamp. The screw is accessed from the rear of the frame. Remove the screw and the “civic” ball mount will come off. Then just replace it with the Supra’s ball mount and reinstall the clamp. Then reinstall the glass by pushing it back into the frame.
View attachment IMG_0516.jpeg
And that’s it. Hopefully this helps a few of you! I’ll try to add some more photos in a reply to this.
Attachments
Last edited:


