
Project Git 'er done!: Stages 1, 2…now 3.
- Thread starter supraguy@aol
- Start date
You are using an out of date browser. It may not display this or other websites correctly.
You should upgrade or use an alternative browser.
You should upgrade or use an alternative browser.
Not too much new here.
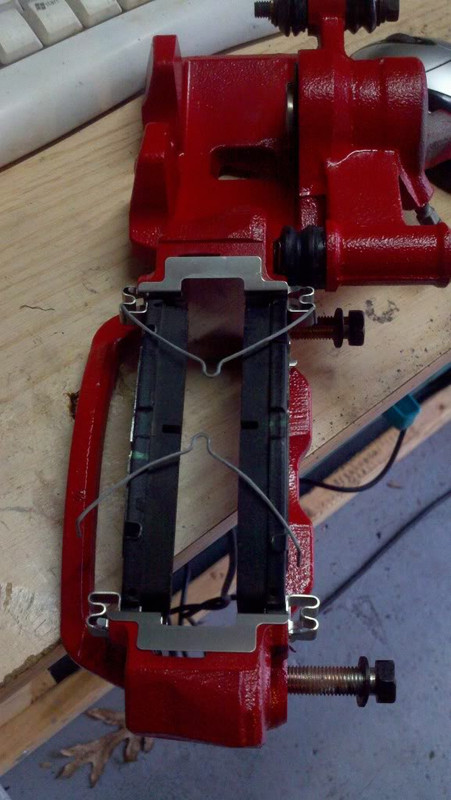
Went over to my friend's house this weekend, and he helped me to powdercoat by rear calipers red, and my rotor hats black.
Decided after disassembling the calipers, that I would go ahead and buy a couple of rebuild kits for them, as one of the slider boots had a tiny tear in it,
and both pistons had a tiny bit of rusty residue in them. After those arrive, I'll be able to finish the rear subframe and reinstall it. Then it's on to the front subframe.
YaaaaaaY!!!
This is looking scarily similar to my build. Im'a hop along for the ride on this one, hopefully i'll be able to contribute somehow.
This is looking scarily similar to my build. Im'a hop along for the ride on this one, hopefully i'll be able to contribute somehow.
very nice cant wait to see what else you do !
giving me lots of ideas for my supra build!
thanks
giving me lots of ideas for my supra build!
thanks
Don't worry, people!
I haven't stalled out, was just out of town for 9 days.
Came home to a few boxes- two reman'd axles, and all new rear brake hardware.
Here's old and new axles. They gave me 333,000 miles, they've earned their retirement:

I haven't stalled out, was just out of town for 9 days.
Came home to a few boxes- two reman'd axles, and all new rear brake hardware.
Here's old and new axles. They gave me 333,000 miles, they've earned their retirement:
Last edited:
New brake hardware. Didn't even know there were supposed to be wear clips on the back:

Still waiting on one more box for the rear subframe; a little DIY project for the rear bushings.
PS- in that last pic, I got a bit carried away with wear clips, and accidentally put all 4 on one side.
I've fixed that, though.")
Still waiting on one more box for the rear subframe; a little DIY project for the rear bushings.
PS- in that last pic, I got a bit carried away with wear clips, and accidentally put all 4 on one side.
I've fixed that, though.
Last edited:


Awesome build! look forward to the interior. ive seen the leater skins for our seats on ebay but there are no reviews on them.
The few comments on the forums that I've seen, seem to all be very positive concerning the fitment, so I'm very optimistic.
No updates this week.
Spent $500 on furniture and $300 on new Khumo's for my daughter's car.
Still waiting for some urethane parts to come in before I show off pics of the reinstalled rear subframe.
Spent $500 on furniture and $300 on new Khumo's for my daughter's car.
Still waiting for some urethane parts to come in before I show off pics of the reinstalled rear subframe.
So here's what I've been doing today.
I had BIC nylon rear subframe bushings, but they were too noisy, transmitting too much of the diff noise into the car.
If this were going to be a track car, I wouldn't care, as they do take out all the slop, but this is going to be a road car for 99% of its life.
I tried Raptor racing for rear bushings, but they were out and didn't expect to be ordering a set any time soon. So, I decided to make my own.
Not bushings, mind you, just a replacement spacer to ADD to the originals. The rubber on mine was in great condition, they just weren't thick enough
to take up the slack. So I just used them as molds for the additional thickness of a liquid urethane spacer, in 80A hardness.
My original bushings:

Cut out some drink cups- perfect diameter for this project:

To make sure they didn't seep, I silicone'd the cups on:

I placed in sockets to match the center shaft size. Both the insides of the cups, and the sockets were coated with a PAM cooking spray:

Liquid urethane mixed with hardener, and poured, making sure to match the levels between the spacers:

Now, I just have to wait two + days for full curing before the subframe is reinstalled.
Then I finally go on to the front suspension.
I had BIC nylon rear subframe bushings, but they were too noisy, transmitting too much of the diff noise into the car.
If this were going to be a track car, I wouldn't care, as they do take out all the slop, but this is going to be a road car for 99% of its life.
I tried Raptor racing for rear bushings, but they were out and didn't expect to be ordering a set any time soon. So, I decided to make my own.
Not bushings, mind you, just a replacement spacer to ADD to the originals. The rubber on mine was in great condition, they just weren't thick enough
to take up the slack. So I just used them as molds for the additional thickness of a liquid urethane spacer, in 80A hardness.
My original bushings:
Cut out some drink cups- perfect diameter for this project:
To make sure they didn't seep, I silicone'd the cups on:
I placed in sockets to match the center shaft size. Both the insides of the cups, and the sockets were coated with a PAM cooking spray:
Liquid urethane mixed with hardener, and poured, making sure to match the levels between the spacers:
Now, I just have to wait two + days for full curing before the subframe is reinstalled.
Then I finally go on to the front suspension.
Last edited:

We'll see.
I checked the new spacers tonight, and they are almost fully cured.
They seem to be just slightly harder than the original rubber, which is what i wanted.
I have to go out of town for a few days, so I'll just let them sit on the bench, so I know that they'll be fully cured when I get back and install them.
Getting there...
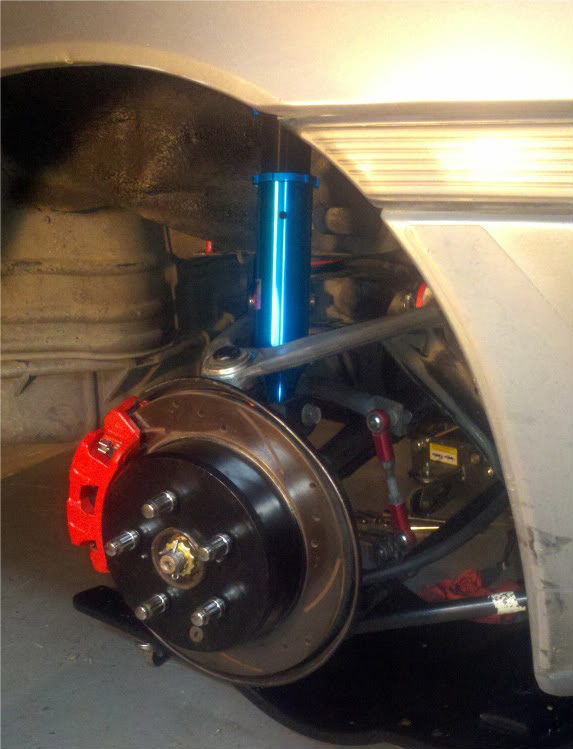
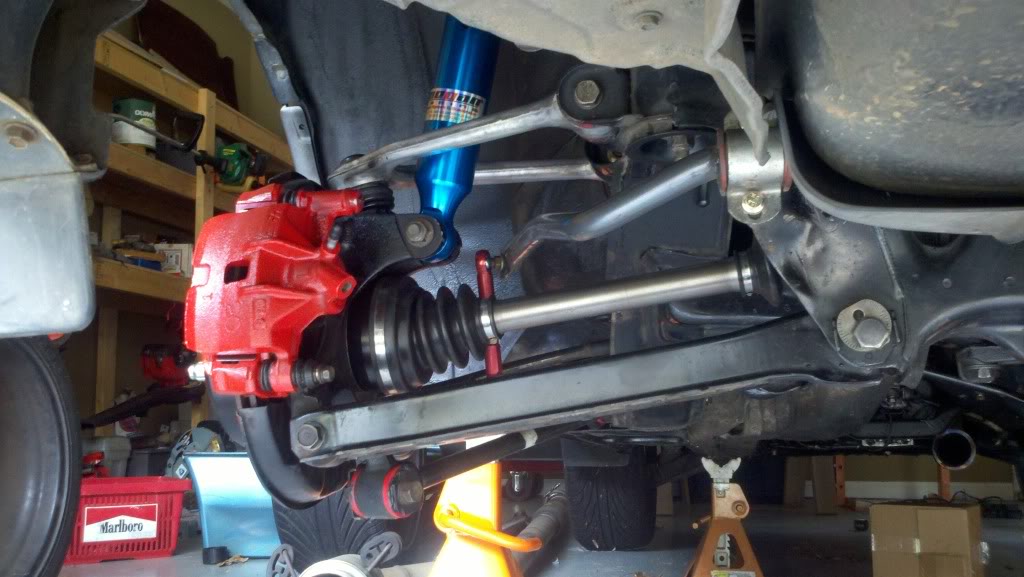
Subframe in, Shocks, Ebrakes, and halfshafts connected.
Tomorrow, I'll finish reconnecting the brake lines and driveshaft, and then I'll turn the car around so I can begin on the front suspension and brake upgrade.
Subframe in, Shocks, Ebrakes, and halfshafts connected.
Tomorrow, I'll finish reconnecting the brake lines and driveshaft, and then I'll turn the car around so I can begin on the front suspension and brake upgrade.
Last edited:
Rear subframe/ suspension: DONE

Oops- I guess I have to adjust the ride height back there...:biglaugh:
Next- the second half of stage 1: Front suspension
Remove front subframe
Remove upper and lower arms
Powdercoat lower arms and replace all bushings with Energy Suspension
Replace steering rack and tie rods
Replace steering rack bushings
Replace lower balljoints
Inspect upper A-arms, replace if necessary
Inspect subframe bushings, replace as necessary
And...rather than rebuild and powdercoat the original front calipers as I had planned, I decided to upgrade:


Front Cobra calipers and rotors.
Oops- I guess I have to adjust the ride height back there...:biglaugh:
Next- the second half of stage 1: Front suspension
Remove front subframe
Remove upper and lower arms
Powdercoat lower arms and replace all bushings with Energy Suspension
Replace steering rack and tie rods
Replace steering rack bushings
Replace lower balljoints
Inspect upper A-arms, replace if necessary
Inspect subframe bushings, replace as necessary
And...rather than rebuild and powdercoat the original front calipers as I had planned, I decided to upgrade:
Front Cobra calipers and rotors.
Last edited:
Got some good progress done today on the front.
I started taking off front body panels to facilitate my access, as well as reduce my workload when I start on the bodywork stage:
Removed old busted Kaminari bumper:

Then the header panel, bumper reinforcement and grill:


Then the inner and outer fenders:


Then on to the front suspension. Apparently, my tierod ends and balljoints were more tired than I thought(they were all replaced about 8 years ago):


Looking pretty bare:


Also, my Cobra rotors showed up. Here's a comparison to my old rotors:


Now I'm waiting on the bracket kit for the brakes, and new balljoints to arrive.
Next, I have to degrease the lower arms, replace all the bushings with ES bushings. Some were pretty chewed up.
Then I powdercoat the lower arms and replace the steering rack and bushings.
I started taking off front body panels to facilitate my access, as well as reduce my workload when I start on the bodywork stage:
Removed old busted Kaminari bumper:
Then the header panel, bumper reinforcement and grill:
Then the inner and outer fenders:
Then on to the front suspension. Apparently, my tierod ends and balljoints were more tired than I thought(they were all replaced about 8 years ago):
Looking pretty bare:
Also, my Cobra rotors showed up. Here's a comparison to my old rotors:
Now I'm waiting on the bracket kit for the brakes, and new balljoints to arrive.
Next, I have to degrease the lower arms, replace all the bushings with ES bushings. Some were pretty chewed up.
Then I powdercoat the lower arms and replace the steering rack and bushings.
Last edited: