**This thread is/was created for Supramania.com and MKIIItech.com ONLY. So if you plageurize, I WILL deal with you. This is your only warning!***
So what is this thread?
Consider it a feature lesson off the MoTeC in what it can do above the "normal" run of the mill standalone. This is using the ECU Manager for the Mx00.
I will focus only on Ethanol Percentage and not Ethanol Temp, both take the same steps though.
So everyone here has heard of E85 and also know that I have been a proponent of this fuel for quite some time (2005 and counting). Well before the MoTeC it took to physical fuel maps to map out the E85 and some tweaking for ethanol blend changes, as of the MoTeC and thanks to thier 4d tables. No more. This is based on some research and also based on how John Reed does the Fuel/ign table for E85 cars.
The Flex Fuel sensor is a MUST!!
http://www.megamanual.com/flexfuel.htm
GM Part #12568450 which has been superceded by #12570260.
So as per the megasquirt site, we see that the flex fuel sensor runs off a 12v+ supply and has a digital output signal which is infact two signals. Frequency and Pulse width in msec. Frequency is tied directly to the ethanol content of the fuel and Pulse width is tied directly to the temprature of the fuel.
1 millisecond indicates -40°C (-40°F), and
5 milliseconds indicates 125°C (257°F).
For this post we are going to use frequency only.
So let get started shall we?
**DISCLAIMER! (yes they are always needed!!) This post is focused on the features of what a MoTeC mx00 series EMS can do. It is not to be construed as a how-to, instructions, step-by-step, directions on how to do this for you car. I hereby release myself from any warranties either expressed or implied by this post. If you do decide to follow this, you do so at your OWN risk and I will not be held liable for the outcome to your car. Please consult a qualified and prefereably, certified MoTeC tuner (ie John Reed) on getting this done if you decide to go this route.
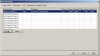
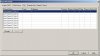
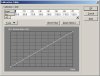
So the first order of business (the MoTeC Mx00 must be setup for your particular engine configuration wise, otherwise stop reading right now!) is to set an input and name it appropiately so we know what we are dealing with, Under the Adjust > Sensor Setup > Input Setup > User Tab. Press the User 1 field and press change. This will take you to where you can change the name and all other parameters for that channel. So we assign the channel name as E85% D1 and Channel Abbreviation as E85% D1(Trying to be as descriptive as possible so E85% Digital1). For the Input, tie it to Digital 1 (this is for this example only, it can be tied to any of the four digital inputs). Under Calibration, Select Custom and tie it to the HZ 1 decimal place (attached as MoTeC-Input-Assign2.jpg). Once that is complete, Now we press the Table button, In the calibration table we need 10 entries. If you read the above information pertaining to the Frequency to ethanol content. We see that 50hz = 0% and 150hz = 100%. Well that is our tables") So to keep things neat, 10 steps from 0 to 100% which directly ties to the hz;
So to keep things neat, 10 steps from 0 to 100% which directly ties to the hz;
example: 0 = 50hz, 10 = 60hz ... 100 = 150hz. (see attachement labled MoTeC-Input-CalTable.jpg). Once the Calibration table is done. Press ok and press ok again. The User Input tab now shows E85% D1 (E85% D1) for the first field (attachment MoTeC-E85-Assigned.JPG).
Next order of business, tie the Digital input to what we are looking to measure (Adjust > Digital Input> Dig In 1 - off > Function) which in this case we want to use the Speed Measurement as that reads the pulses and calculates a frequency, so type 1. Then go to Adjust > Digital Input> Dig In 1 - Speed Measure > Parameter. Under the Measurement Type, type 3 and press ok.
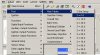
Now we go to where the fun really starts, Adjust > General Setup > Main setup. Look for two entries, Efficiency Z and Load Z. efficiency is tied to Fuel and load is tied to ignition. So under Efficency Z (4d). You want 7 as your selection, as if you recall, we changed User 1 to E85 % D1. This is exactly what is going to control the Z axis of the fueling and ignition. The software will tell you that the fuel tables will be set to zero, press Yes, otherwise the software won't let you continue. The next confirm box will ask you "You will need to setup the Fuel-Z axis sites. Would you like to do it now?" Press Yes, on the numbers, add the percentage that we created to the user 0 - 100. No percent signs, should use up 11 cells. Once that is done, if we go back to Adjust > Fuel > Main Tables (notice it is plurar now) > Z = x where X = the numbers that you used in the Fuel-Z axis cells. So we now have 11 tables to fill in 9See attachment MoTeC-Fuel-4d.jpg)!! Rinse lather and repeat for the ignition (load Z).
The beauty of the 4d tables is that just like in the normal 2d tables (say RPM v inj pw) the software interpolates between the z axis as well as the x and y axis. No need to exchange maps when the map is already compensating for WHATEVER content of oxygenated fuel the state is using, from 0% all the way up to E98!!
So what is this thread?
Consider it a feature lesson off the MoTeC in what it can do above the "normal" run of the mill standalone. This is using the ECU Manager for the Mx00.
I will focus only on Ethanol Percentage and not Ethanol Temp, both take the same steps though.
So everyone here has heard of E85 and also know that I have been a proponent of this fuel for quite some time (2005 and counting). Well before the MoTeC it took to physical fuel maps to map out the E85 and some tweaking for ethanol blend changes, as of the MoTeC and thanks to thier 4d tables. No more. This is based on some research and also based on how John Reed does the Fuel/ign table for E85 cars.
The Flex Fuel sensor is a MUST!!
http://www.megamanual.com/flexfuel.htm
GM Part #12568450 which has been superceded by #12570260.
So as per the megasquirt site, we see that the flex fuel sensor runs off a 12v+ supply and has a digital output signal which is infact two signals. Frequency and Pulse width in msec. Frequency is tied directly to the ethanol content of the fuel and Pulse width is tied directly to the temprature of the fuel.
- 50 Hertz indicates 0% ethanol, and
- 150 Hertz indicates 100% ethanol.
1 millisecond indicates -40°C (-40°F), and
5 milliseconds indicates 125°C (257°F).
For this post we are going to use frequency only.
So let get started shall we?
**DISCLAIMER! (yes they are always needed!!) This post is focused on the features of what a MoTeC mx00 series EMS can do. It is not to be construed as a how-to, instructions, step-by-step, directions on how to do this for you car. I hereby release myself from any warranties either expressed or implied by this post. If you do decide to follow this, you do so at your OWN risk and I will not be held liable for the outcome to your car. Please consult a qualified and prefereably, certified MoTeC tuner (ie John Reed) on getting this done if you decide to go this route.
So the first order of business (the MoTeC Mx00 must be setup for your particular engine configuration wise, otherwise stop reading right now!) is to set an input and name it appropiately so we know what we are dealing with, Under the Adjust > Sensor Setup > Input Setup > User Tab. Press the User 1 field and press change. This will take you to where you can change the name and all other parameters for that channel. So we assign the channel name as E85% D1 and Channel Abbreviation as E85% D1(Trying to be as descriptive as possible so E85% Digital1). For the Input, tie it to Digital 1 (this is for this example only, it can be tied to any of the four digital inputs). Under Calibration, Select Custom and tie it to the HZ 1 decimal place (attached as MoTeC-Input-Assign2.jpg). Once that is complete, Now we press the Table button, In the calibration table we need 10 entries. If you read the above information pertaining to the Frequency to ethanol content. We see that 50hz = 0% and 150hz = 100%. Well that is our tables
So to keep things neat, 10 steps from 0 to 100% which directly ties to the hz;example: 0 = 50hz, 10 = 60hz ... 100 = 150hz. (see attachement labled MoTeC-Input-CalTable.jpg). Once the Calibration table is done. Press ok and press ok again. The User Input tab now shows E85% D1 (E85% D1) for the first field (attachment MoTeC-E85-Assigned.JPG).
Next order of business, tie the Digital input to what we are looking to measure (Adjust > Digital Input> Dig In 1 - off > Function) which in this case we want to use the Speed Measurement as that reads the pulses and calculates a frequency, so type 1. Then go to Adjust > Digital Input> Dig In 1 - Speed Measure > Parameter. Under the Measurement Type, type 3 and press ok.
Now we go to where the fun really starts, Adjust > General Setup > Main setup. Look for two entries, Efficiency Z and Load Z. efficiency is tied to Fuel and load is tied to ignition. So under Efficency Z (4d). You want 7 as your selection, as if you recall, we changed User 1 to E85 % D1. This is exactly what is going to control the Z axis of the fueling and ignition. The software will tell you that the fuel tables will be set to zero, press Yes, otherwise the software won't let you continue. The next confirm box will ask you "You will need to setup the Fuel-Z axis sites. Would you like to do it now?" Press Yes, on the numbers, add the percentage that we created to the user 0 - 100. No percent signs, should use up 11 cells. Once that is done, if we go back to Adjust > Fuel > Main Tables (notice it is plurar now) > Z = x where X = the numbers that you used in the Fuel-Z axis cells. So we now have 11 tables to fill in 9See attachment MoTeC-Fuel-4d.jpg)!! Rinse lather and repeat for the ignition (load Z).
The beauty of the 4d tables is that just like in the normal 2d tables (say RPM v inj pw) the software interpolates between the z axis as well as the x and y axis. No need to exchange maps when the map is already compensating for WHATEVER content of oxygenated fuel the state is using, from 0% all the way up to E98!!