Few quick questions. Pictures included, dial-up users beware.

DMB-87Supra

New Member
May 31, 2007
21
0
0
Northeastern Pennsylvania
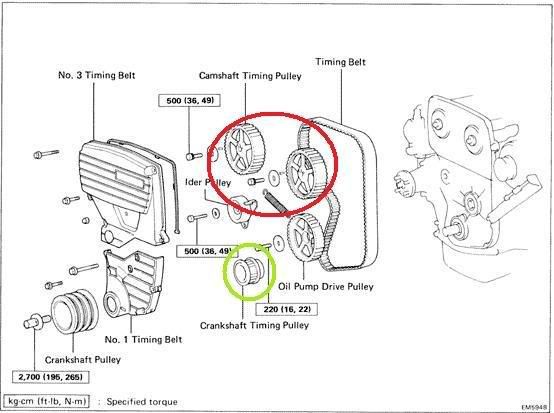
I'm working on getting the engine on my Supra back together and I just had a few real quick questions. There's a whole story behind it and it's been apart for a long time, but I'm not going to go into that. Straight to the point. First of all, does this look about right for the intake and exhaust cam timing. From what I've read the first lobe on the cams should be facing slightly inward toward each other. See below:

supra2.jpg


On to the next issue, I can't recall for the life of me (and I get everything organized but I can't seem to figure out what the hell bolts into here -- see on top of vacuum canister where the red circle is). If anybody could tell me what's supposed to bolt there, I'd greatly appreciate it as well. See picture below:

supra1-modified.jpg


Lastly, this I really don't need but it would be nice to have, does anyone have diagrams of all the cooling lines and/or pictures of different steps in putting a Supra motor back together. Not really necessary but it would make things easier on a few things without me having to think as hard. As far as the cooling lines go, I diagram I found in the TSRM didn't seem all that great and I have fairly good diagrams of all the vacuum lines as well as schematics for the electronics. Thanks in advance.
 

Dirgle

Conjurer of Boost
Mar 30, 2005
1,632
0
36
41
Pauma Valley, CA
As for the cams, if you place the timing gears on them they will both have a notch points straight up, as well as lines up with the timing plate cover.
 

DMB-87Supra

New Member
May 31, 2007
21
0
0
Northeastern Pennsylvania
You mean the 3 little holes in the timing gear, where one is at like a 45 degree angle, one is at a like a 90 degree angle to the side and the last one is straight up? The only issue is that's how I originally had it, but due to what I read about the first cam lobes being pointed inward a hair, I turned the cams a bit. With the way they are at this point, do you think I'll have any issue if I let it go, or do I have to rip them back off (which becomes a huge pain to me because I need to go borrow a tool or two to get them back off without having to do alot more work just to pull them off. Thanks in advance.
 

Dirgle

Conjurer of Boost
Mar 30, 2005
1,632
0
36
41
Pauma Valley, CA
There is no need to pull the cams back up. Just put the timing gears on with the pin in the center hole and turn them so the notches are pointing up.
 

DMB-87Supra

New Member
May 31, 2007
21
0
0
Northeastern Pennsylvania
Not the cams, actually pulling the bolt on the timing gears. Ripping that starter back out so I can jam the flywheel is a pain in the ass with how I'm working at the moment and alot of times the damn thing just slips out on me anyway (well can't remember on the timing gears but I know on the crank I had to have somebody actually hold it in there). Basically the easier way I found to do it is with an impact wrech and a small pair of vice grips. The impact wrench breaks it so quick they just come right out without really needing to apply any force to hold it. Problem is I don't have an impact wrench hence the needing to borrow tools.

Honestly, I'm so frustrated with this car anymore. I've owned alot of cars and I currently have a 300ZX as well which I thought was a pain to work on. To be honest, I've had more issues that I've had to fix on the Supra since I've bought it and it's the biggest pain in the ass I've ever had to work on. I love the damn car and anytime I just sit in it, I wish I could start it up and take it for a spin, but honestly I'm about ready to junk the damn thing. I've got thousands into this car (not kidding, literally thousands), I've rebuilt so much shit that kept going wrong with this car when I first bought it, and I just can't bring myself to get rid of the damn thing even though everyone says I'm stupid for dropping that much cash into it. It's like I've replaced almost everything in it, so once this is done there shouldn't be any more problems... Eh don't mind me just venting...

I just want the car back together and this has been an ongoing project for some time due to time and money restrictions.

Thanks for the advice. I guess I'm going to have to try to get hold of a friend with an impact wrench again. Any clue on what bolts up to the red circled part in the other picture per chance?
 
Last edited:

Dirgle

Conjurer of Boost
Mar 30, 2005
1,632
0
36
41
Pauma Valley, CA
Not sure about the part you have circled as I'm not real familiar with the vacuum system in the NA. I assume it bolts to one of the mounting points under the upper intake plume.


I guess I'm confused. Why you need an impact wrench to pull the bolts on the timing gears.

The only two you need to adjust are the ones circled in red, the one circled in green only goes on one way so you shouldn't need to mess with the flywheel.

p731855_1.jpg


Here are how you need to set the marks and pin holes. There is also a spot on the cams that you can fit a wrench to so you can torque the fastener bolt down.

p731855_2.gif


If I'm not being clear about something let me know, as it stands I'm not sure what you're trying to do with the starter and flywheel.
 

DMB-87Supra

New Member
May 31, 2007
21
0
0
Northeastern Pennsylvania
I didn't notice there was a matchmark on the actual cam gears. I thought you had to mark one yourself. Therefore I figured I would have to pull the bolt out to see the 3 holes so I knew how it was aligned. Thanks again, sorry for the misunderstanding. The thing I was saying with the starter and the pulley was something totally different. I was thinking about when I had to pull the crank and i had to jam a screwdriver in between a flywheel tooth to keep the crank from spinning so I could break the nut (again this is much easier with an impact wrench as I've found out since if you just put the car in 5th gear with the e-brake on and use the impact wrench to remove the crank bolt). Anyway, sorry about the confusion, it's been a really long stressful day and the half of it isn't over yet. I appreciate all the help.

EDIT: Thanks for the tip on torqueing the cam gear bolts down. Don't know how I didn't think of that. I had to turn the cams using that spot on the camshaft before. I never even thought about just putting the adjustable on there and using that to hold it.
 
Last edited:

AJ'S 88NA

New Member
Jul 26, 2007
2,419
0
0
Florida
The hole on the top of the vac canister is for a vac. switch which has two hoses and a plug in for the wirering harness. one hose goes to the can and the other goes to the little vac pipe under the intake.
 

f00g00

Supramania Contributor
Jul 2, 2007
586
0
16
Kuwait
AJ'S 88NA said:
The hole on the top of the vac canister is for a vac. switch which has two hoses and a plug in for the wirering harness. one hose goes to the can and the other goes to the little vac pipe under the intake.
The Pipe under the intake is the ACIS valve. If that wasn't cconnected then you would lose some power at the top end.
 
Last edited:

AJ'S 88NA

New Member
Jul 26, 2007
2,419
0
0
Florida
f00g00 said:
The Pipe under the intake is the ASIC valve. If that wasn't cconnected then you would lose some power at the top end.
No I'm talking about the Vac. tubes that run along the bottom of the intake parellel to the block that all the vac. lines(FPP, EGR,etc.)are connected to.
He's wanting to know what went on top of the vac. canister.
 

f00g00

Supramania Contributor
Jul 2, 2007
586
0
16
Kuwait
Here is a pic of my vac cannister that shows as AJ pointed out has a VSV attatched to the top but the hose goes to the ACIS valve. The one that is in the middle of the pic,the other hose from the VSV goes to the cannister.
here is another link that shows the vaccum routing for the vsv
http://www.turbomr2.com/MR2/Reference/TVIS/TVIS.htm
 

Attachments

  • 00000029.jpg
    00000029.jpg
    335.2 KB · Views: 10

AJ'S 88NA

New Member
Jul 26, 2007
2,419
0
0
Florida
f00g00 said:
Here is a pic of my vac cannister that shows as AJ pointed out has a VSV attatched to the top but the hose goes to the ACIS valve. The one that is in the middle of the pic,the other hose from the VSV goes to the cannister.
here is another link that shows the vaccum routing for the vsv
http://www.turbomr2.com/MR2/Reference/TVIS/TVIS.htm
I stand corrected. I couldn't remember were the other line went. Thanks for setting me straight foogoo.:icon_bigg