Crank and no Start- Puzzled

Ryan_

New Member
May 8, 2013
15
3
3
Earth
Hi everyone,

I am losing my mind trying to figure out why the car is not starting. Any help would be greatly appreciated.

1991 Turbo Auto.

Recently repaired the BHG. Started fine, would hesitate and die under load. Needed some throttle to cold start.

I had to really harass the car one day to move it around the busy plaza where the garage is, limping it around with gas/brake to keep it alive and firing it up after it dies.

Recently:
-installed a new Cold start thermoswitch (old one was physically broken). -No change in cold start.
-installed and hardwired a new o2 injector (original was fouled up and old, throwing a code) -Code is gone. Car now cranks and does not start.

So far trying to get it to start I have:
-Ensured it has gas. (1/4) tank, New gas.
-FPR reads 40PSI
-Confirmed spark.
-No codes.
-Re-timed CPS.
-Double checked engine timing
-Swapped CPS.
-Swapped MAF
-Checked Fuse box behind battery and Driver's kick panel -All fuses are good.

https://youtu.be/Pd-9JWfDKkc
youll hear me tapping the throttle -ignore that
 
Last edited:

57Bonus

New Member
Dec 14, 2022
18
7
3
67
Did you check the fuel injectors?
And make sure all your intercooler hoses are in good shape, not loose/leaking. Last time I had a no start was due to a split intercooler hose.

Oh, and when checking/adjusting your timing, did you install a jumper to pins Te1 and E1?
 

Ryan_

New Member
May 8, 2013
15
3
3
Earth
I will triple check the hoses, maybe I'll borrow a smoke machine and check the entire system. Visually I havent seen an issue though

How can I check the injectors?
And yes, always had the jumpers when setting timing originally.

Thank you for your response
 

57Bonus

New Member
Dec 14, 2022
18
7
3
67
I usually check my fuel injectors for flow pattern and make sure they aren't plugged up by using a kit that cycles the injector while spraying carb cleaner thru it's inlet. Unfortunately, you have to remove the injectors to use this method.

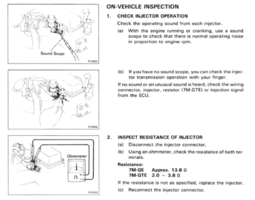
There's also an on-vehicle inspection per TSRM:
1702945526912.png
 

Bru

Member
Feb 28, 2013
52
30
18
Tampa Bay Area
What you're describing reminds me of when I forgot to plug-in the airflow sensor. It would start, but ran like crap and would cut out. Here's a link to the online manual so you can check what you described in what you double did. Also make sure that bundle of ground wires under the intake manifold is tight. One time I only hand tightened it and it would die and run funny. After I tightened it down, everything went back to normal. Never clean the air flow sensor with any solvent because if liquid gets inside, it destroys its function. I found out the hard way. The Karman vortex air flow meter is like a microphone listening to the increasing and decreasing frequency of the air passing by.

The online manual.
 
Last edited:
  • Like
Reactions: 57Bonus

Ryan_

New Member
May 8, 2013
15
3
3
Earth
What you're describing reminds me of when I forgot to plug-in the airflow sensor. It would start, but ran like crap and would cut out. Here's a link to the online manual so you can check what you described in what you double did. Also make sure that bundle of ground wires under the intake manifold is tight. One time I only hand tightened it and it would die and run funny. After I tightened it down, everything went back to normal. Never clean the air flow sensor with any solvent because if liquid gets inside, it destroys its function. I found out the hard way. The Karman vortex air flow meter is like a microphone listening to the increasing and decreasing frequency of the air passing by.

The online manual.
Ive actually had the same thing happen before with the AFM. This time its definitely not it. I even swapped AFM\s with no resolution. thank you though!
 

Ryan_

New Member
May 8, 2013
15
3
3
Earth
I usually check my fuel injectors for flow pattern and make sure they aren't plugged up by using a kit that cycles the injector while spraying carb cleaner thru it's inlet. Unfortunately, you have to remove the injectors to use this method.

There's also an on-vehicle inspection per TSRM:
View attachment 81691
I will give this a shot, thank you
 

Ryan_

New Member
May 8, 2013
15
3
3
Earth
Are the spark plugs wet or dry?
Wet!

So this is the beginning of my situation, reiterated from my initial post:

The car would start, and idle smooth but would stumble and cut off under pressure.

While looking for what I expected was a vaccuum leak I did the following:

1. Installed and hardwired a new 3 plug O2 sensor.
The previous sensor was also a 3 wire, hardwired like crap and it was a rats nest. But it only had 1 plug wired into it. I don't recall which one it was but I'm thinking it was the O2 signal and not the ground or heater. (no light was thrown).

2. Installed a new Cold start thermoswitch.

3. Lastly, figured out that my aftermarket FPR was not getting vaccuum. I had it hooked up to the wrong hardline under the intake manifold, which was not hooked up to the VSV on the other end.

Now, I'm thinking I've sorted her out and all should be well, but then I get this cranking issue...

So here's where I am at:

Ive removed the plugs, which were carbon fouled and wet. The intake smelled strongly of gas.
-Let it sit overnight.
-Next day, installed new plugs and tried to fire her up with no luck
-Unplugged the 02 Sensor, and Cold start injector thermoswitch and it turned over and ran for 2 seconds like garbage and cut off.
-Could not replicate this situation as I assumed it was flooded again and would only crank.

I have checked engine timing. swapped CPS. swapped AFM. noluck.

I have checked for continuity for the CPS plug to ECU. All good.,

Checked continuity from CSI thermoswitch plug to ECU (tried every pin as I didnt see a place for it in the pinout) no continuity to any pin on the ECU plug.
-Could this make it dump fuel?
-Is there a pin for this in the ECU plug?

Checked for continuity on the O2 Sensor and this is where Im stumped:
out of 3 wires:
1 Red W Blue stripe has continuity to the HT (O2 sensor heater)
1 Brown wire (possibly grafted into a different color prior) has continuity to OX
the last wire, Black w/ red stripe lights up at the following pins: ISC1, ISC2, ISC3, ISC4, IGT, IGTA, IGTB.
-Is this normal, like just all connected grounds or something? Could it be indicative of a stuck relay or something?

ALSO, when cranking with the O2 sensor plugged in, one of the EGR vacuum lines pops off while cranking.

I am at my wits end with this..

Any help would be greatly appreciated.
 

57Bonus

New Member
Dec 14, 2022
18
7
3
67
Checked continuity from CSI thermoswitch plug to ECU (tried every pin as I didnt see a place for it in the pinout) no continuity to any pin on the ECU plug.
-Could this make it dump fuel?
-Is there a pin for this in the ECU plug?
From the 7mgte wiring diagram, there looks to be two wires coming from the CSI switch to ecu. A green wire connected to pin STJ and a black w/blue stripe wire to pin STA.
Checked for continuity on the O2 Sensor and this is where Im stumped:
out of 3 wires:
1 Red W Blue stripe has continuity to the HT (O2 sensor heater)
1 Brown wire (possibly grafted into a different color prior) has continuity to OX
the last wire, Black w/ red stripe lights up at the following pins: ISC1, ISC2, ISC3, ISC4, IGT, IGTA, IGTB.
-Is this normal, like just all connected grounds or something? Could it be indicative of a stuck relay or something?
Looking at the 7mgte wiring diagram, the black w/red stripe wire connects to ISCV which then goes to pins ISC1, ISC2, ISC3, ISC4. But wiring from pins IGT, IGdA and IGdB all go to the igniter, so not sure why there's continuity to them.
 

Ryan_

New Member
May 8, 2013
15
3
3
Earth
If you have good spark, this is the problem. It isn't timed, to include possibly the CPS.
Im a little lost, what do you mean?
When I swapped the CPS I re-timed did it at TDC as per the manual, with the CPS aligned and turned to accomodate meshing with the camshaft
 

Ryan_

New Member
May 8, 2013
15
3
3
Earth
From the 7mgte wiring diagram, there looks to be two wires coming from the CSI switch to ecu. A green wire connected to pin STJ and a black w/blue stripe wire to pin STA.

Looking at the 7mgte wiring diagram, the black w/red stripe wire connects to ISCV which then goes to pins ISC1, ISC2, ISC3, ISC4. But wiring from pins IGT, IGdA and IGdB all go to the igniter, so not sure why there's continuity to them.

Thanks for pointing this out... I'll double check the CSI switch and maybe just connect the O2 pin on the O2 sensor, and not the heater and ground to exclude the IGT and IGdA.. Not sure if its the right thing to do but this is how it was connected when the car did run.
 

57Bonus

New Member
Dec 14, 2022
18
7
3
67
and maybe just connect the O2 pin on the O2 sensor, and not the heater and ground to exclude the IGT and IGdA.. Not sure if its the right thing to do but this is how it was connected when the car did run.
FWIW, my NA-T ran fine without the heater and ground wires connected. I ran my engine without heater and ground for about a week or so before converting to a heated O2 sensor.
 

Ryan_

New Member
May 8, 2013
15
3
3
Earth
Update: no luck.

I had the plugs out of the car overnight to dry up any residual fuel, only ran it with O2 pin plugged into the O2 sensor and the problem persists with the same symptoms.


I tried without any connectors on the O2 sensor plugged in -same thing

I swapped the CPS and re-timed, same thing.

I noticed it cranks 'faster' without the O2 sensor plugged in.

Will do a compression and leakdown test on the weekend and re-check all grounds.

I did take a voltmeter and check the voltage from the harness to the igniter as per the TSRM (see below) and got a reading of 10.5 ...Its not far from 12V. Does anyone think this is indiciative of anything?

My rationale is that while I was jerking the car in and around the shop (running like crap, constantly starting and using two feet to keep it alive and move it, that something shook loose. Perhaps a connection, or a ground. I dont see how anything else could happen...
 
Last edited:
  • Like
Reactions: 57Bonus

Bru

Member
Feb 28, 2013
52
30
18
Tampa Bay Area
To be clear, when installing the CPS, take off the oil filler cap and rotate the engine clockwise until you see the #1 cylinder intake cam lobe pointing up indicating top dead center and also at the crankshaft timing mark. Rotate the engine about 120° clockwise, then back up counterclockwise 10 to 40° past TDC and then clockwise again stopping at TDC. That puts slack in the cam gear so that the CPS can be inserted. When inserting the CPS, align the slot in the housing and the drilled mark on the gear. Aim the bolt hole on the head for the middle of the CPS slot and let the center shaft rotate slightly when it makes contact the camshaft while holding the housing firm going straight in. It's a good idea to take the plastic cover off to be sure it doesn't move before making contact with the camshaft. Instal the CPS retaining bolt loosely, Set timing to 10° BDTC By rotating the CPS with the E1 to TE1 jumper in the diagnostic block. Tighten down the bolt and recheck after it's tight. Remove the jumper and note that the timing advances beyond 12° at idle. Anyone that doesn't have a timing light can get a loaner from AutoZone. Connect the positive and negative leads to the battery and the strobe pickup in line with the #1 spark plug at the front of the engine. Here's a link to the online manual for CPS installation: Click here to go there. If the problem still persists, you may want to verify the valve timing. Here's the method: Click here to go there.
 

57Bonus

New Member
Dec 14, 2022
18
7
3
67
Checking your grounds is a good idea. Especially, check the grounds connected to your intake manifold.

And your fuel pressure regulator is not showing over 40psi?
 

Ryan_

New Member
May 8, 2013
15
3
3
Earth
Checking your grounds is a good idea. Especially, check the grounds connected to your intake manifold.

And your fuel pressure regulator is not showing over 40psi?
Had a quick peek at those grounds and they are connected but the wiring to the connectors seem like they could be stronger. Left and Right fender grounds are good.


The FPR reads 40-41 PSI after I crank it, and it holds pressure overnight.
And for reference the FPR is getting vacuum from under the intake manifold, after the fuel vsv -the stock location.
I'm now realizing its too high, and I will turn it down, but it did idle pretty clean as it is prior to me messing with the O2 sensor wiring.

Also, it should run with the ISCV unplugged right? (I was running through the process of elimination yesterday and thats something i re-pinned and rewired a little while back)
 
Last edited:

57Bonus

New Member
Dec 14, 2022
18
7
3
67
Yeah, turn down the fpr to oem spec of 33-40psi (no vacuum).

Pretty sure the engine will run with ISCV unplugged but not that well since ecu uses ISCV to control engine speed. I recently sold my spare ISCV to another Supra owner to fix their broken ISCV - their engine didn't run quite right and the idle was really high.
 

Ryan_

New Member
May 8, 2013
15
3
3
Earth
So, here's an embarrassing yet positive turn of events:

Turned down Fuel Pressure -no start

I then decided to do a compression test and while removing #1 spark plug, I noticed that the #1 Plug connector to the coil pack had #5 written on it. After swapping #1 & #5 to the right coils she fired right up.

I removed this coil pack and the same wire a dozen times, over the past month and never noticed this. Turns out, 2 years ago when I replaced the wires, I wrote the numbers on the caps with a sharpie, as the caps I got did not have nay indications and as you know, with the coils mounted its hard to see whats what. In this process I mixed up #1 & #5 (opposite ends) but I realized my mistake and installed them accordingly and never re-labelled or looked back since then.

Thank you everyone that chimed in.
 
  • Like
Reactions: alcyon and 57Bonus