JZA70 Black Hardtop Beauty Project.

Royalmaas

New Member
Aug 29, 2012
22
0
0
Norway
First of all, my name is Roy and i am located west in Norway, tought i should get around and start using this forum for once :icon_bigg

I ave recently started rebuilding my 87 Hardtop MA70 Supra. I bought this car back in the summer of 2012 and have had it off the road since winter 2013.

It was originally a NA Hardtop bought new here in Norway in a grey metallic color back in early 87. When i bought it two years ago it was a ok looking car but mechanically it was far from top. I drove it 20k miles in one year, and gave it tons of abuse..

Last summer i decided i either wanted to sell it or get it on 100% condition and bukd it as i realy wanted it to be.

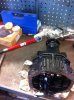
That includes a 1JZ engine, new R154, Standalone and JZA70 trim all around.

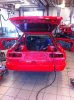
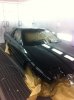
Here is some pictures of the car from two years ago.

29809_507574035920918_112220184_n.jpg

bm_supra_alm_s_1_990790p.jpg

IMG_0027.jpg


As you can see it looks in fairly good shape, but the engine was having bad oil consumption and i was realy tired of driving around in a car i didnt feel 100% satisfied with...

So then it all started, i got in contact with Toyparts in Norway wich is a specialist with MK3 Supras and we made a plan for a 1JZ conversion with mods.


Underneath will be different updates from the work, i will finnish the cars interior and exterior before it gets the transplant.
 

Royalmaas

New Member
Aug 29, 2012
22
0
0
Norway
We started off by stripping the car down, it will be painted in Black 202 Toyota paint. I am a certified mechanic and work at a Toyota Dealer so i have access to many advantages. :icon_razz

I can write up a list of parts that will be installed in the car.


BC Racing coilovers
Koyo Radiator w/fans
Shaftmasters Alu shaft
Harness bar
Differential upgrade kit
Whiteline roll bars Front & Rear
3" exhaust from Twins and back
Innovate LC1
Pressure and temp gauges
Takata Harness with Bride Low Max seats
JDM Taillights
Autoshine Spec G front fender
+++ Alot of Toyota OG new parts, i want the car to have a OEM look with inspiration from the japanese 90s such as Mid Night Club and such..


Will upload some pictures tomorrow, i have done some to the car but to tired to do a write up atm...
 

Attachments

  • IMG_0699.jpg
    IMG_0699.jpg
    146 KB · Views: 25

Royalmaas

New Member
Aug 29, 2012
22
0
0
Norway
Technically it will be a JZA70, JZ Engine + A70 Chassis :biglaugh:

Anyways, sorted the diff out a couple of days ago. I installed the Weir performance stage 1 upgrade wich uncludes a second spring for LSD clutch plate preload, and shims to adjust correct backlash on spider and side gears :icon_razz

We started by checking backlash at ring and pinion, aswell as visually inspecting bearings. All was in mint condition.

IMG_0740.jpg


Here is a picture of the clutch plates dissasembled, and you can see the new spring installed inside the old.

IMG_0742.jpg


The clutch plates were nearly as good as new, that is because these LSDs are weak as hell and lock like shit from factory, so they never get enough stress to wear out..


After reassembly we tried to meassure the torque requiered to open the LSD.. Before installation we managed 50ft.Lbs, stock from factory is said to be 75ft.. But i believe that is when it gets straight from the factory...

With this kit we didnt manage to open it untill we achieved 94ft.lbs ! :biglaugh: Should deffinetely lock more than before...

IMG_0744.jpg
 

Attachments

  • IMG_0740.jpg
    IMG_0740.jpg
    151.8 KB · Views: 7
  • IMG_0740.jpg
    IMG_0740.jpg
    88.3 KB · Views: 7

Royalmaas

New Member
Aug 29, 2012
22
0
0
Norway
I am also working on the brakes wich will be rebuilt stock once for now, until i can afford a big brake kit...

They all worked and were in good condition, but i decided i wanted to sandblast the calipers and paint them grey so they look brand new. That includes all new gaskets and such...

Before blasting.

IMG_0704.jpg


After blasting and painting!

IMG_0706.jpg


IMG_0707.jpg


We then started to work on the subframes, we sandblasted them and painted them with hammerite wich i think will hold up nice.


After dissassembly..

IMG_0713.jpg


IMG_0714.jpg


IMG_0716.jpg


IMG_0717.jpg


After blasting :icon_bigg


IMG_0733.jpg


IMG_0725.jpg


IMG_0723.jpg


And painted and ready for an overhaul !


IMG_0734.jpg


IMG_0732.jpg


IMG_0724.jpg


Here is the rear subframe completed with new adjustable arms all around, overhauled differential, new Whiteline bar and BC Racing coilovers :icon_razz

IMG_0747.jpg


IMG_0748.jpg


The front subframe will be completed once i recieve my new steering rack with end links and poly bushings ! :icon_bigg
 

Royalmaas

New Member
Aug 29, 2012
22
0
0
Norway
Time for the boring part... Rust repair:: angry ::

The door and aswell the back of the rear was rusted all the way through, so i cut out more than nessecary and welded in new plates. The car underneath is 100% rust free so im glad this is all i found..

IMG_0757.jpg


IMG_0758.jpg


IMG_0760.jpg


IMG_0770.jpg


IMG_0772.jpg


I also fitted the new front end before getting ready for paint, was realy easy and i can strongly recommend products from Shine Auto !! :icon_razz

IMG_0773.jpg


IMG_0774.jpg
 

Royalmaas

New Member
Aug 29, 2012
22
0
0
Norway
Been a while with no activity in here, getting the car prepped for paint took more time than i expected... But its better to use more time and get it 100% than throw it all together...

But finally the car is black :biglaugh:

IMG_0839.jpg


IMG_0840.jpg


IMG_0841.jpg


Now the fun part finally can start, lots of new parts :icon_bigg
 

Attachments

  • IMG_0839.jpg
    IMG_0839.jpg
    100.6 KB · Views: 6