Former Grassroots Motorsports $2008/09 Challenge car

Shaggz00

New Member
Apr 26, 2012
14
0
0
Silver Spring, MD
What's up, everybody!
So I was told by another forum member that I need to get around to making/updating a build thread, so I guess I'll start with the old one...

http://www.supramania.com/forums/showthread.php?68665-The-2008-Grassroots-challenge-build-up-thread&highlight=Grassroots

Since the challenge, the car hasn't moved much. It went to a couple shows, bummed around town a bit, and ended up under a cover in my carport in August 2011. Here she was when we moved her here:

p1999819_1.jpg


I started her up every once in a while, but I didn't really have money to get her tagged and up to par, so she mostly sat. I stole the Walbro pump at one point in order to replace the blown one in my F250... So there was that, lol. In early September 2012 I finally decided to give it a go, and I installed another pump and fired her up. She ran like crap, and I had no clue why. I thought maybe bad gas, so I got some gas but still no go. Did a compression test and #1 was dead. Completely dead. Zero compression, so I did some digging and discovered a stuck valve.

p1999819_2.jpg


I tried everything I could think of in order to free the valve, but it wasn't any use. My thinking is that with an open 3" exhaust, and sitting so long, the valve must have gotten rusty or some crap, and seized up. Soooo, she sat, while I contemplated my next move. I rolled her into the garage in late September 2012, and enthusiastically started tearing into her...

p1999819_3.jpg


Moving on into October...

p1999819_4.jpg

sm_photo_missing.jpg


Ok, I got no clue why the next set of pics won't show up, so I guess I'll start a new post... hold please...
 

Attachments

  • 2011-08-24_18-50-59_236_zpsd43d409f.jpg
    2011-08-24_18-50-59_236_zpsd43d409f.jpg
    103.7 KB · Views: 11

Shaggz00

New Member
Apr 26, 2012
14
0
0
Silver Spring, MD
One more de-construction pic...


So the thing about being a car guy and having a garage, is that you want to actually USE the garage. Since my AllTrac has taken up semi-permanent residence on jack-stands in the other bay, the Supra got pushed around quite a bit. He she is in march 2013...


So My memory is kinda fuzzy on the next few months, but in May, this thing happened:


Love that boy more than life itself! He's my firstborn, and It's so amazing to watch him grow. He changes so fast and it's hard to believe he was ever that small. I can tell you right now, that unless you have kids, you have ZERO clue what I'm talking about. All the stuff that my Dad did for me growing up suddenly makes sense, and I wish I could hold him forever and never let him grow up... and become an ungrateful teen, haha.

Well, the boy was 3 days old, and I decided it was time to move the Supra back in the garage and get back to work. She had been outside the better part of a year, and I was hoping to have it finished by the time the kid turns 16.


In July I made a little progress, and I got to test out my new face mill at work


In case you were wondering, I'm a professional welder by trade, and semi-professional machinist. I was trained at the Lincoln Electric Welding School in Cleveland Ohio, and I got my start at a motorsports shop here in MD. I moved onto my own welding company, and now I work for a local county government.

August 31st 2013, the cylinder head is FINALLY back on the motor. This is not the head that came off the car, it came from my spare motor (which I traded an exhaust job for). I didn't want to mess with the stuck valve, and the cam journals had some serious scoring. Both my sets of cams were f-ed, too, and it took me a LONG time to source a clean set. It's probably common knowledge around here, but it's pretty apparent that the 7M has a bit of a dry start problem. I'm subsequently running Lucas Oil Stabilizer, and I plan to do so every oil change. It will keep all those journals well lubricated, and prevent dry starts.


Maintaining a house, a marriage, a kid, and a full time job, is kiiiiinda a time killer, but I get in 20 mins here and there when I can. At one point it took me over a month to get the wheels and brakes off to have the rotors cut...

September 1st: (ok, so I guess I had a pretty good chunk of time at that moment (wife was probably out of town with the kid, lol), I'm just going by time stamps on the pics here...


So I had to make a decision on the turbo. The one that was in the car was toast, and well, I needed a replacement, lol. I had another turbo from the spare motor, but I wanted something biggerrrrrrr! :evil2: Way back when, before I knew about turbos, and I had just gotten the Alltrac, I followed some bad advice and got a t04-E 50mm turbo upgrade. The 2 liter 3SGTE really couldn't ever push that turbo well, and since I steal all kinds of stuff from the Celica for other projects, I decided to steal the turbo, too. haha. Stock VS 50 Trim:


I thought that the Alltrac and Supra turbos were pretty much identical... I was wrong. Whammy...
I had to modify the wastegate bracket (cut/bend/weld), and I also had to lengthen the wastegate actuator arm (cut/bend/lengthen/weld). I was careful to try and apply the same tension to the new arm, that the old one had. (It's currently running 8PSI consistently, so I guess I did a pretty good job)

The same night I did the turbo swap, I had her outside and running for the first time in a year. This is September 2013 still:


She hadn't had an oil change in years, and way back when, my buddy/teammate/superman wanted to make sure the oil filter didn't fall off somehow, haha. I thinnnnnk this took me the better part of two hours to get off. Don't worry, the favor has since been re-payed when his g/fs car needed some maintenance and he wasn't available, lol.


iight, I'ma leave you guys with this pic for now; the story being that yes, she was running again, but still needed a lot of bugs worked out. The electrical system was somewhat of a mess, and because it was a no-fucks-given type of challenge car build, we cobbled a LOT of shit together. I'm talking like a billion zip ties here, lol. The front bumper was help on with zip ties for crying out loud! haha. I needed to spend some time sourcing parts, including a new front bumper beam, while keeping in mind I'm on a got-a-newborn-baby type of budget...


To be continued...
 

Shaggz00

New Member
Apr 26, 2012
14
0
0
Silver Spring, MD
Thanks Beals, It is a pretty clean shell, but it's far from perfect. I feel confident in calling it a 5 footer. It had a front left collision at one point in it's life, and we did replace the FL fender, and the bumper needed massaging.

As far as the paint, It didn't start off so clean. It was your typical faded Super Red, but we heard somewhere that you could thin out house paint (Rustoleum), and spray it on with a gun, so that's what we did for $2008. We were super happy with the resulting uniform paint, until we saw the other challenge cars' paint glimmering in the sun! haha.
For $2009 we had to strip ALL the Rustoleum off, and we bought a cheap single stage red. We painted the engine bay at our workshop, along with the interior. The interior gray color matches the shadow gray interior perfectly, but it was actually an accident. I had gone to ProFinishes with a small budget, and asked them if they had any fuck-ups (wrong color, order noone picked up, etc). Dude pulled out a can of gray he said he could give me a deal on. We really didn't care what color it was, as long as it was a decent quality paint, but it ended up being a perfect match. Lucky us!

The exterior red was painted by a friend who paints cars for a living, after hours, at the shop he worked at. We did kick him a couple bones for his time, and it was worth it. There are imperfections, but like I said, it's a 5 footer.

Unfortunately, our original build thread is missing a lot of the photos, but if you go here, you can see some of the videos of the build including paint:

http://www.streetfire.net/profile/skipbarber.htm

I'm cracking up watching those videos again, haha. If you guys ever get a chance, I would definitely try and get a GRM $20xx build going. It was stressful and time consuming, but I have nothing but happy memories of our challenge builds, even the times at 3AM, when we were delerious, and we hated each other, haha. We hope to build another car one day, and we actually talked about a car that became available the other day. We've already built a Toyota, a DSM, and a Volvo, so we gotta move on to another brand.

I got school tonight, but I'll try and get some more pictures up this evening...
 

akito

Keep Laughing.You're Next
Jul 31, 2006
1,568
0
0
Springfield/Va
Hey Avi, it was a nice meeting you yesterday. I'm glad you got this thread going again. Again, I LOVE YOUR ENGINE BAY, IT'S HELLA CLEAN!
 

Supra28

Supramanian
Aug 17, 2006
1,921
0
36
Columbus, OH/Kansas
I was wondering what happened to this car. I followed the build and thought you guys did a real good job ESPECIALLY on the engine tuck, honestly one of the best 7M engine tucks I've ever seen. Do you plan to run a FFIM for a cleaner look?
 

Shaggz00

New Member
Apr 26, 2012
14
0
0
Silver Spring, MD
Akito, It was great meeting you too, man! I'm sure we'll be in touch in the near future. I'll try and drive it to work when we get a nice monday, and I'll come up to Springfield at lunch or something.

Supra28, Thanks a lot for the compliments! Yeah, it's still around, just been sitting. That wire tuck was a LOT of work, and it took three of us, each with different jobs to pull it off. I'm the welder, and did all the metal work. Edwin (Skipbarber) is the wiring pro, and did all the wiring (extending/shortening wires, routing wires out of sight), and David did a ton of the cleaning/painting all the bits and pieces.

I would love to do a FFIM, but I have yet to see an impressive setup. Like I said, I'm a welder/machinist by profession, and as such, I'm a bit of a perfectionist. I don't believe in just slapping a 3" tube on top of some cut up runners and calling it a day. There are airflow issues that need to be addressed to prevent inconsistant A/FRs between cylinders. I'm sure I will get around to it one day, and if you have some pics of good examples, post em up!

On a seperate note, I was thinking about my sloppy ass shifter last night, and was looking on driftmotion for replacement shifter bushing(s). Do I need just the one large bushing, or are there several that need to be replaced? I did do some searching, but I think I was getting mixed threads between MK3's and 4's, so I'm not quite sure. I saw some things about ordering a set of Ebay bushings, then I saw others about the one large one.
 

akito

Keep Laughing.You're Next
Jul 31, 2006
1,568
0
0
Springfield/Va
Shaggz00;2000032 said:
Akito, It was great meeting you too, man! I'm sure we'll be in touch in the near future. I'll try and drive it to work when we get a nice monday, and I'll come up to Springfield at lunch or something.

Supra28, Thanks a lot for the compliments! Yeah, it's still around, just been sitting. That wire tuck was a LOT of work, and it took three of us, each with different jobs to pull it off. I'm the welder, and did all the metal work. Edwin (Skipbarber) is the wiring pro, and did all the wiring (extending/shortening wires, routing wires out of sight), and David did a ton of the cleaning/painting all the bits and pieces.

I would love to do a FFIM, but I have yet to see an impressive setup. Like I said, I'm a welder/machinist by profession, and as such, I'm a bit of a perfectionist. I don't believe in just slapping a 3" tube on top of some cut up runners and calling it a day. There are airflow issues that need to be addressed to prevent inconsistant A/FRs between cylinders. I'm sure I will get around to it one day, and if you have some pics of good examples, post em up!

On a seperate note, I was thinking about my sloppy ass shifter last night, and was looking on driftmotion for replacement shifter bushing(s). Do I need just the one large bushing, or are there several that need to be replaced? I did do some searching, but I think I was getting mixed threads between MK3's and 4's, so I'm not quite sure. I saw some things about ordering a set of Ebay bushings, then I saw others about the one large one.

You should once she's all smoothed out. I bought the green truck busing for my car #33505-35020 from toyota, also got the pivot bushing too. The shifter feels nice and firm instantly and not sloppy like before. It's a really cheap and well worth upgrade.
 

Shaggz00

New Member
Apr 26, 2012
14
0
0
Silver Spring, MD
This has got to be the quickest start to finish build thread ever, lol.

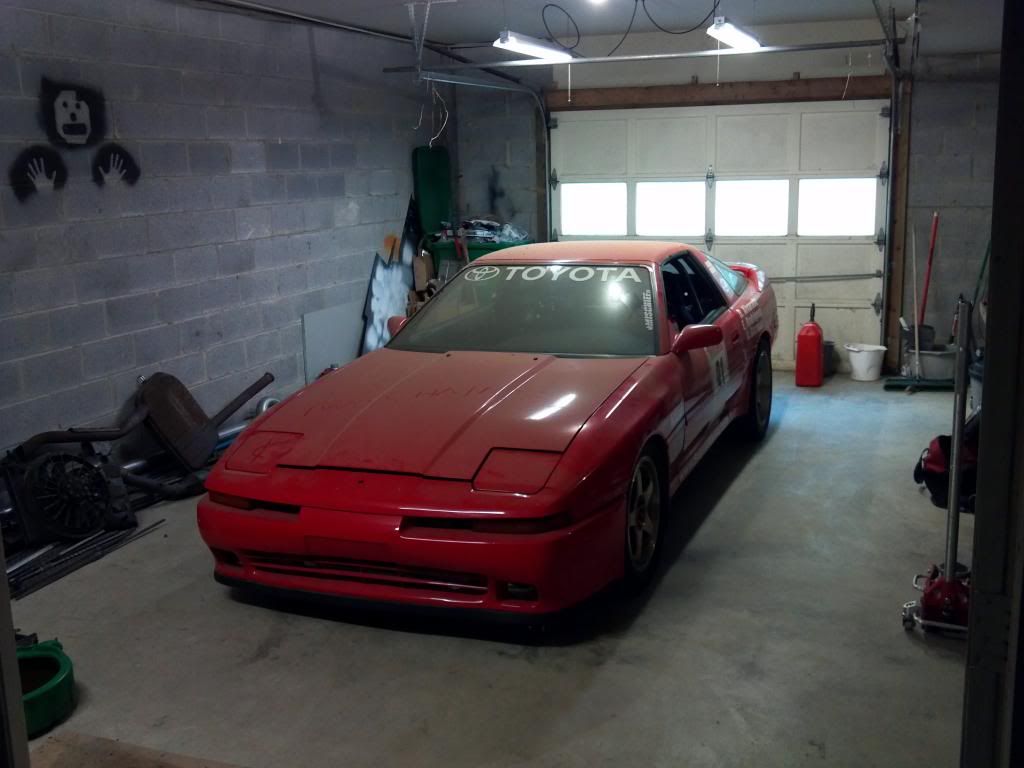
Ok, so for tonight, real quick, here's what I got, March 22nd 2014:


There was a lot of updating I needed to do. Like I said the electrical was kinda messy, so i tried to clean it up the best I could. Originally, we had mounted the fuse box upside-down in the FL wheel well. It's pretty much the only place the wiring harness would allow it to reach after all the tucking we did. The only problem with that, was that we had no wheel liners. So at some point along the line, water got in and corroded a lot of the connections. I had to replace the main relay, the headlight relay, and the 100A fusible link, which were all very corroded, and the headlight one straight up didn't work. I cleaned all the connections, stole a bunch more stuff from the AllTrac, did a lot of re-soldering and heat shrink wrapping, and redid all the grounds. I also swung the fuse box around to the front of the little metal divider between the wheel well, and the FL headlight area. So now the fuse box is directly under the headlight. Still mounted upside down, but it's the best I could do. I did spray all the open-air connections with a product I had called Rustore, which forms a waxy coating over metal, and is meant to keep it from rusting out in the stockyard. I also drilled a hole in the fuse box "bottom", to drain out any water just in case. Although I honestly don't ever plan on driving her in the rain/wet.

Here's what the boy looks like now (March 23rd):


Now you can get an idea of how quick time flies when you have a kid! Nothing makes you realize how quickly you're getting old, as watching your child grow. He's a really happy kid, and my wife and I have been extremely blessed to have such a happy and healthy kid. Whereas before I would look at any random baby and not blink twice, now I stop and look at them, and realize how special they are to somebody, They are someones pride and joy, and that makes me happy.

Ok, enough of the baby stuff, I realize nobody really cares about looking at other peoples kids, that's just the way it goes, haha. Sorry bout forcing you guys to look, but it's part of the Supras story!! lol. He's keeping me from working on it more! hahaha

Here's a picture of what the center console area looks like now:


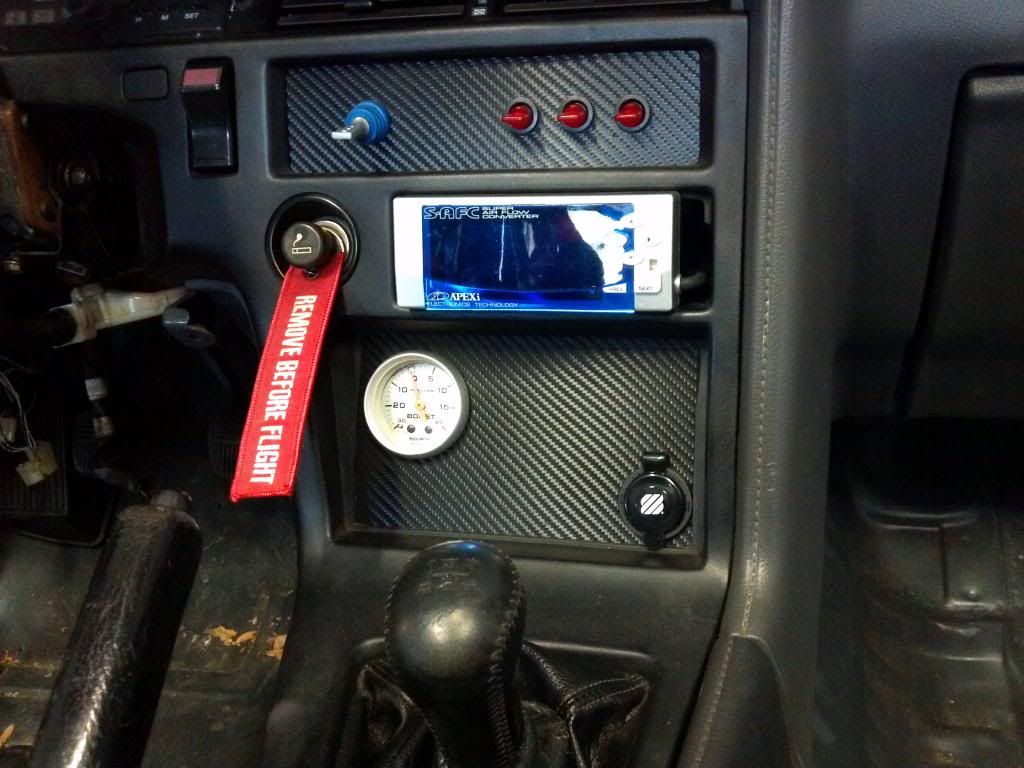
Before it was just the switches up top, and a blank plate below. The Boost gauge was flopping around to the left of the steering wheel zip-tied to the heater duct, lol. When we first made the switch panel, we just drilled some holes willy-nilly in the plate, and they ended up all crooked. This time I made the plate out of aluminum, and used the mill at work to drill the holes in a precisely straight line... Did I mention I'm a perfectionist? lol. I mounted to boost gauge proper, and added a second power port because believe it or not, the stock cig lighter is the engine start button, lol. It's wired up to a relay to power the starter. It's kind of my "key", and I have to take it with me when I leave the car, because there is no more ignition switch/column lock. I wrapped both the plates with that carbon fiber lookalike vinyl, and I'm super happy with the results. at least it gives it a uniform look. I wrapped my snowboard with the same vinyl, and I got a compliment on my board for the first time in my life, by the ski-check guy, lol. he was like "I've never seen a board like it!! It rocks!"

I also had to source a new shift boot and center console from a forum member. Jonoturbo, thanks a bunch, dude! I also needed to find a new mounting bracket for the center console, because I forgot we tossed it when we gutted the car (shout out to Tubbie for that one!) I'm trying to revert the car back to a streetable state, it's just way too bare and tinny sounding right now. It... sounds like a bare bones race car, basically, but I want it to be at least semi comfy.

Oh, a couple things I did do, found another front bumper beam and foam at the junkyard, and snagged a set of front wheel liners from a local guy, whom I actually don't know, a mutual friend found them for me. I ordered all new hardware for the wheel liners, and a needed to order a bunch of hardware for random trim pieces. One of my absolute favorite new items I ordered, is the new targa weatherstripping. I hated to shell out the dough for them, seeing as how I don't ever plan on driving it with the targa on; It was basically just for cosmetics, cuz the old shit was nasty and half painted red, lol.

Hmmm... what else we got...
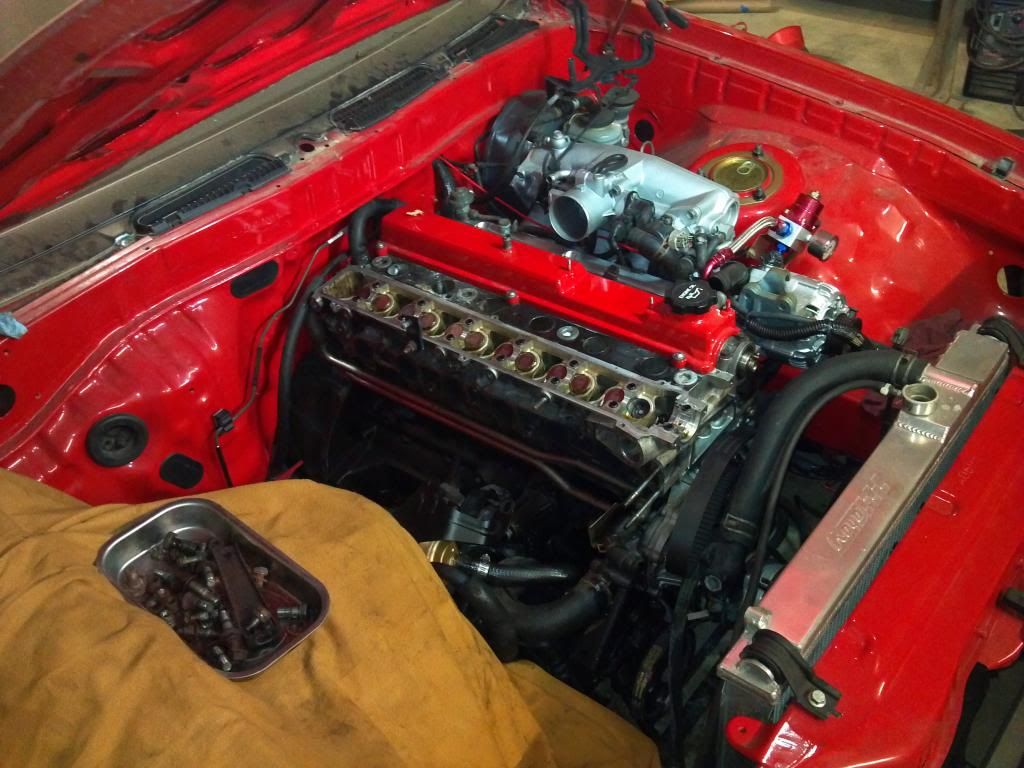
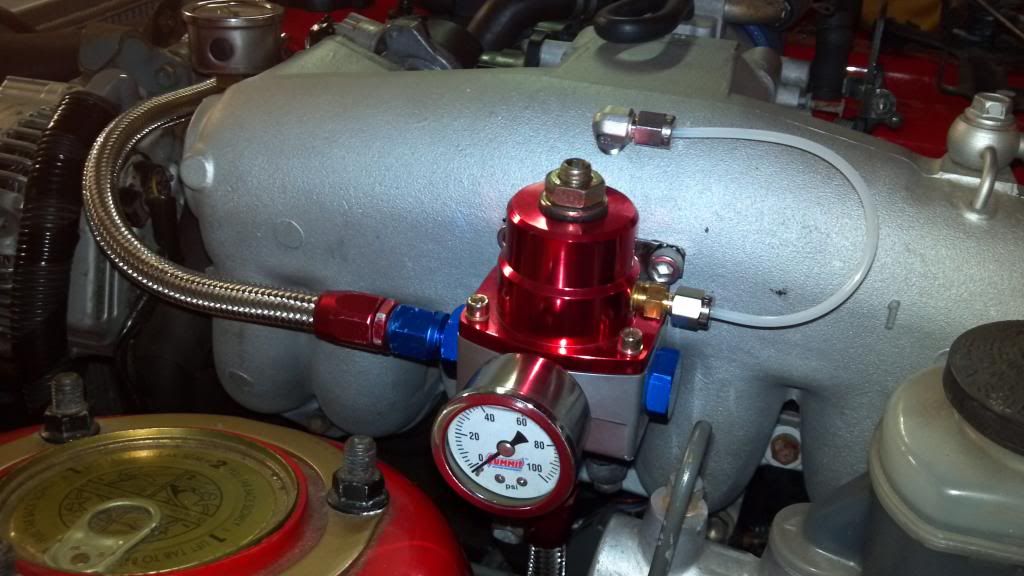
Ok, if you look at some of the older pics, you will see the the FPR is just kinda hanging off the side of the intake manifold. Yes it worked, but it really bugged me. Not only that, but it shared a vacuum source with the boost gauge and the BOV. I wanted it to be mounted solid, and also have a dedicated vacuum source. I took off the throttle body, used a vacuum cleaner to catch shavings, and drilled/tapped the manifold. I used swagelock fittings which I had to kind of piece together from the parts bin at work, but I'm super happy with the result. I'm not sure how long that capillary tubing will last before it becomes brittle, but it works for now.


Something else I did -because I needed a third dedicated vacuum source for the new BOV mounting location, and because I wanted a maintenance type gauge under the hood when checking for vacuum leaks- was cut off the large hose fitting on the plug at the end of the intake manifold, and drill/tap three 1/8"NPT holes.


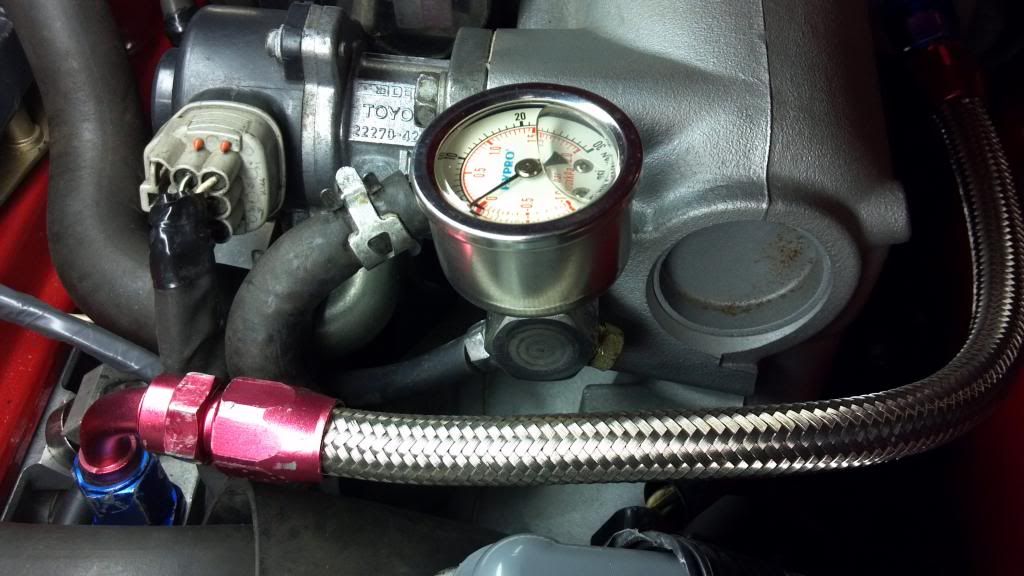
The gauge was mostly just a fun add-on, I know I don't really NEED it. It will make boost leak tests a lot easier, though :icon_bigg

Here's the new BOV mounting location:


I pretty much had to wing this one because I was short on time. I really wanted to recirculate the BOV, because I'm not fond of the idea of discharging metered air and causing a rich condition. However temporary it may be. I'm pretty sure that's what was causing the car to stall at stop signs. So I machined an aluminum adapter to take the discharge diameter of the Forge, down to the diameter of the OEM accordion intake hose for the stock BOV location. Then I machined another aluminum hose fitting to weld onto my intake pipe. I was scrambling for aluminum pipes for the intake, so I could try and make a meet last weekend -which I didn't make- so I just welded up whatever pipes I had, you can see some of the bead rolled ends welded together in the pic.

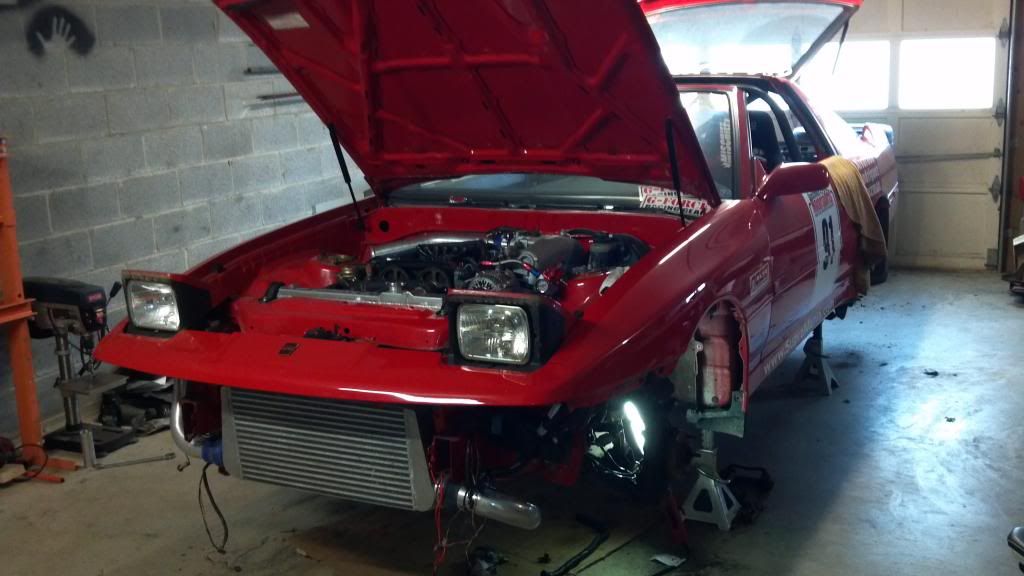
Here is the most recent engine bay shot:


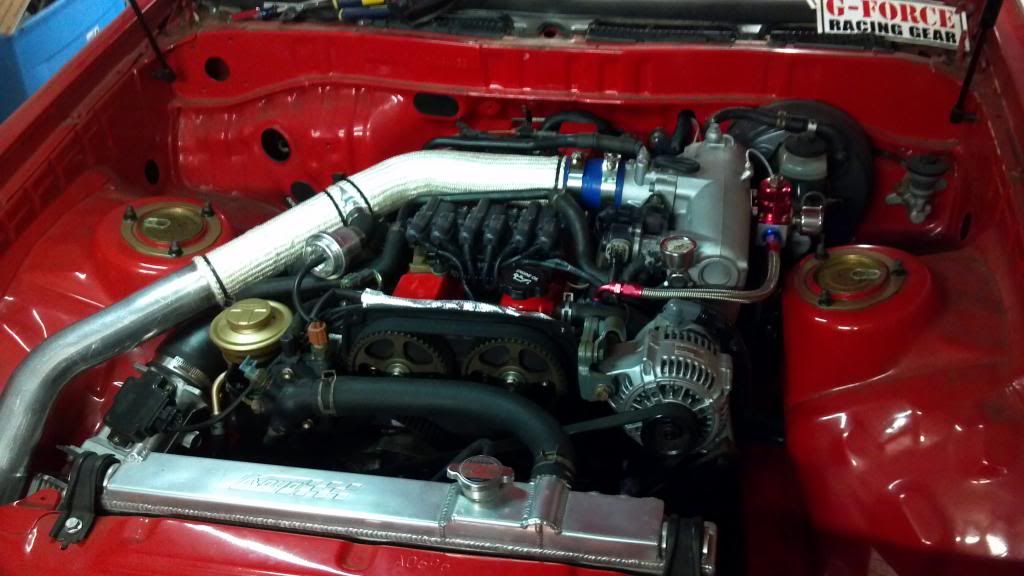
It still needs to be washed, but there it is. The sleeving over the intake tubing is this stuff: http://www.mcmaster.com/#sleeving-insulation/=rgud72
I might have screwed up on that sleeving purchase, because although it's pretty sweet looking, and yes it withstands flame, I never thought about paying attention to R-values. So truthfully I have no clue if it's really "insulating" anything. I'll probably come up with some other solution eventually, or yes, a FFIM... maybe.

Well that's all for tonight, I'm 31 and back in school to try and not spend my life as a welder (although I do love my job). So yeah, I got an exam next Tuesday, and need to hit the books. I was a shitty student back in the day, but these days I have this insane desire to annihilate everyone, by getting the highest grade in the class! Truthfully I had absolutely zero clue what I wanted to do when I was in college the first go round, but I can tell all you guys who are still in school now, try and tough it out, because it sure as hell doesn't get any easier when you work full time and have a kid. You don't realize it, but you've got it fuckin made. BUT...these are life lessons which everyone's gotta learn on their own. So just... do whatever the hell you want, I don't care, lol

Till next time.
 
Last edited:

Shaggz00

New Member
Apr 26, 2012
14
0
0
Silver Spring, MD
Gotta get back to studying, cuz I've been slacking all day. Real quick though, I received a few goodies today!


Gonna try out a couple things here, the 2JZ engine mounts, which from what I understand, I need to cut off one of the locating pins? Also new shifter bushings, and a couple trim screws for the rear mudflaps which were missing. I miiiiight get these on tomorrow, but I'm not holding my breath.
 

Shaggz00

New Member
Apr 26, 2012
14
0
0
Silver Spring, MD
Minor update:

I took the Soup to a local meet last Saturday night, only the second long-ish trip since the rebuild. There was some freeway driving involved, and I noticed that the oil pressure gauge was hanging around the second marker, between 0 and 40. I'm guessing this means it was hovering around 20PSI. Does that sound normal for 5th gear, 2500ish RPMs? I felt like that was really low, so I took it easy, I was kinda sketched. Then I thought I was hearing knocking, so I was momentarily freaking out, but I realized that it was the shifter making the noise. (No clue why, but I can only assume it has to do with the worn out shifter bushings) Which... leads me to my next topic:

I just finished installing new shifter bushings. I used the green truck bushing, and the little white one on the bottom. Both stockers were worn to hell, and I swear the shifter had two inches of play in any given gear. SOOOOOOO much better now. It actually shifts like a sports car again! :icon_bigg

Still need to install the stock Harmonic balancer back on there, and install the 2j motor mounts...

Also, it was brought to my attention that I should be running 550's with the Lexus intake housing. I already have 4 Evo 8/9 injectors, so I'm gonna hit up a friends shop at some point here and snag two more. Anybody have more input on that situation?
 

Shaggz00

New Member
Apr 26, 2012
14
0
0
Silver Spring, MD
akito;2002564 said:
I'm glad to hear positive feedback about the green bushing. And yes, 550s and lex AFM.

YES, thank you for the tip! I would have never known, since it doesn't show up in the Online Parts Diagram for some stupid reason. That stock bushing looks like it was worthless since the day it was installed. It's basically like an O-ring or some garbage